Kit Woolsey vs John O'Hagan Annotated Match
Michigan BMAB 2022

I just want to say a quick thanks to Roberto and Dmitriy for organizing this BMAB. Their efforts make it possible for me to spend all this time studying two amazing players, who, whether it made an impression them or not, were both very gracious and kind in their interactions with me at this event.
This was a beautifully played match between two giants of the game over July 4th weekend 2022. The match files were provided to all the BMAB participants, so I have the opportunity to review every move the two Grandmasters made. Naturally, that’s exactly what I am going to do below, with closer looks at particular positions and sequences that are of note. The end result, after factoring in all the various roll-outs I performed in preparing this post, was that Joh O’Hagan played a 2.75 and Kit Woolsey played a 2.17. Beautiful play from both players. Even if I am not going to spend much time elaborating (pontificating) on a particular position, there will be splits next to the position showing Blue’s wins, Blue’s gammons and Red’s gammons before and after the roll. I decided to keep the player to whom the winning odds applied fixed throughout for ease of tracking the changes. John is Blue (bottom) and Kit is Red (top) and I will provide an indication of the quality of the analysis after the split (Rollout & # of games, ++, +, etc.). Here we go:
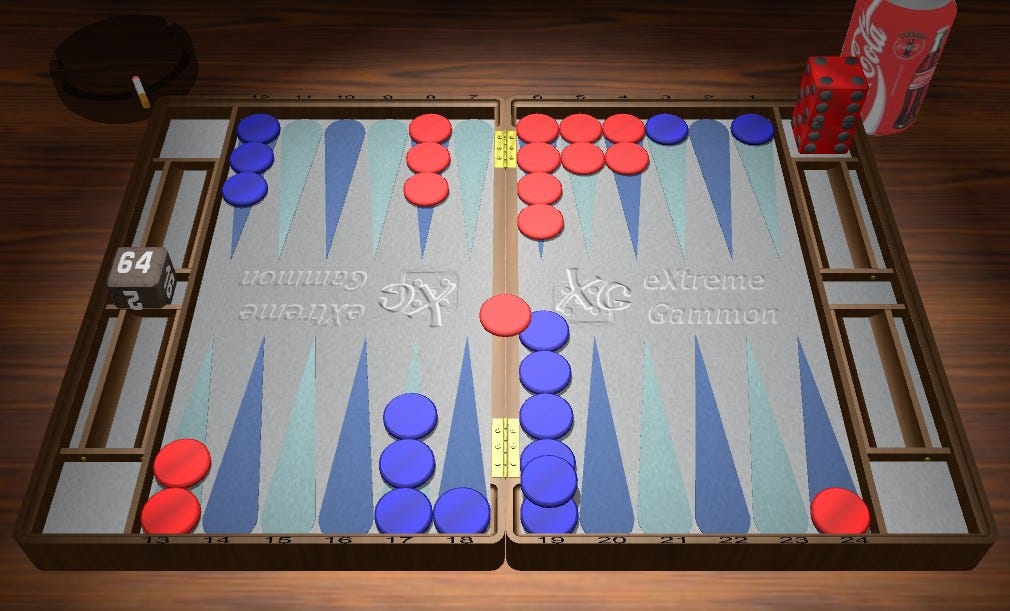
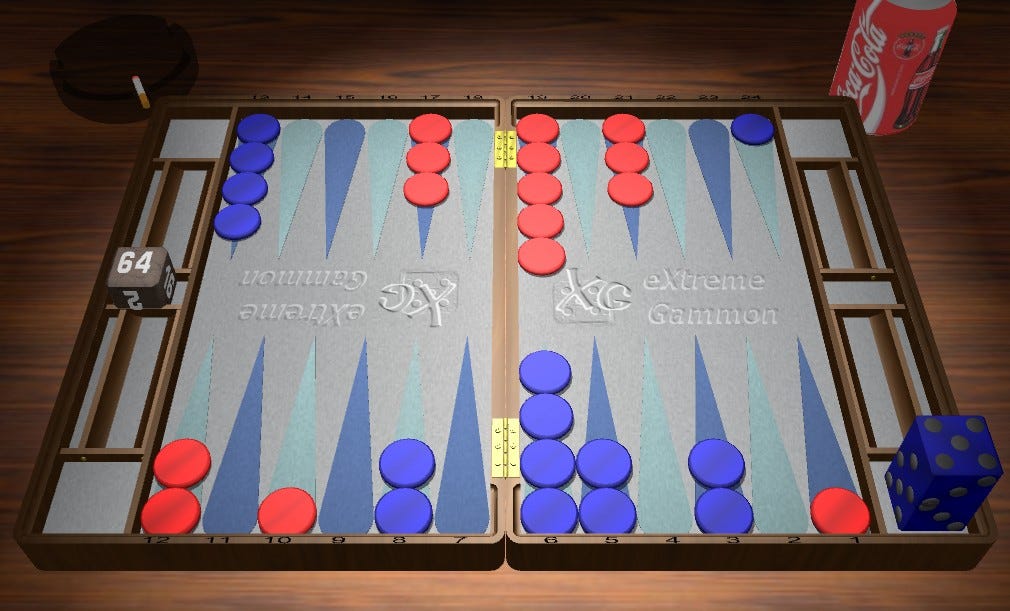
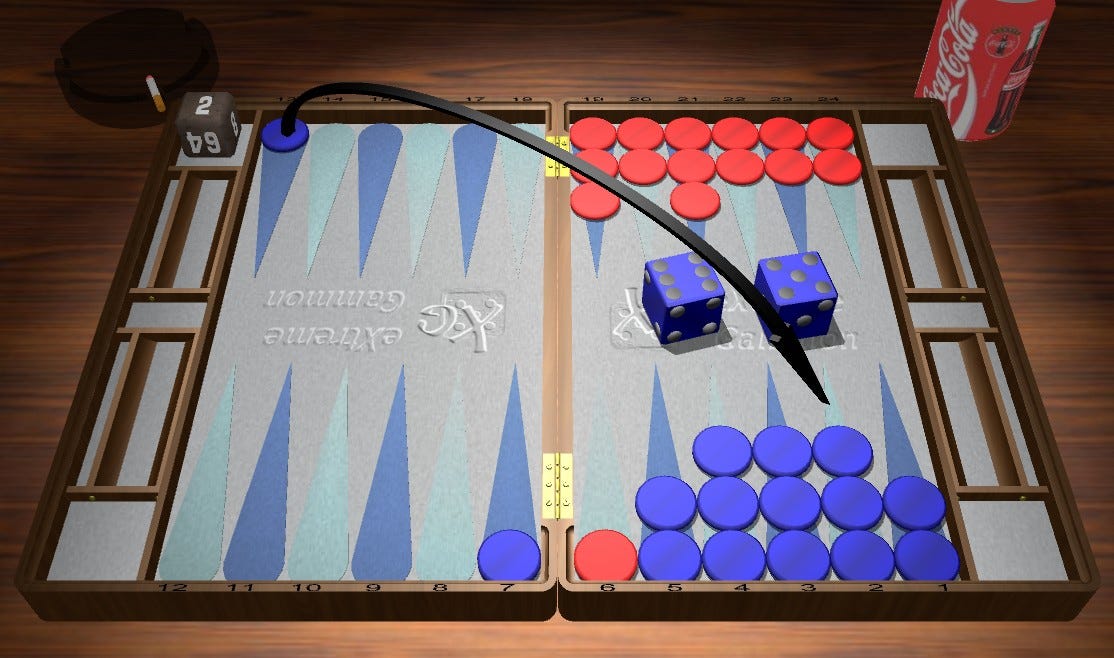
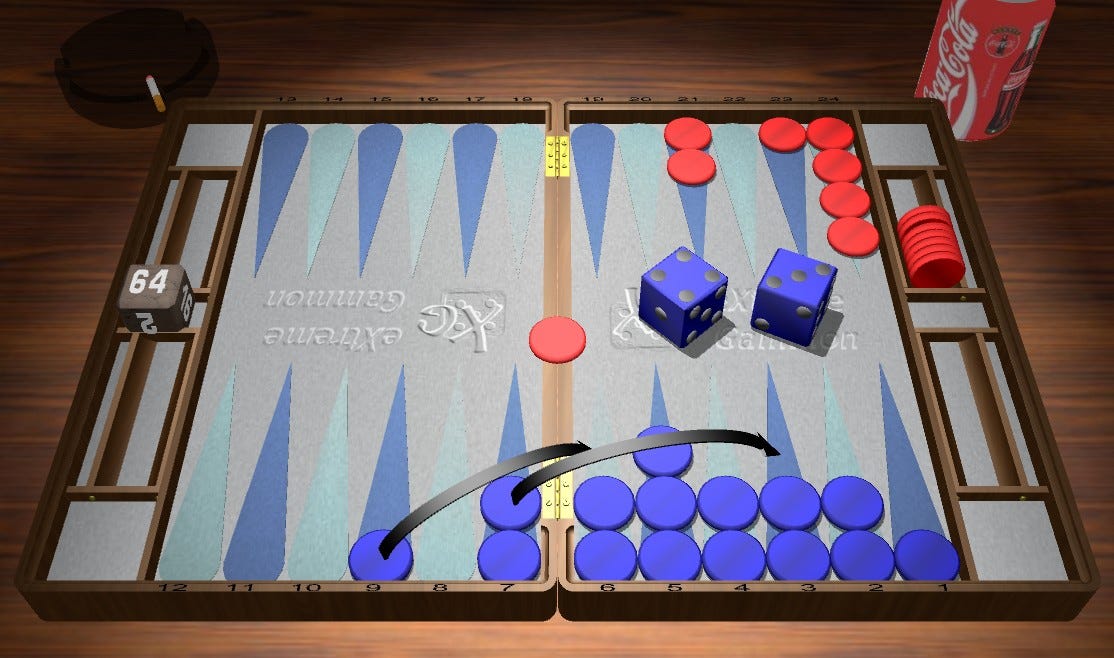
Game 1 - O’Hagan 7 Away Woolsey 7 Away
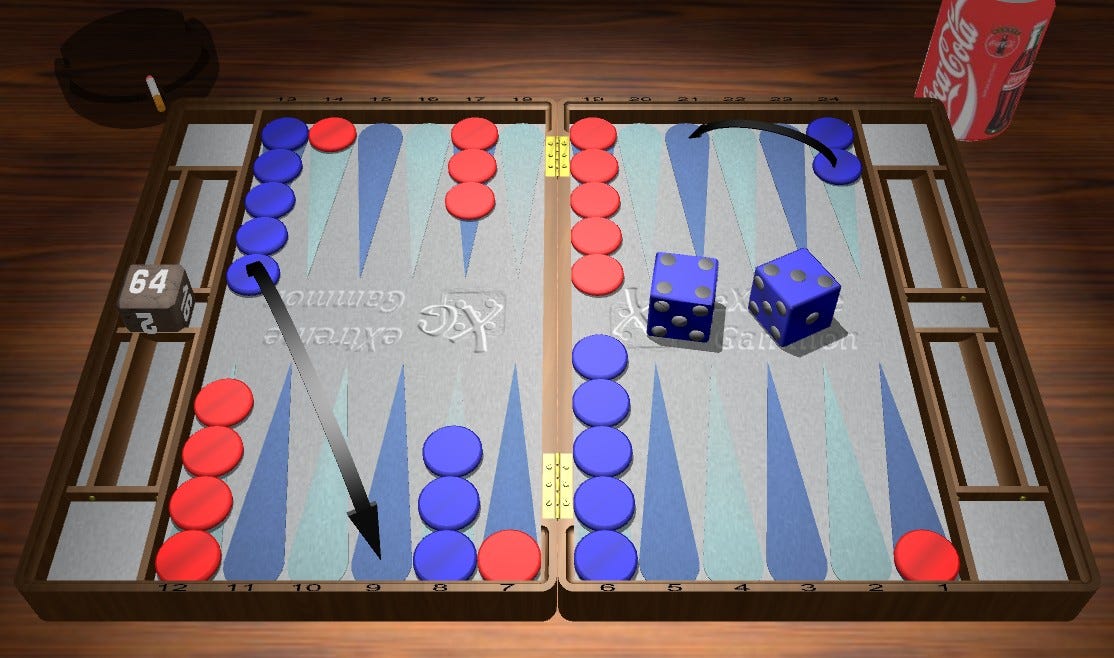
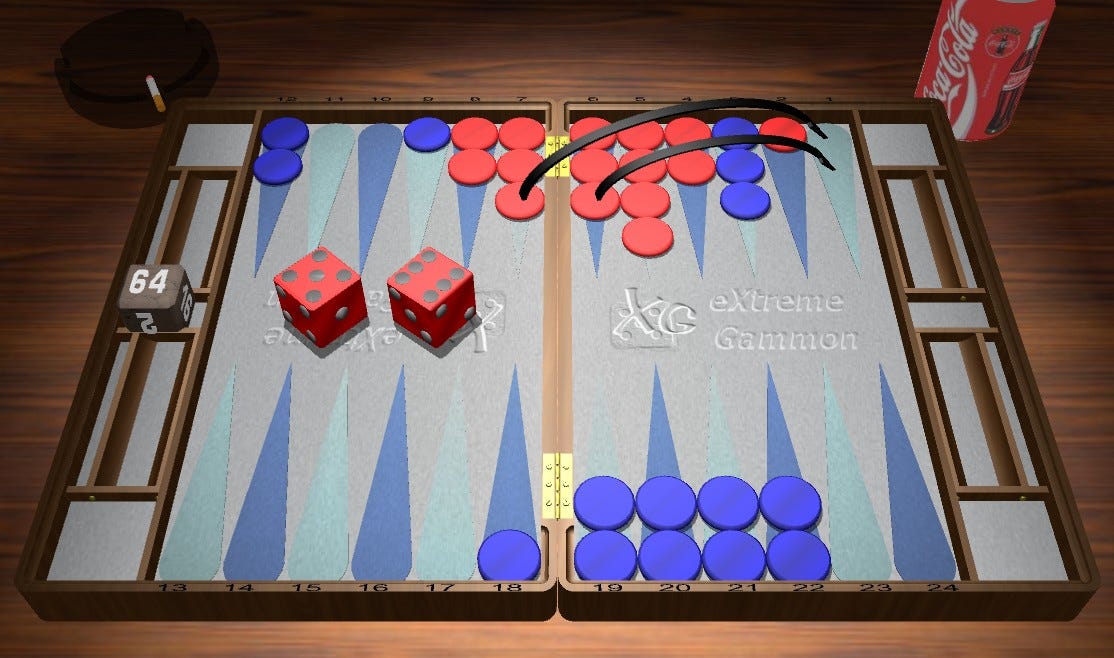
Blue rolls 52 - 24/22, 13/8 (50.1%/13.9%/13.6% - Rollout of 186,624 games) - John opens with the splitting play
Red rolls 22 - 13/11 (2), 6/4 (2) (44.7%/11.3%/14.9% - ++) - Kit responds with 22 and makes two new assets. ****Reminder, the splits represent the same thing each time. Blue wins/ Blue gammons/Red Gammons****
Blue rolls 51 - 24/23, 13/8 (38.7%/10.4%/20.6% - Rollout of 1,296 games)
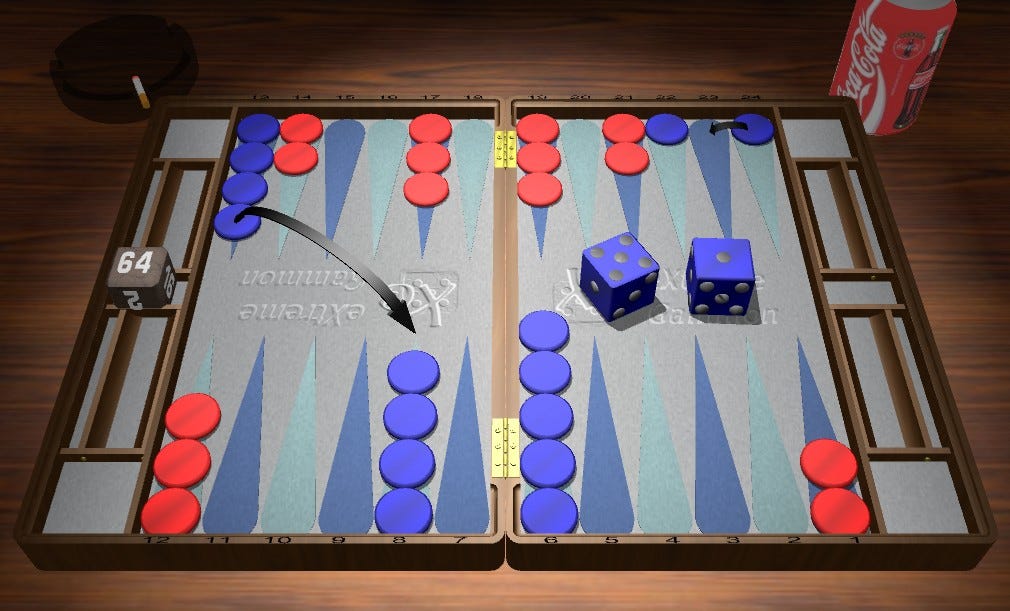
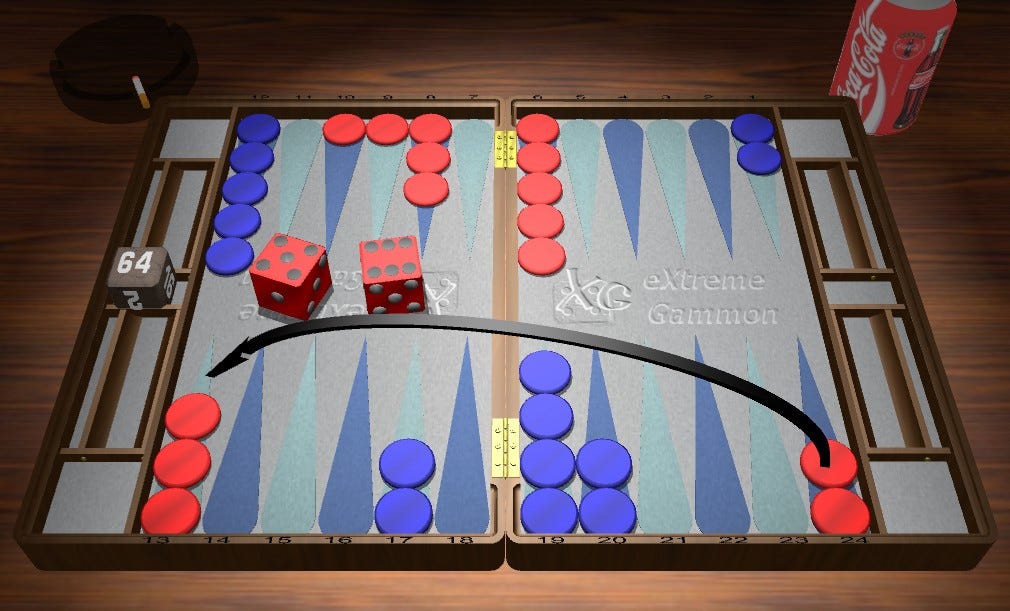
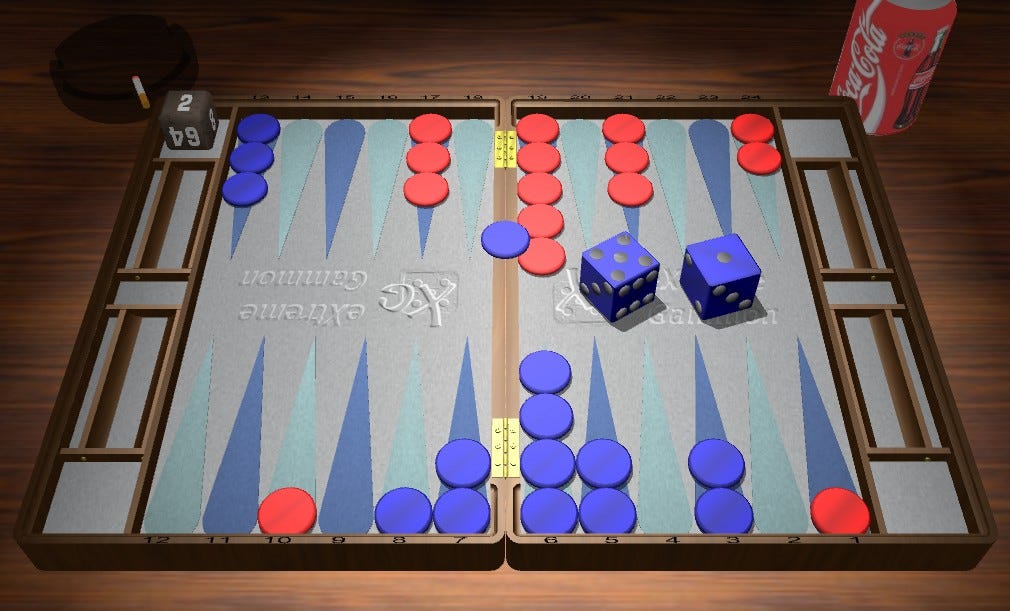
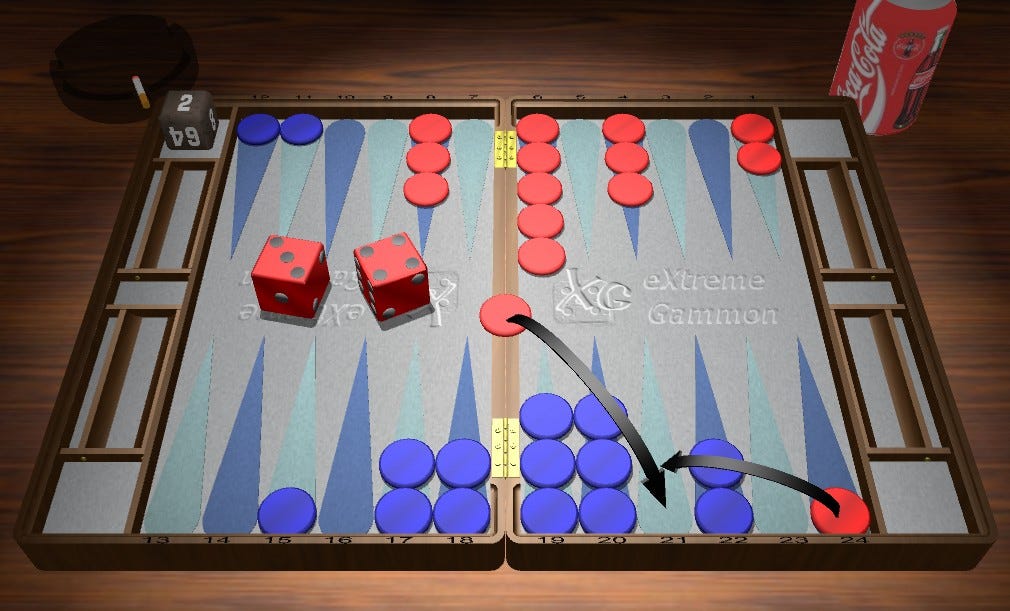
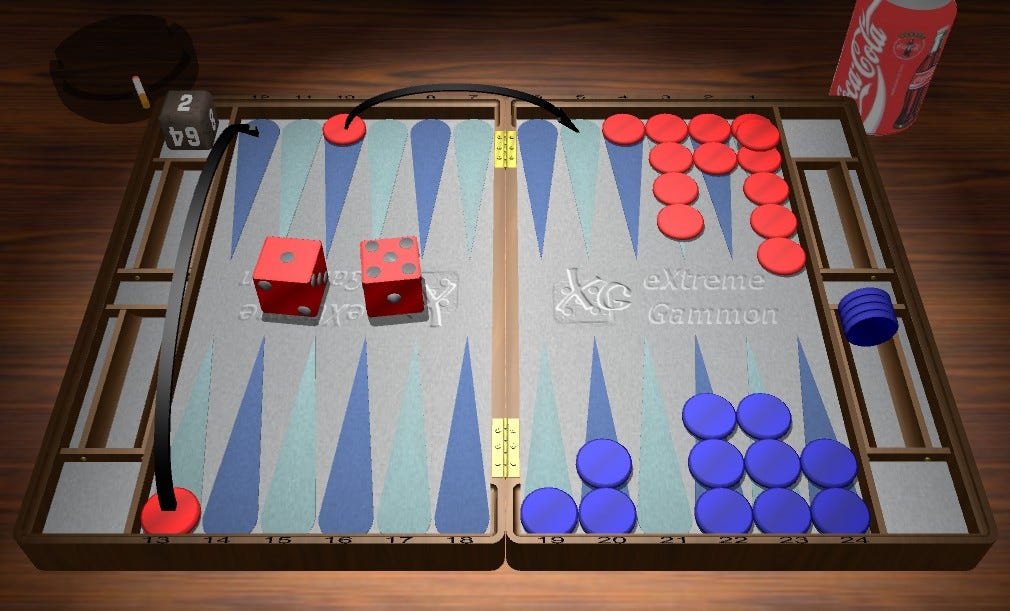
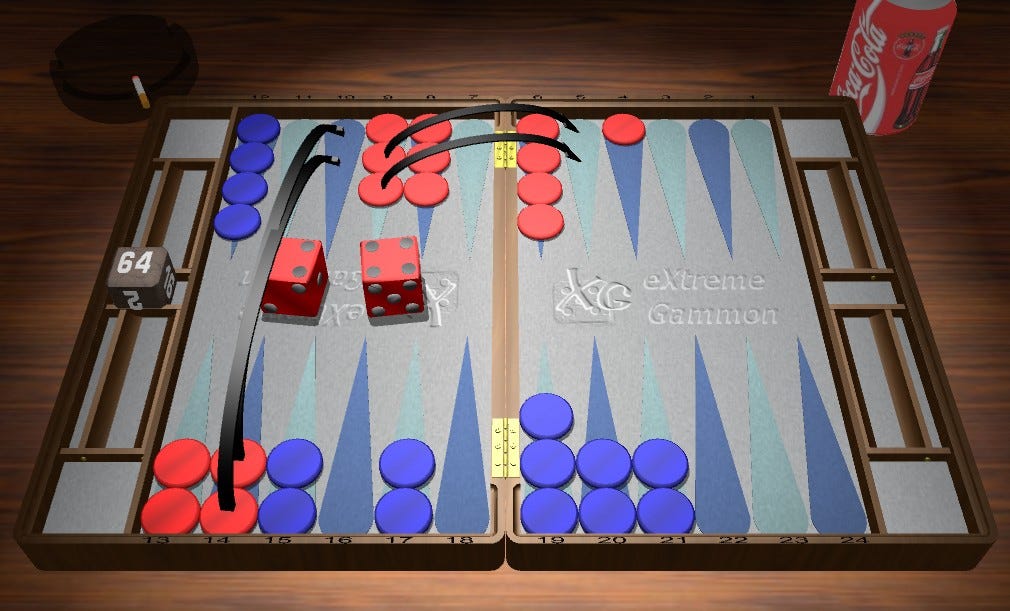
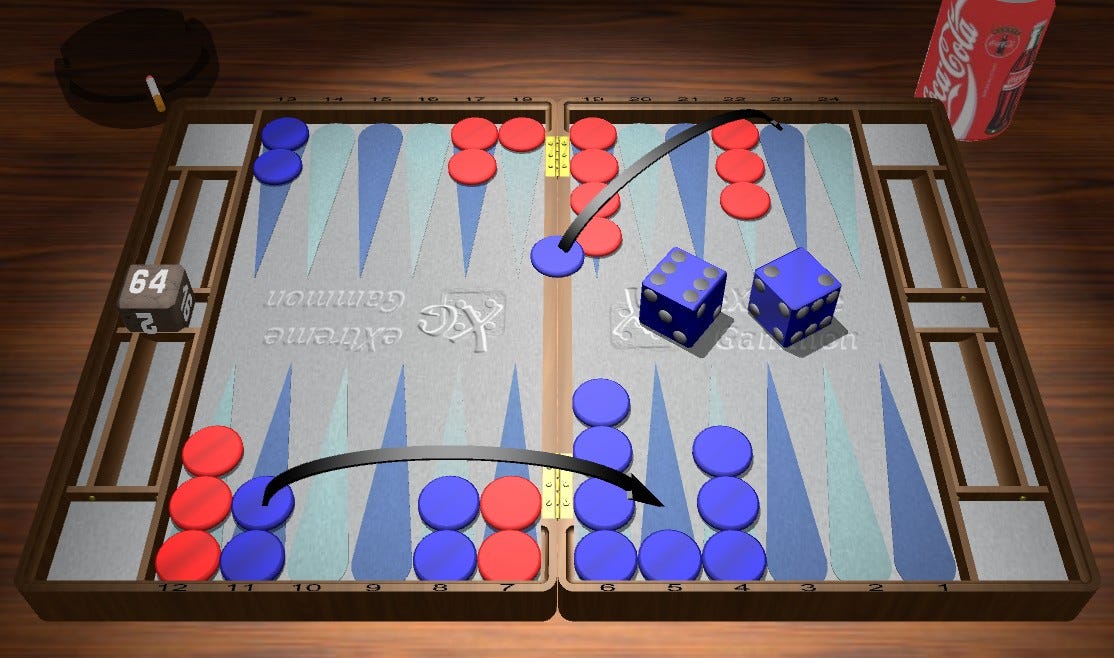
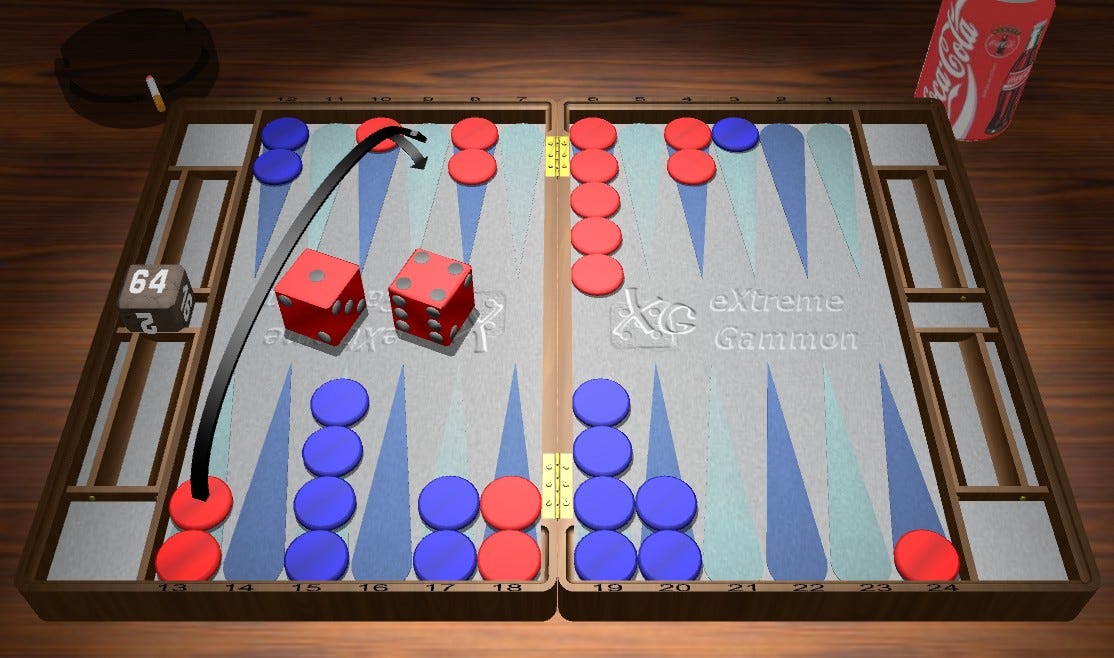
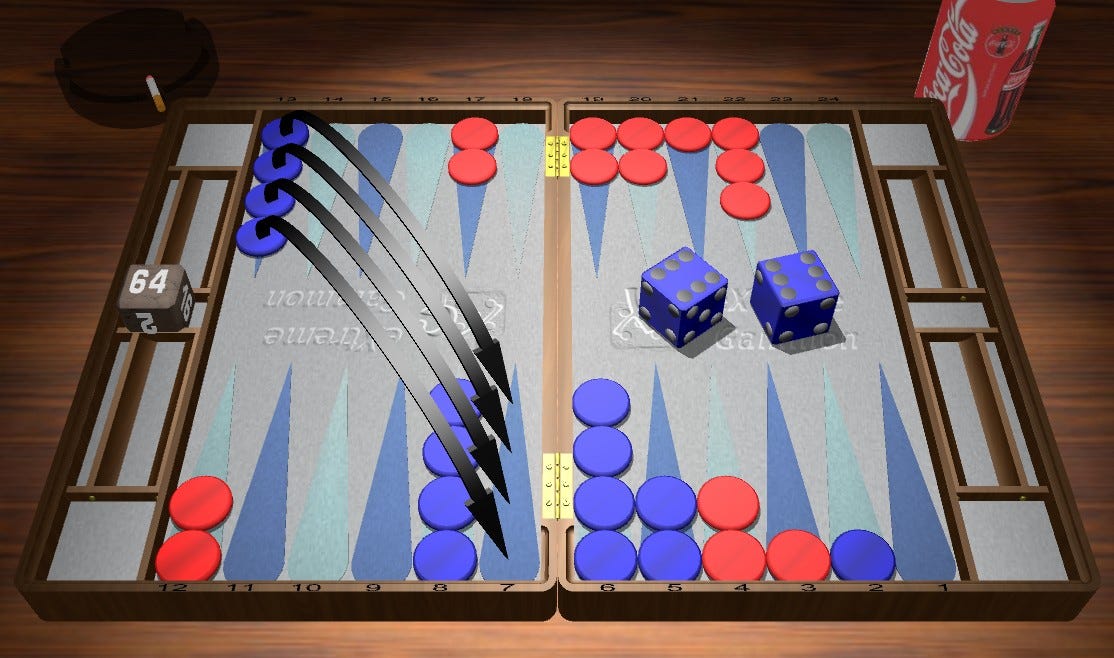
Here is one that I flagged because I was surprised to see that slotting the 5 was not correct. I am unsure, but I imagine that, had I been sitting there, I would have slotted the 5 with the ace. So, why is it wrong by .045 to do so?
The slotting play created both more excellent rolls for Red and more especially weak rolls. The problem with the play is that the additional excellent rolls that Red gains (22, 44, 54 and 64) are not counter balanced by the weak rolls (21, 51, 65), not only in number, but in relatively how much better or worse these rolls get. Obviously, that is quite easy to understand with the convenience of dice distributions, but what is the pattern that can be understood over the board? Put otherwise, what is the critical factor for Red’s structure that makes its so dangerous for Blue to slot that point?
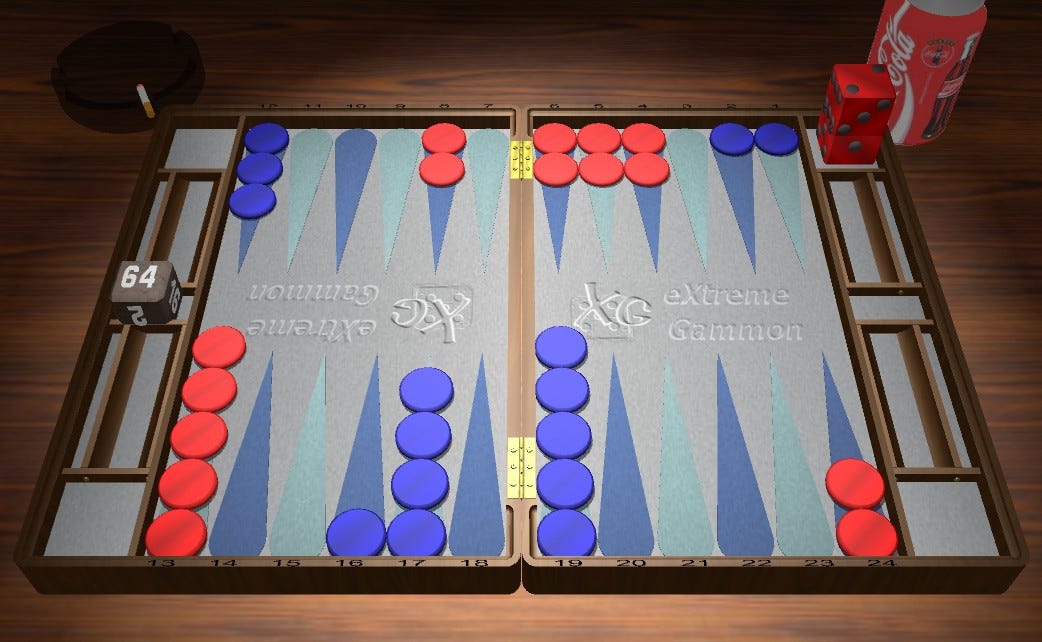
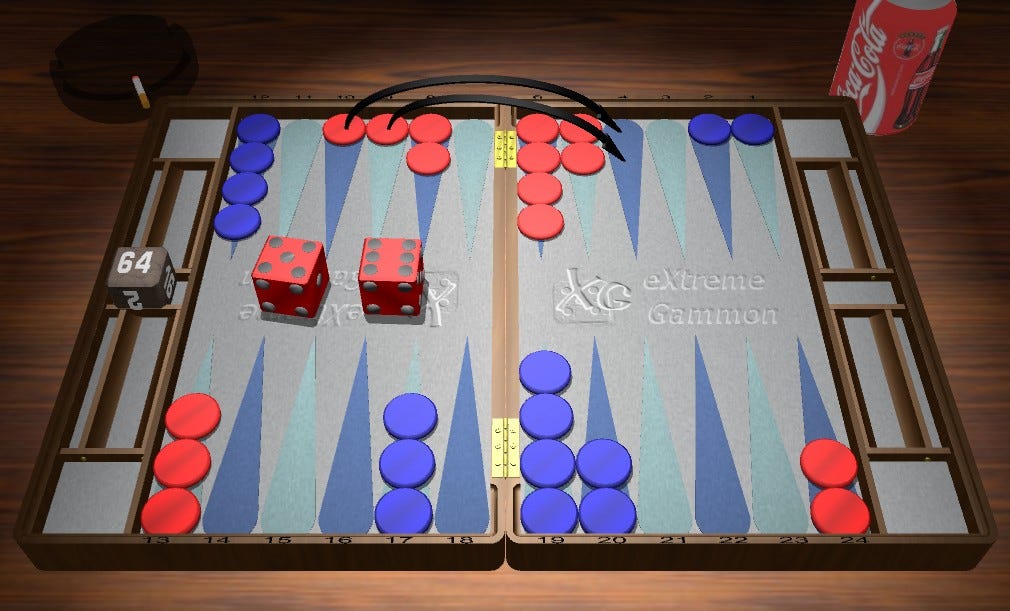
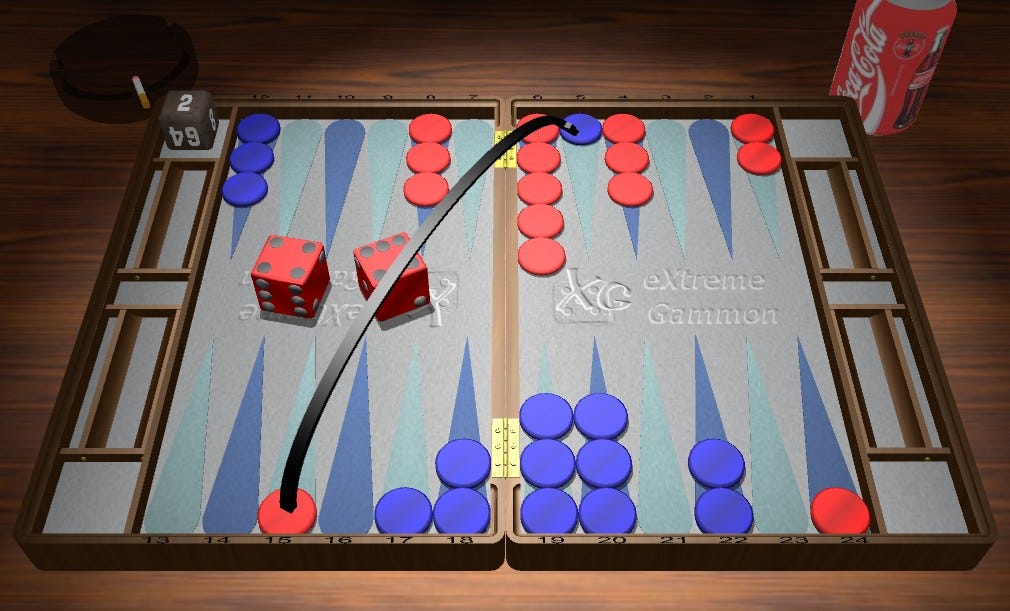
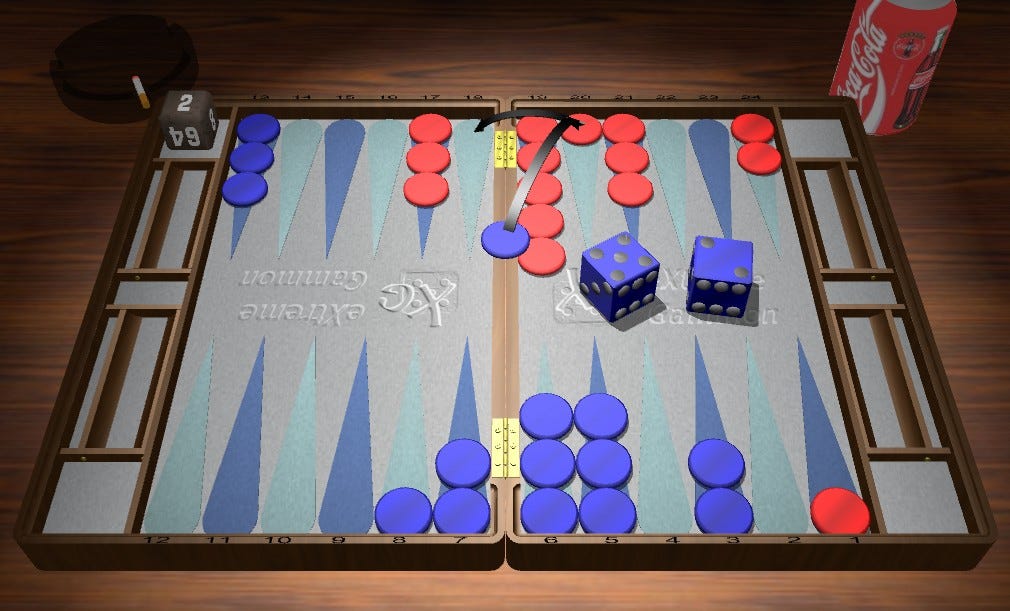
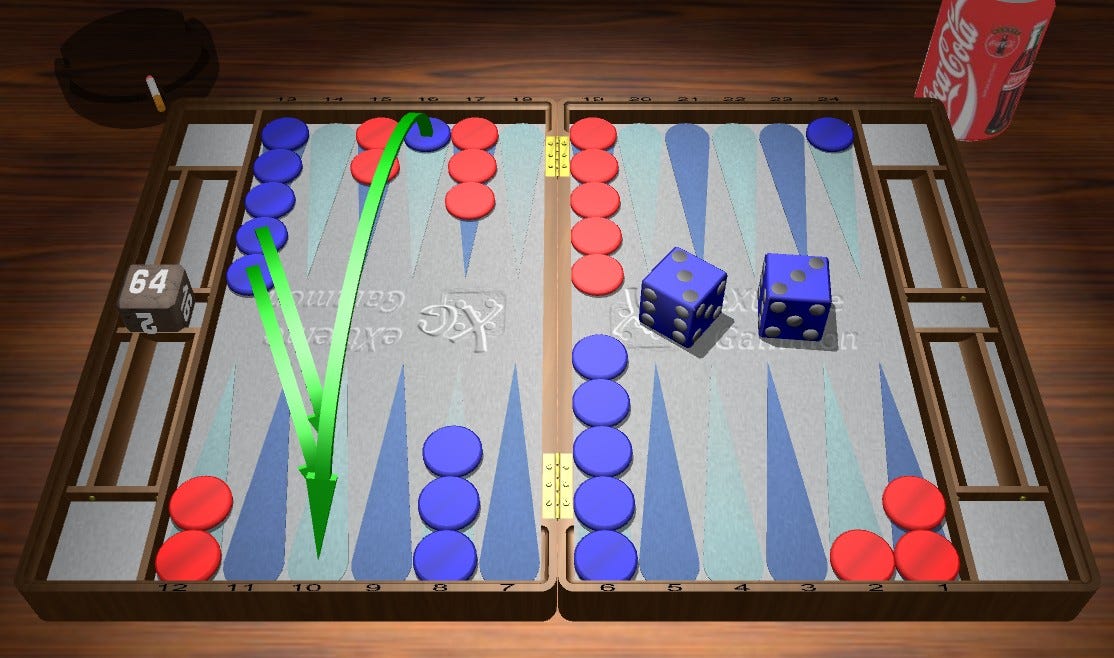
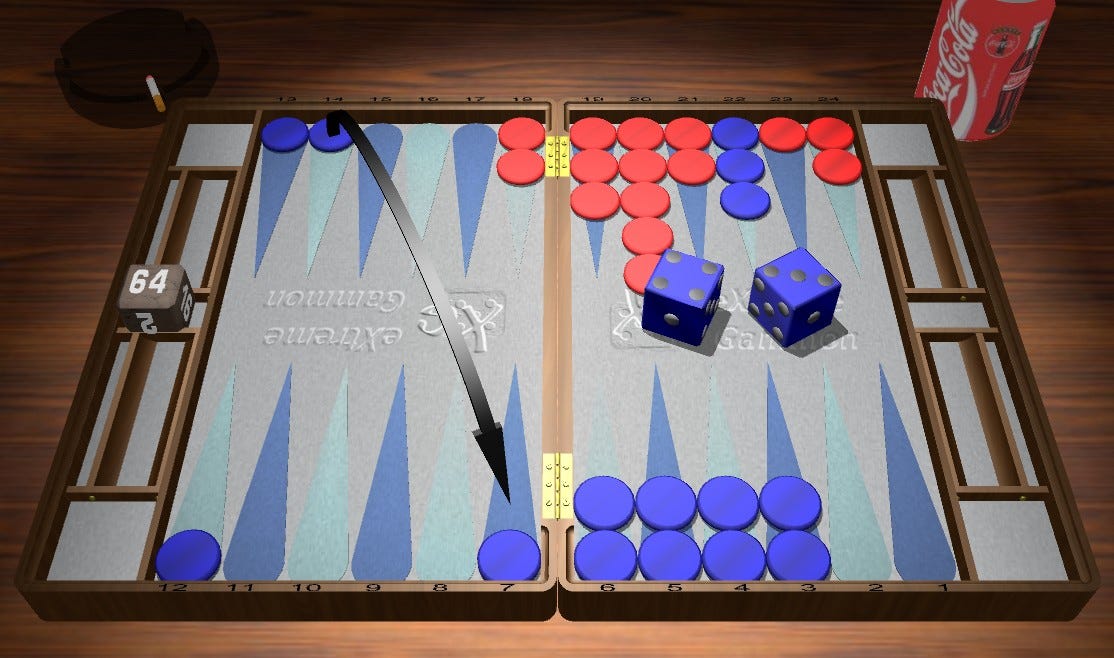
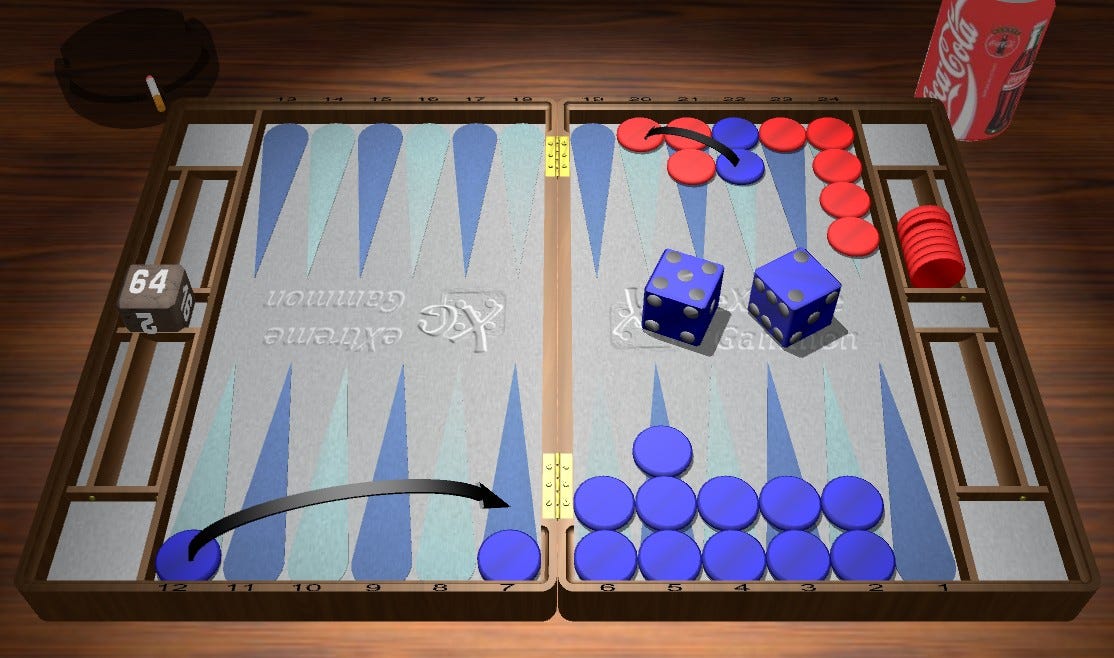
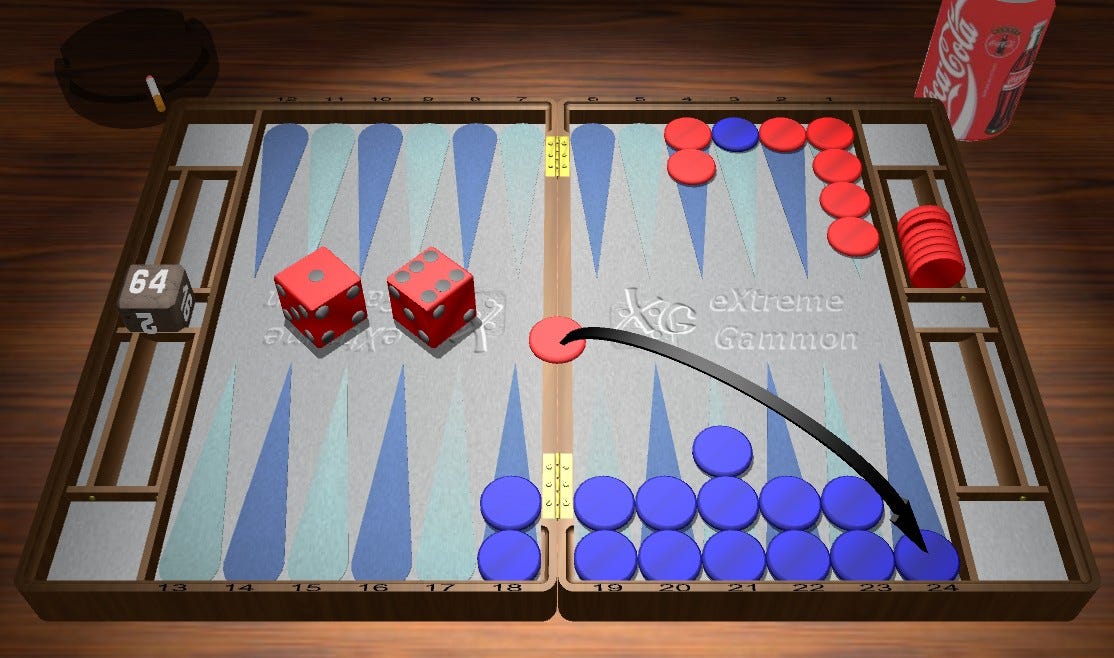
Perhaps, its the 11 points and, with it, the strong proclivity to Prime for Red? Well, let’s look at a similar sequence… 42-52-41-51:

So, the play is the same either way, which suggests the 11 points and its strong priming implications, is not the critical factor. It seems that the critical factor is the threat on both sides of the board. That said, it’s challenging to find a position where Blue might slot because when the threat isn’t as substantial Blue isn’t blocked from stepping up or jumping over the prime. You can look at sequences like 61-52-22-51 to see that the slotting play gets relatively worse (becoming a blunder) when the threat to Blue is increased. To recognize a pattern, the best we can do is perhaps rely on the wisdom, as written back in 1982 by Mike Senkiewicz1, that says it is too risky to slot a checker after splitting the back checkers.
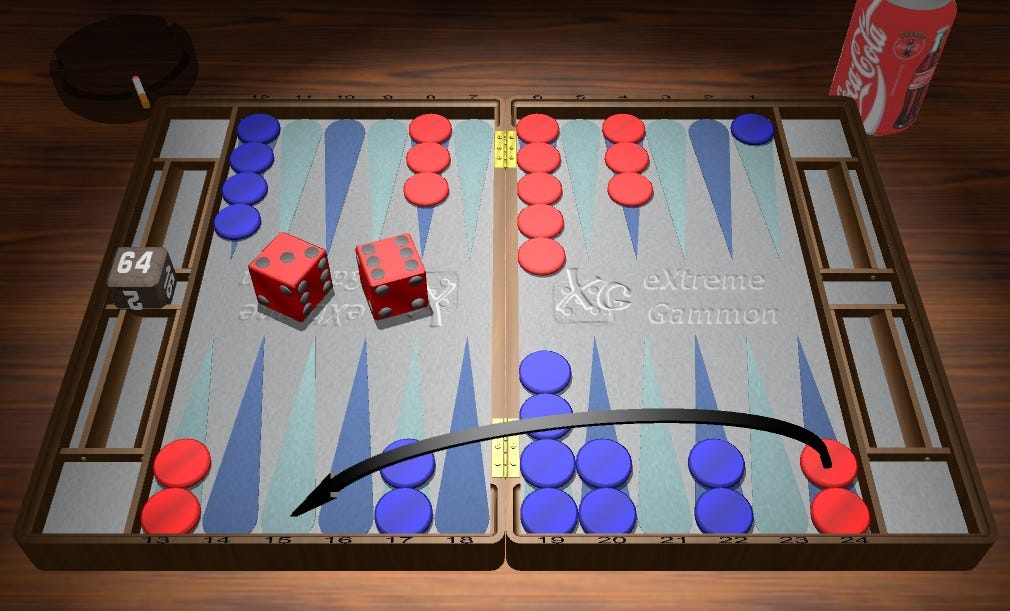
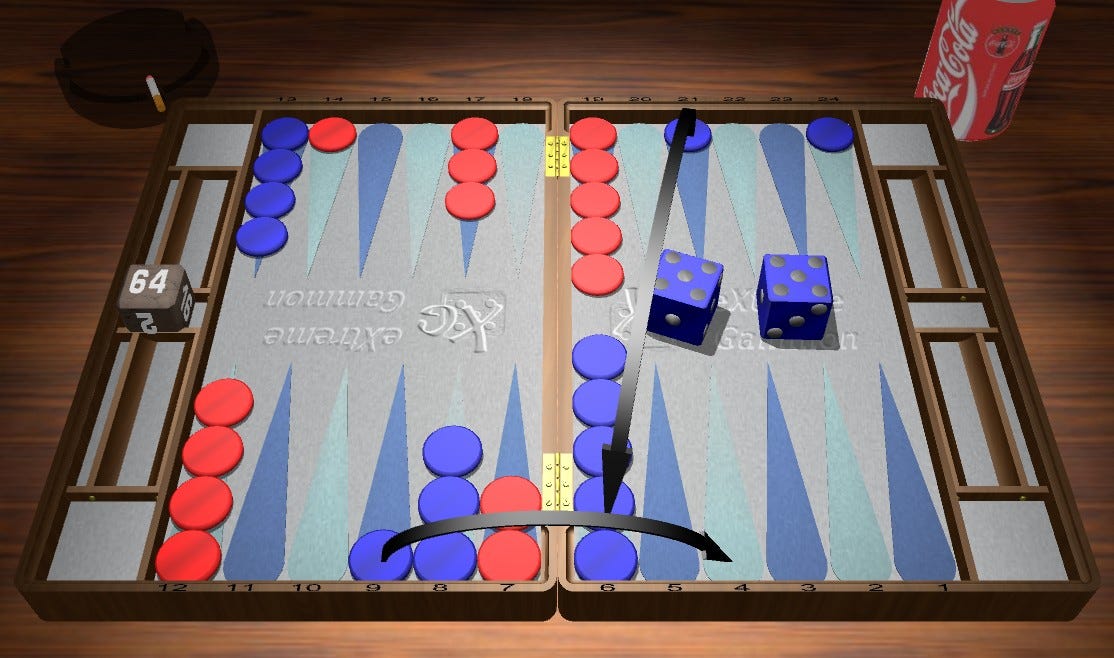
Red rolls 41 - 11/7, 8/7 (41.0%/11.1%/18.6% - ++). Straight forward play.
Blue rolls 52 - 22/15 (35.1%/8.2%/24.2% - ++). O’Hagan makes the clear play, exiting from the back rather than stacking on the 6.
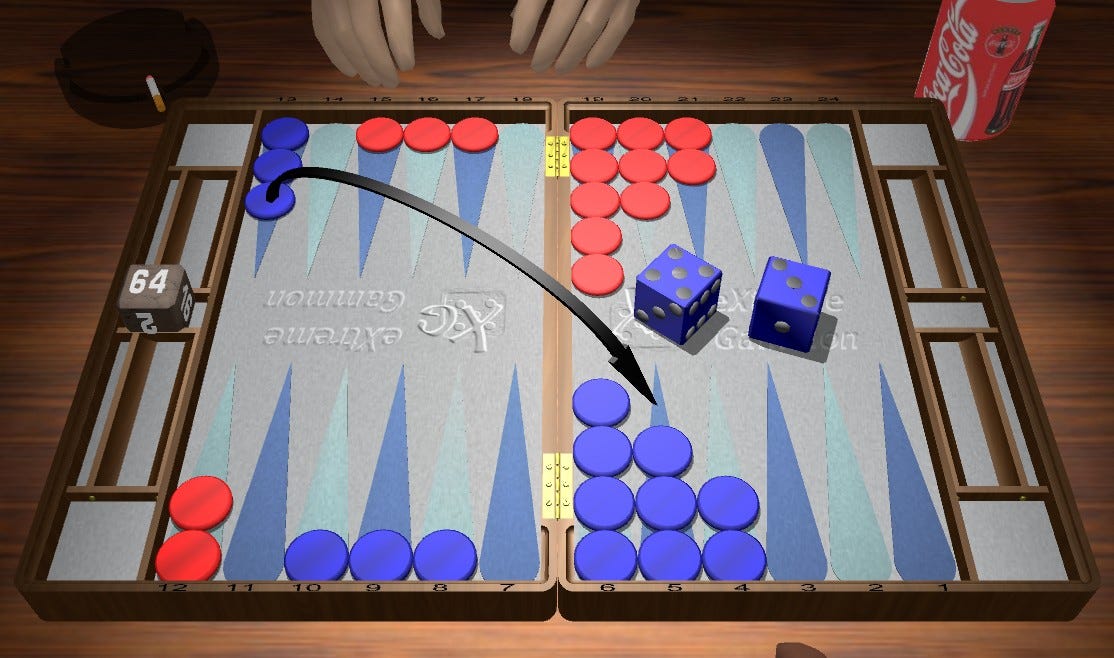
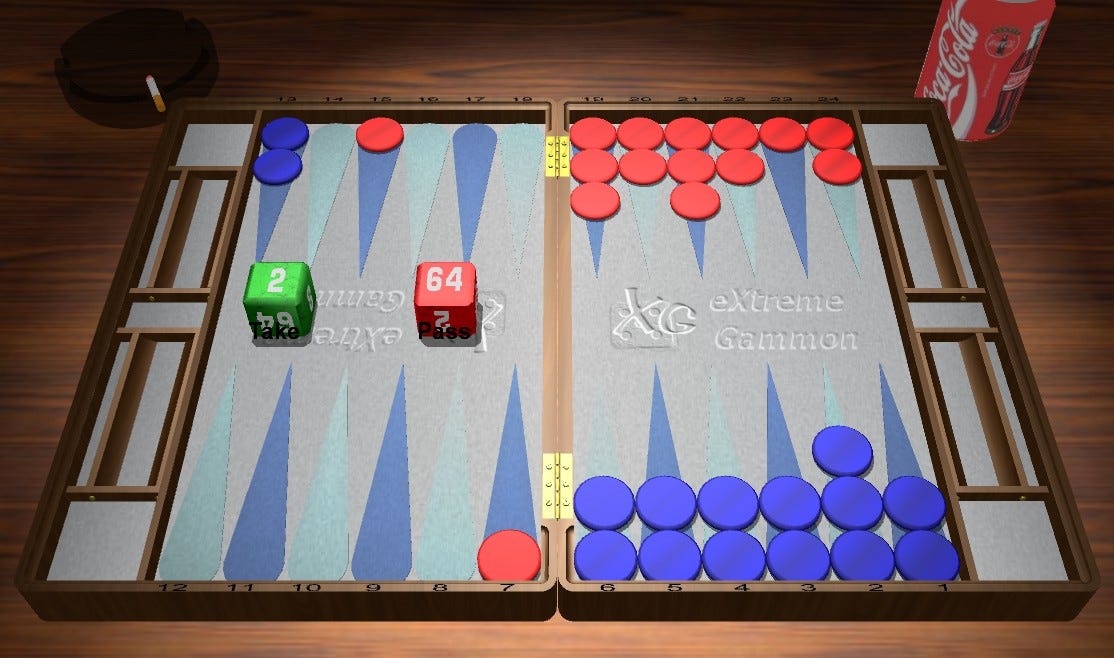
Red Cube Decision - No Double

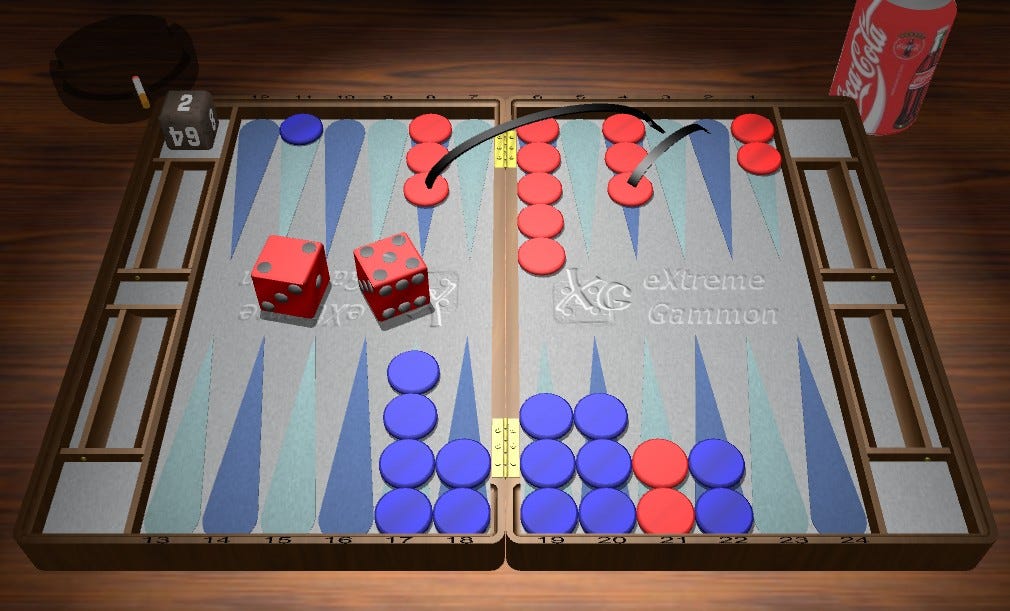
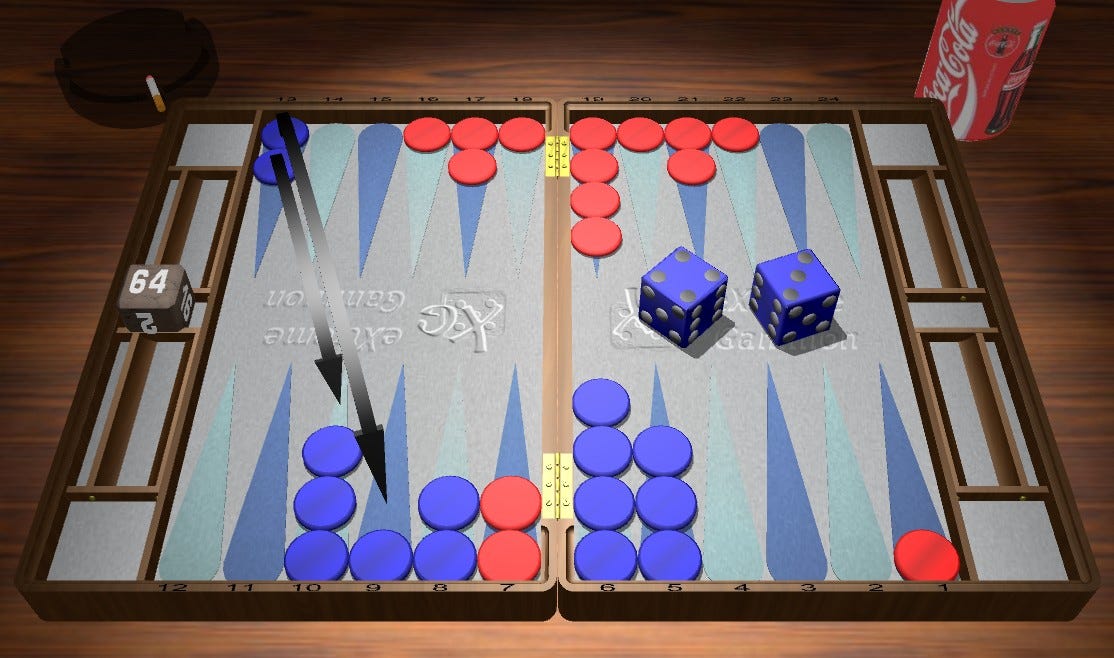
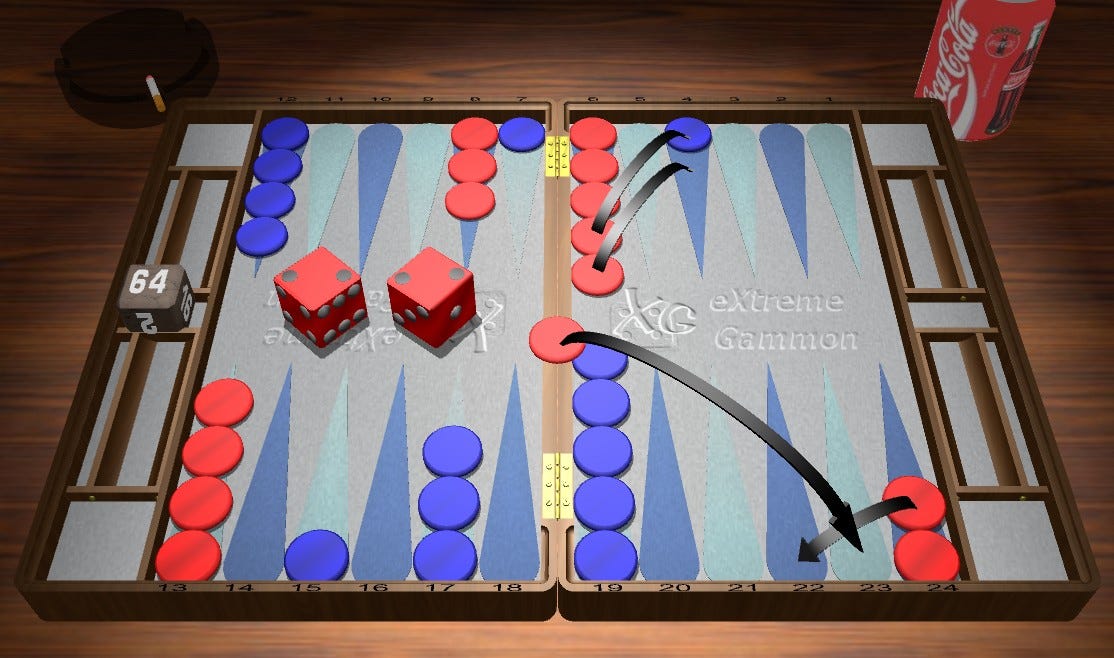
Here, Kit Woolsey has a cube decision to make and it falls into a category that I have begun to call “unsplit doubles”. Essentially, though it’s fairly self explanatory, it is when you are considering a double prior to splitting your back checkers. The rule of thumb is that Red wants a two innerboard point advantage and some blots to attack. That’s the general pattern we are looking for, but more nuanced indicators like lack of gameplan flexibility for your opponent and the opposite for the doubler can make up for a lack of blots or one too few innerboard points. In this case, Red has made the Bar point and has excellent chances to prime as well as, perhaps, blitz Blue, while Blue has an especially inflexible structure.
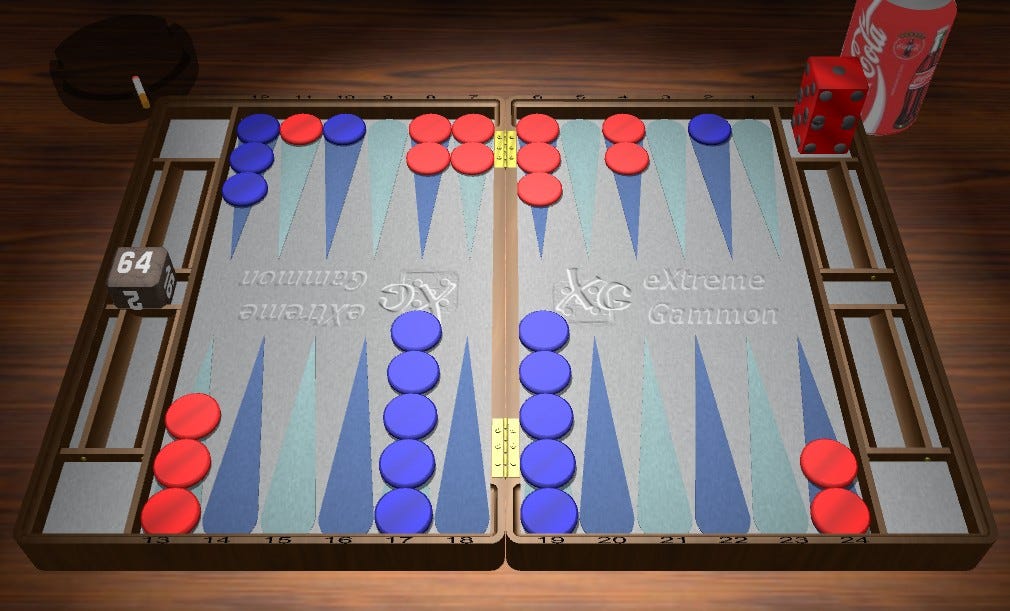
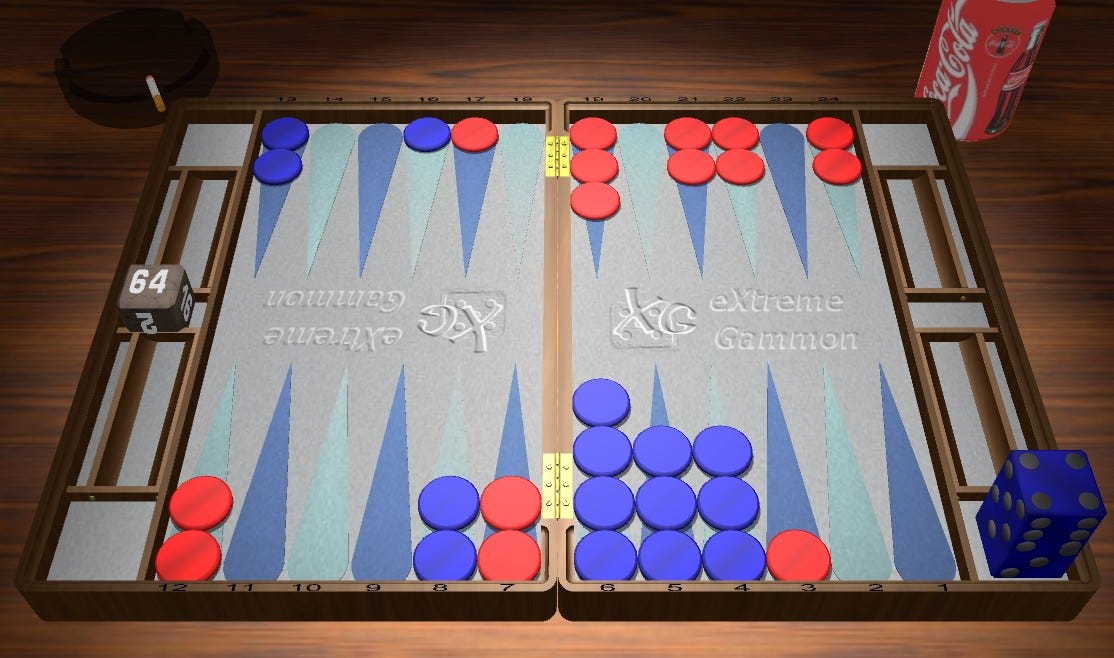
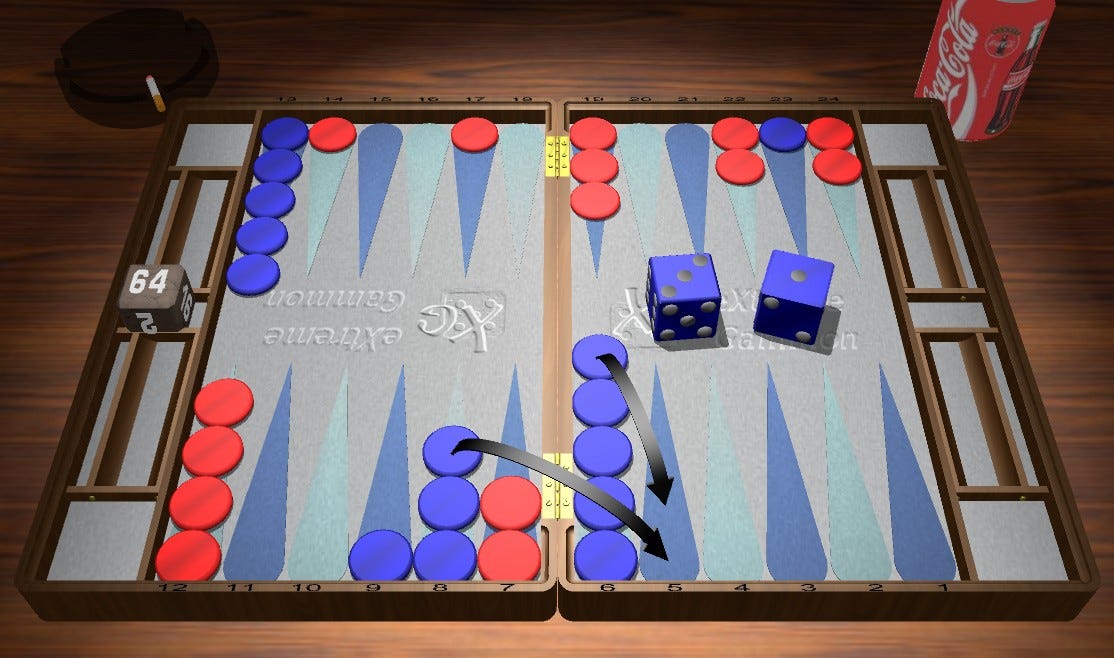
Here is an excellent reference, the opening sequence 31-41-11-32 for a borderline Double/No Double within this pattern:
This one is just on the boarder of a double, which should provide an idea of how to manipulate and adjust estimates when identifying these patterns.
Once, the pattern is recognized, we might want to apply Woolsey’s Law and check to see how many market losers Red might have. In the original, Red has 20 numbers which hit the outerblot as well as 61, 44, 55 & 66 for 25 very strong numbers. Now, those will not all be winners in every sequences, but we can say for sure that 66, 55, 44 & 61 are all essentially winners regardless (they aren’t quite, but close enough), so we can count them as full market losers. The hits are surely market losers when Blue dances which it does 1/9th of the time. That means that of the 20/36 games in which Red hits, 2/36 will result in Red hitting and Blue subsequently dancing. That would leave Red with just 8 market losers, if that were the only ways to lose its market, but it isn’t. Between some unattractive entering rolls (61 & 41 in particular) and its inflexible, brittle structure, there are certainly more sequences that would result in Red losing its market. This seems like a Double and a big Take between our pattern recognition and the number of market losers we can find. And it is:
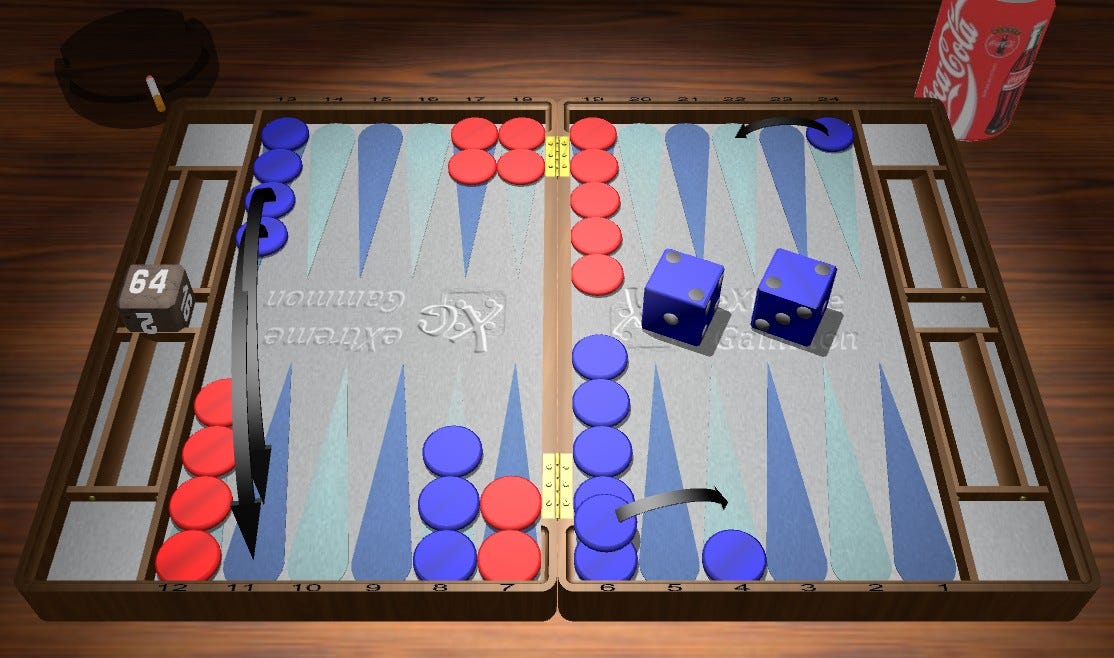
Red rolls 33 - 24/21, 13/10*, 8/5(2) (27.0%/5.2%/27.9% - ++). The hit is obvious and the rest is straight forward.
Blue rolls 43 - Bar/22, 8/4*. (29.9%/6.4%/29.4% - ++)
Red Cube Decision - Double/Pass (29.4%/6.5%/29.6% - ++ after Double/Take). Now, a fairly straightforward Pass for Blue.
Game 2 - O’Hagan 7 Away Woolsey 6 Away
Red rolls 64 - 24/18, 13/9. (49.7%/14.1%/14.1% - Rollout of 93,312 games) Red’s ahead in the match, so no reason to make the two point.
Blue rolls 43 - 24/21, 13/9. (43.5%/10.1%/15.2% - ++)
Red rolls 52 - 9/4*, 6/4*. Red makes the four point. Hitting two is a blunder. (40.9%/9.8%/18.6% - ++)
Blue rolls 53 - Bar/20, 9/6. (37.8%/8.1%/18.8% - ++) Blue enters and safeties a checker. We’ve already mentioned the concept regarding slotting (Bar/22, 9/4) when your checkers are split, so that’s out (-.033 error). A tempo hit off the ace is a blunder and leaves too many blots exposed for not enough gain.
Red rolls 44 - 13/5* (2). (26.6%/4.9%/31.0% - ++)
Blue rolls 63 - Bar/22, 13/7*. (28.6%/5.9%/32.2% - ++)
Red Cube Decision - Double/Pass. (28.4%/6.4%/33.5% - Rollout of 1,996 games after Double/Take)
Game 3 - O’Hagan 7 Away Woolsey 5 Away
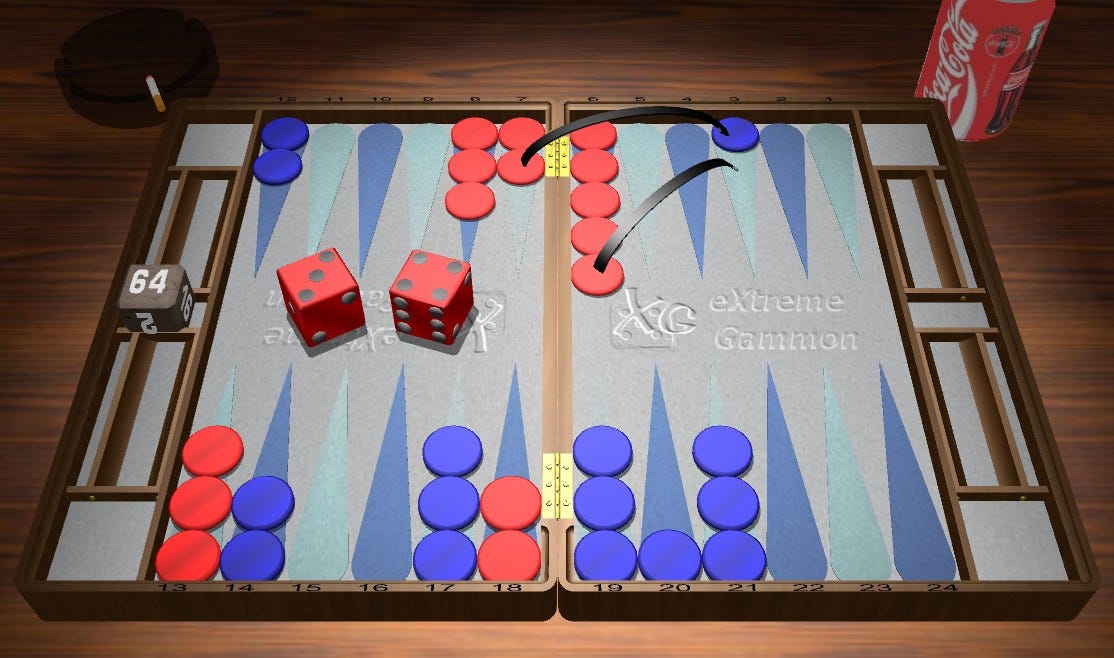
Red rolls 43 - 13/10, 13/9. (50.3%/14.2%/15.9% - Rollout of 20,736 games)
Blue rolls 31 - 8/5, 6/5. (51.4%/14.8%/14.8% - ++)
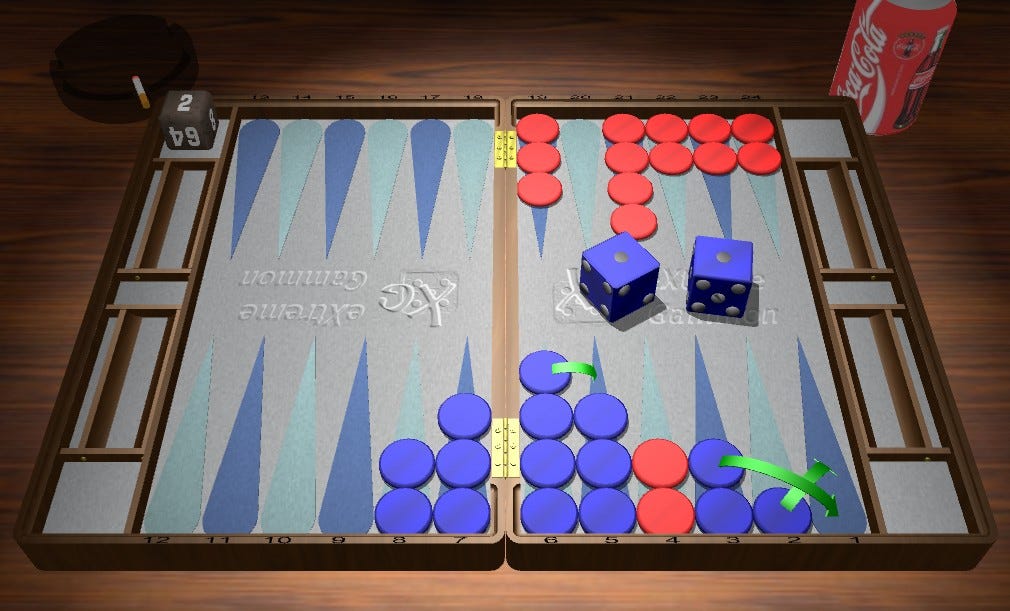
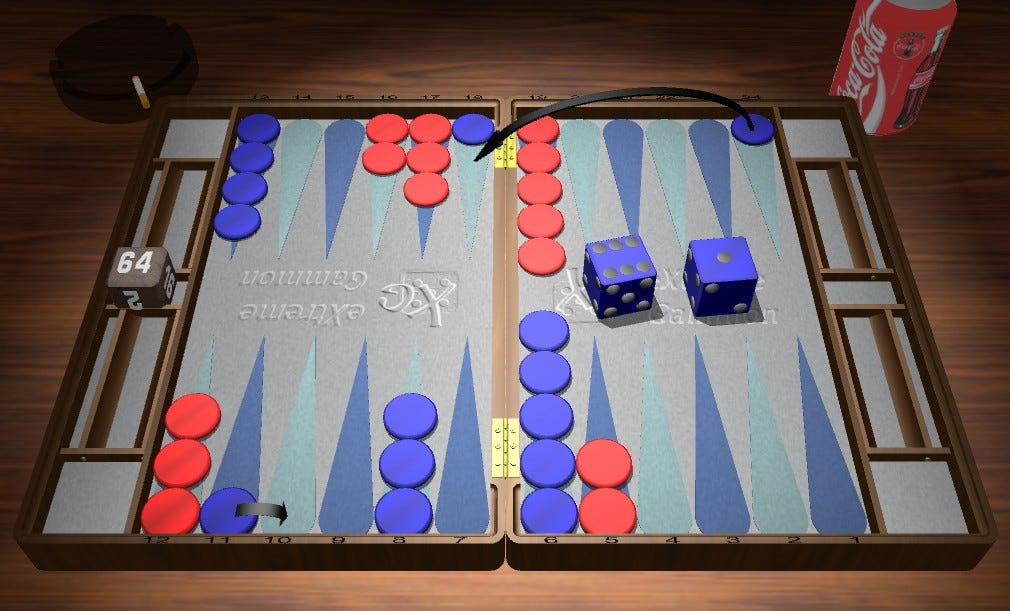
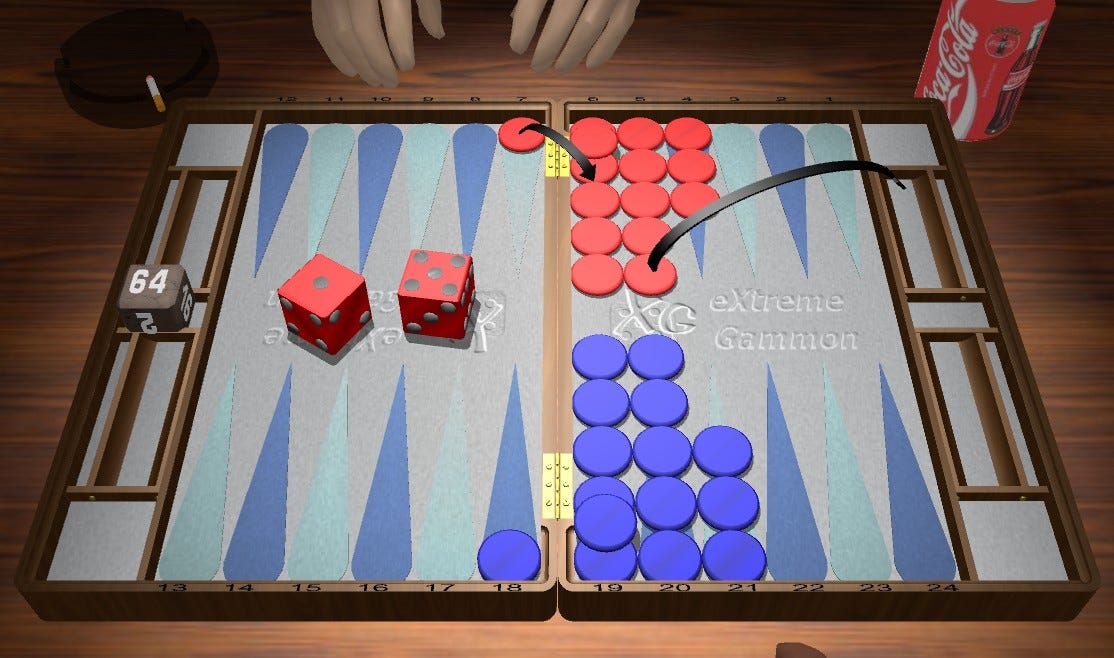
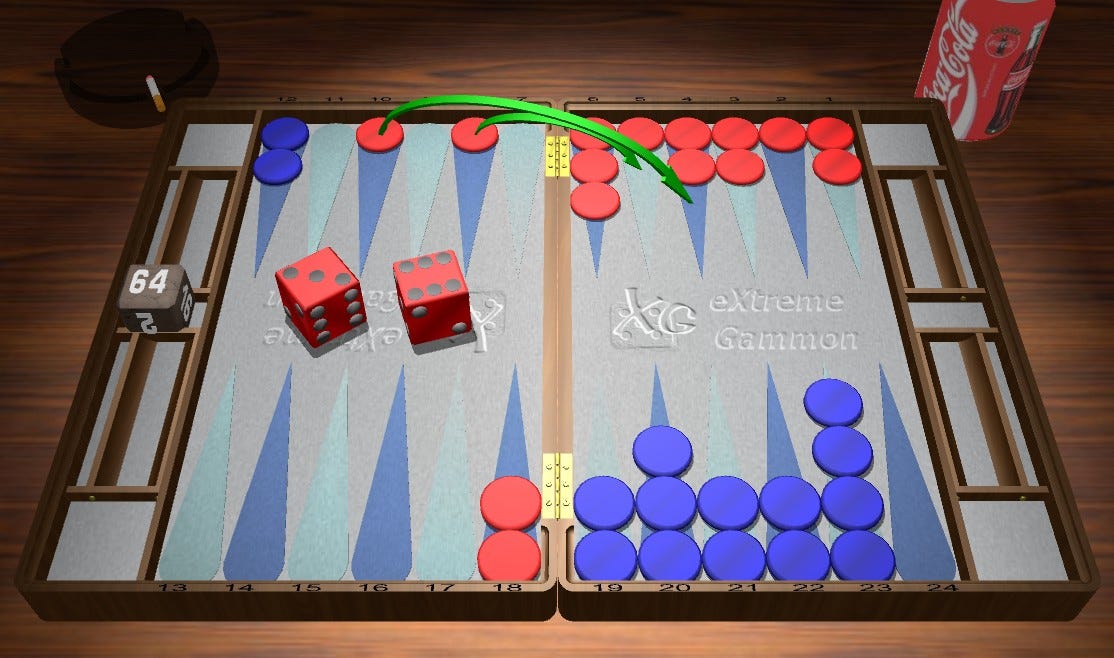
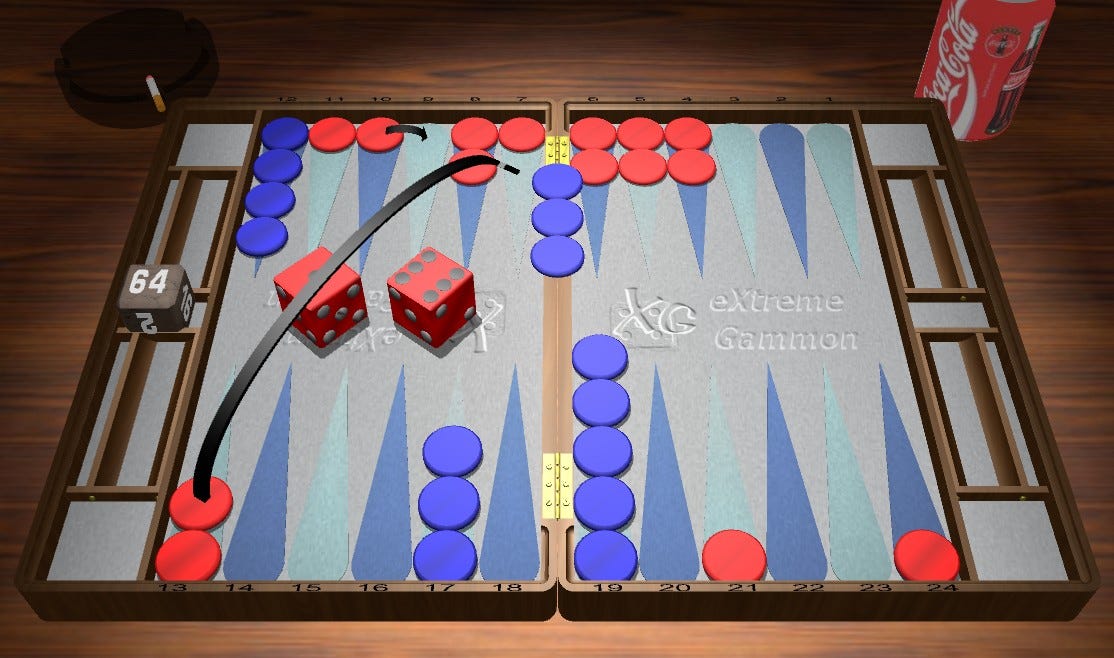
Red rolls 65 - 10/4, 9/4 (54.0%/17.1%/15.6% - Rollout of 5,184 games)
It turns out that this is the second best play. Not by much (-.023), but by enough that it is worth taking a closer look particularly because it seems like such an obvious play. Here’s the preferred checker play:
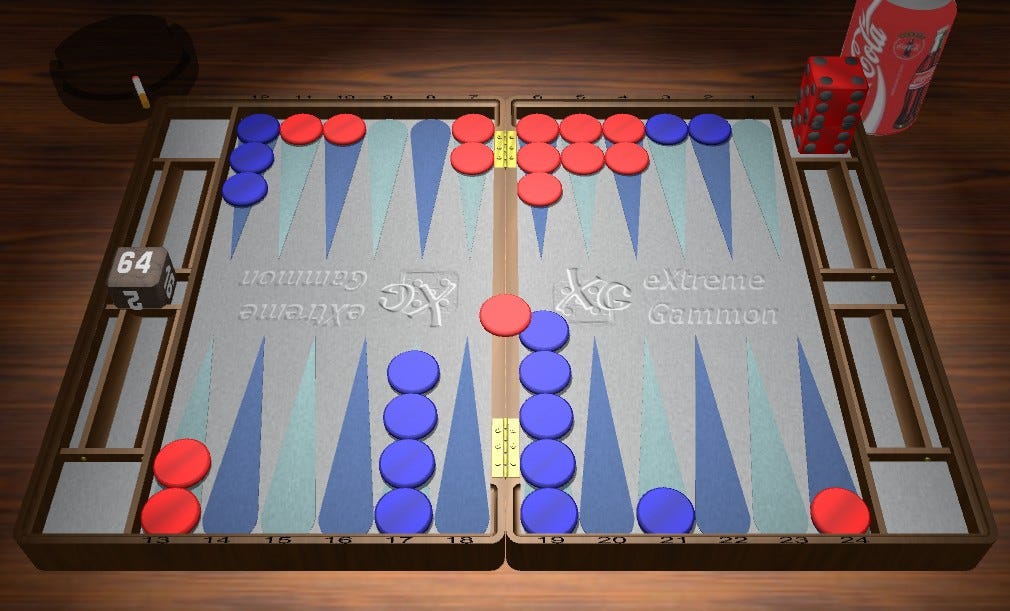
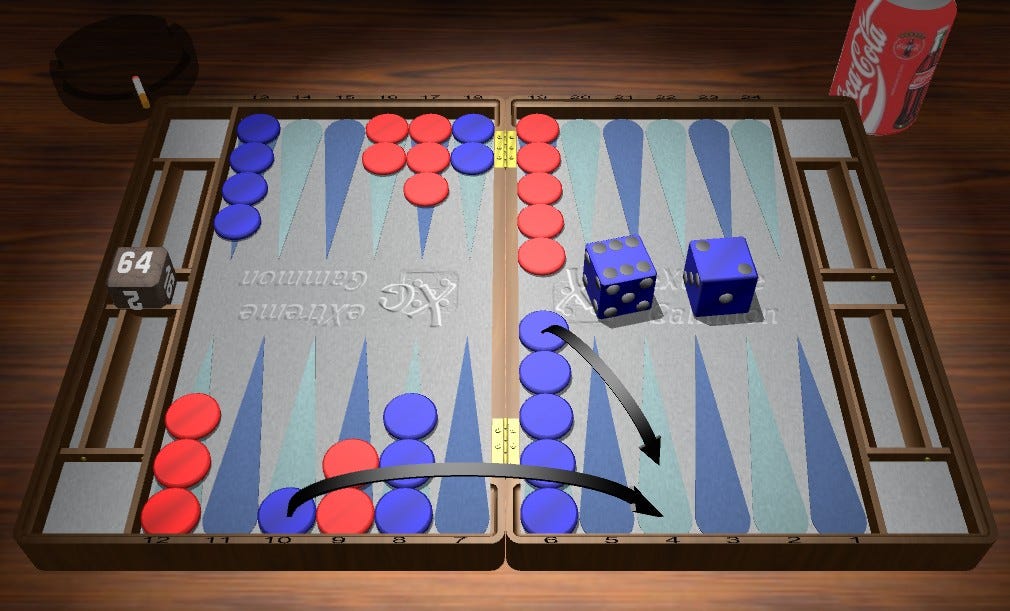
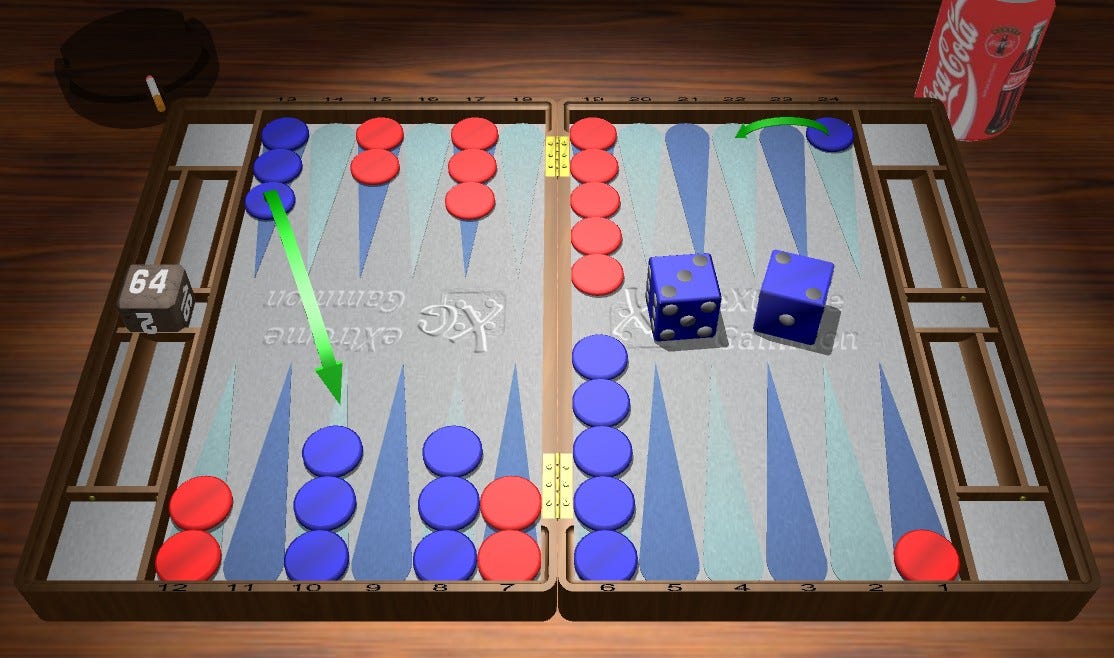
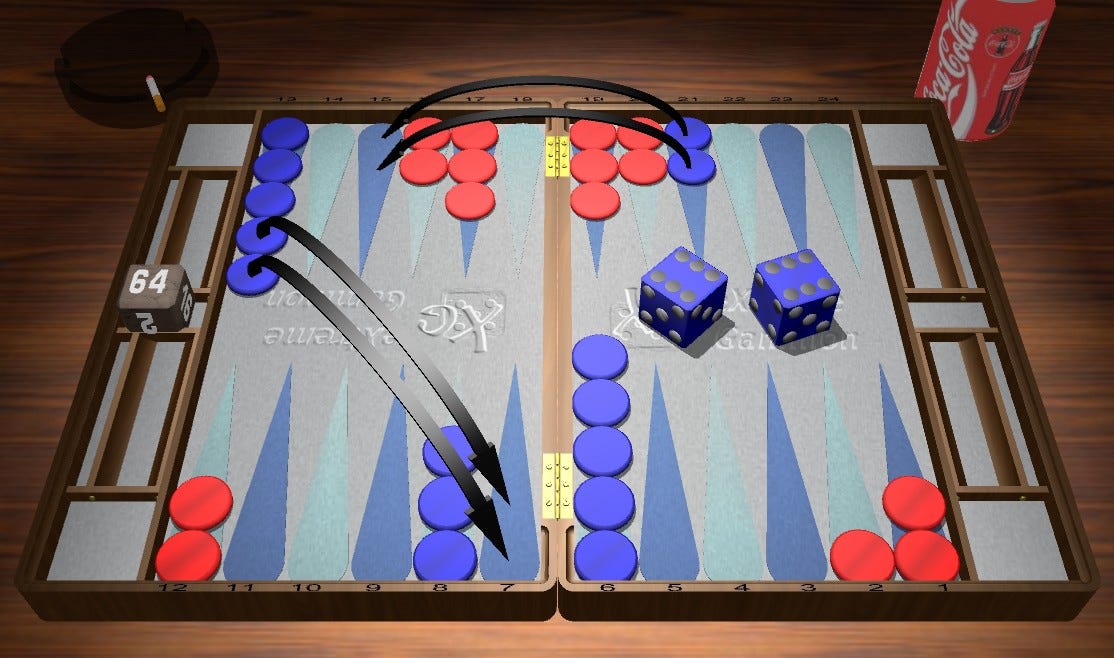
The two important factors here are that Blue hasn’t yet split his back checkers and that Blue has a strong board that is threatening to prime Red in the back. With Blue unsplit, the risk of leaving those two blots is worth the chance to escape a checker before Blue can set up a prime. Here is similar sequence, 43-31-31-51-65, with an extra roll for each player prior to the 65:
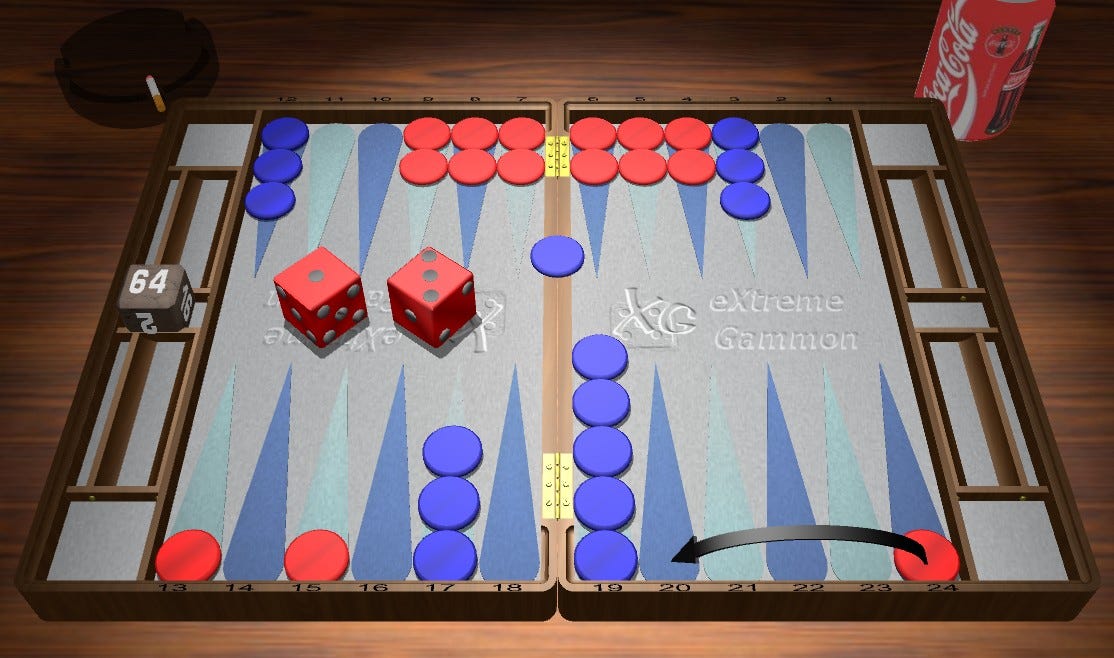
Blue rolls 55 - 13/3 (2) . (56.5%/19.5%/13.2% - ++)
Red rolls 54 - 13/4 . (62.0%/19.6%/11.5% - ++) Both players are in a bit of a standoff to see who will activate their back checkers first, with Blue holding the upperhand structurally.
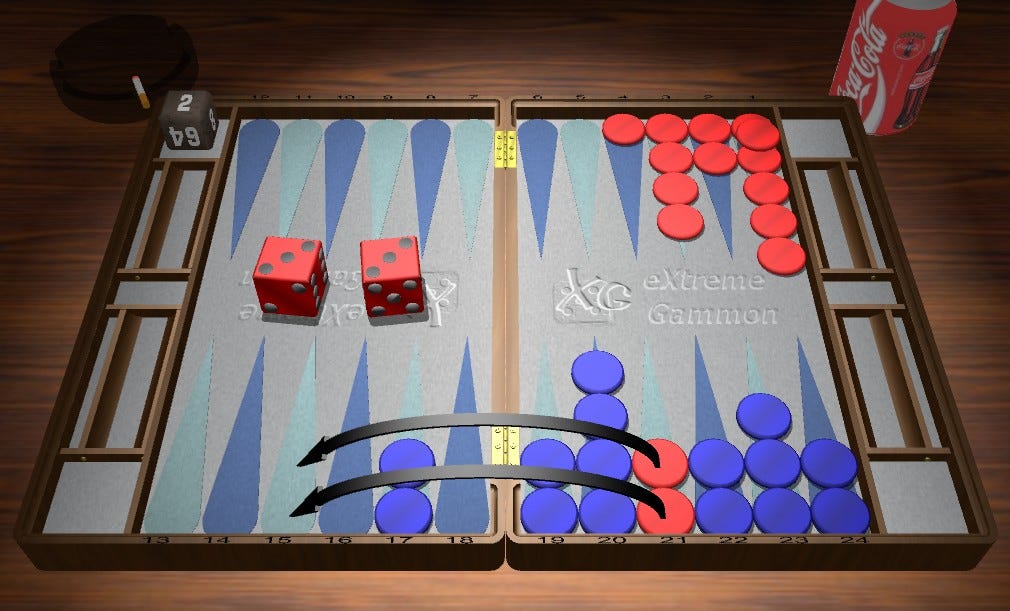
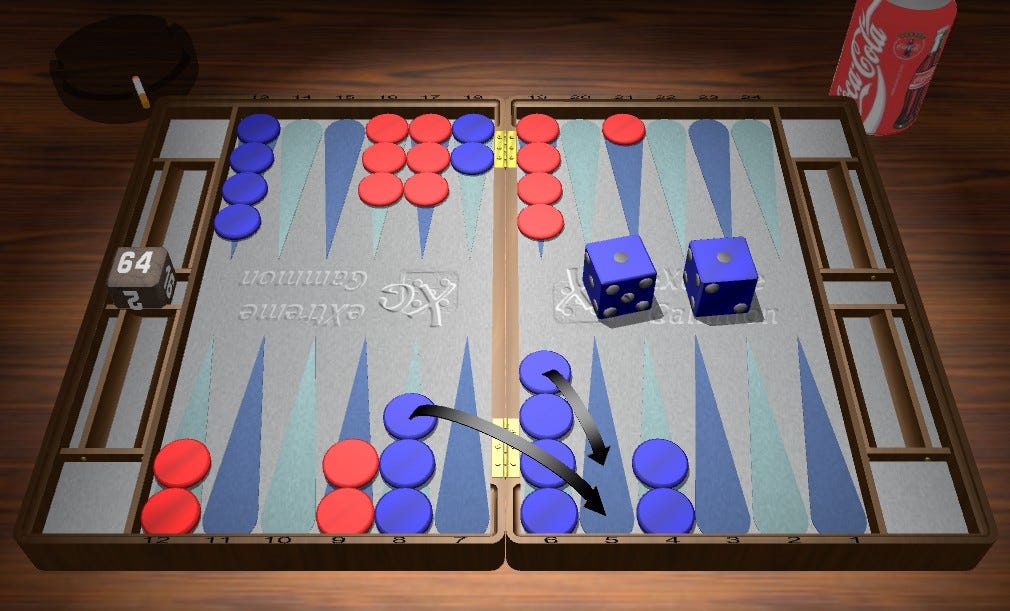
Blue rolls 65 - 24/13 . (63.7%/17.3%/9.7% - ++) Blue escapes a checker first! And look at what it does to both players’ gammons
Red rolls 63 - 24/15 . (66.4%/24.7%/8.2% - Rollout of 2,592 games)
Woolsey has a tricky decision to make here. The preferred play, and the one he settled on, is shown above, but the other option is to split with 6 and play a tempo hit with the 3 (24/18, 4/1*, -.012 error). If we are over the board deciding between two plays such as these, it is useful, though it seems rudimentary, to utilize PRT (Position, Race, Threat) and to compare how the two plays appear through that lens. Position does not change too much for Blue, nor does the race (132 Blue to 131 Red after 24/14 as compared to 133 Blue to 131 Red after the tempo hit), but the tempo hit opens up a host of threats that would not exist after the 24/15 play. Red now gets hit with all 1s, 65, 63, 62, 55, 33, 22 & 11, which totals 21 rolls, as opposed to 14 rolls after 24/15. The tempo hit does create the possibility of anchoring or slowing Blue down by taking half its roll, but those sequences are A) in the future and B) don’t occur often enough to out weight the immediate negative impacts of the tempo play.
The plays are a bit closer than I might expect from that write up, which probably has to do with the fact that Red escapes or anchors the majority of the time when Blue does not hit them and that has a ton of value. Still, I may be leaving something out and should return to tempo hits in more detail at a later date.
Blue Cube Decision - Double/Take. (66.3%/25.1%/8.5% - Rollout of 2,592 games after Double/Take)
As we said above, Blue has the 14 hitting rolls, including 55s, while rolls like 65, 42 and 11 are still quite good. For Blue, this fits nicely into Woolsey’s Law and PRT. O’Hagan has 14 numbers that hit and loose his market in most sequences, while when he does not hit he is in perfectly good shape. By the same token, Red has an easy Take as this is a very good game when Blue misses and all is not lost on a hit as Red can still anchor or come in and hit a fly shot or enter and make a quick prime before Blue can escape. Good Double. Clear Take.
Blue rolls 61 - 13/7 8/7 . (61.4%/19.1%/9.8% - ++) Blue misses the shot, but this isn’t a terrible consolation.
Red rolls 66 - 13/1* (2). (58.9%/12.1%/13.9% - ++). Red with a dramatic roll to change things a good deal, though Blue is still the favorite.
Blue rolls 51 - How to Play this One?
O’Hagan played Bar/20, 6/5 . (59.9%/12.5%/15.2% - Rollout of 5,184 games)
The preferred play is to play Bar/20, which is forced, and then clean up the blot by playing 8/7. The error is small, -.022, but worth looking at.
The reason Blue might leave the blot on its 8 point is two fold. First, when they do not get hit on the next roll, it provides them a greater number of rolls to make the 4 point and, second, it allows Blue to make the 8 point extend their broken prime on the other end on the following roll. That said, Blue’s path to victory is badly hampered by being hit on that 8 point, so even the four rolls that hit are not worth leaving.
Think about it this way: regardless of what Blue does with this ace, Red is going to try to safety its checker from the outfield with most rolls, aside from its great rolls that point on Blue’s inner-board blot or escape and make an outfield point. Further, Red’s structure isn’t an easy one with which to bear in its checkers. Red craves two things 1) the chance to make this a racing game, though do that it needs to escape its back checker and safety its semi-escaped checker, which is a decent amount of work and 2) the opportunity to give itself flexibility with minimal risk and the best way to do both is with Blue on the Bar.
So, its Red’s gameplans more than Blue’s that makes the cleanup preferred. As a result, I wondered if rolling 31 would change this in any way, since Blue would be entering deeper with more of Red’s spares aimed at its back checker. Unsurprisingly, it made the clean up play more attractive, relatively speaking, since Red now has a bit of a Blitz type gameplan available to it.
Anyways, O’Hagan played for the prime, it was a very small error and I feel weird analyzing because of how excellent he and Kit Woolsey are at backgammon, particularly in comparison to me. Still, it’s helping me get better (I think), so on we go.
Red rolls 64 - 15/5*. (63.5%/12.9%/13.8% - ++). The back checker doesn’t move and it’s far too passive to make the deuce point. There is no question. Red hits 15/5* and hopes for the best. It’s worth noting that since the 66s Woolsey’s gammons have remained higher than O’Hagan’s, since he has the 3 point board and a chance for a quick hitting blitz.
Blue rolls 52 - Bar/20*, 20/18 . (75.0%/22.6%/9.0% - Rollout of 5,184 games)
Blue hits pay dirt and the splits reflect it. O’Hagan’s play is 3rd best, but the differences are quite small and we’ve already been through the reasoning above with he 51 play.
A roll such as 21 or 31 leaves O’Hagan with wins closer to 55%, while dancing drops him down to 45% wins. Of course, the weaker entering roll leaves Blue with gammons slightly below Red, while dancing puts them in the opposite situation as when Blue hits, with Red having gammons in the 20% range and Blue having single digit gammons.
Interestingly, there is a bit of theme developing between these last few plays for John O’Hagan. Had he rolled 31 or 21, he would have again faced the decision of whether to safety his blot on the 8 point. If Blue rolls 31 from the Bar, it’s reasonable to either safety the blot or play 13/12, while if Blue throws 21 safetying the blot is 3rd best and playing 13/12 is clearly best. The reason is that, when entering on the deuce point gameplans have changed. Red can prime and Blue must prepare to prime back.
Could we go so far as to say that cleaning up blots in the mid-game is entirely gameplan dependent? Maybe that’s so broad as to mean nothing, but it certainly helps focus us on determine whether a subtle difference in entry has altered our gameplan during the course of the mid-game. Again, moving on.
Red rolls 64 - Bar/15. (78.4%/17.5%/4.4% - ++). Red enters and exits.
Blue rolls 32 - 13/10*, 10/8 (81.5%/22.8%/3.5% - ++). Blue hits and finally remakes the 8 point.
Red rolls 64 - Bar/15. (82.2%/20.4%/3.0% - ++). Red enters and exits.
Blue rolls 43 - 18/14, 13/10* (85.7%/22.0%/2.1% - ++). O’Hagan won’t let Woolsey escape, though a 4th consecutive 64 would be music to Red's ears.
Blue rolls 43 - Bar/21, 24/21 (71.9%/3.1%/1.1% - ++). 43! Also an excellent melody (I think I know very little about music), I’m sure, for Red as Woolsey anchors and wins for Blue decrease precipitously while gammons essentially vanish for both players. Now, we have a holding game for a bit with Red having great racing equity down only 4 pips before Blue’s roll.
Blue rolls 52 - 13/8, 10/8 (68.3%/2.8%/1.2% - ++). Blue has three blots to clean up and even though Red’s board isn’t yet particularly formidable, it’s best option it to put two spares on the 8 point, leaving just one blot for Red to attack.
Red rolls 52 - 8/3, 4/2 (72.0%/2.8%/0.7% - Rollout of 2,592 games). Woolsey opts to slot two points in an attempt to strengthen his board as much as possible, as quickly as possible. The rollout shows us that the preferred play, by a a slim margin (-.006) is to slot only the 3 point and play 6/4 with the deuce. This is a result of how close the race is and we will see the result of slotting two points on the following roll.
Blue rolls 52 - 14/7 (70.7%/1.8%/0.4% - Rollout of 5,184 games). O’Hagan continues his work from his previous turn in which he cleaned up two outfield blots by stacking them on the 8. It makes sense. He leads the race by 4 pips prior to the roll, so bringing the checker in puts him in a fine position to win this game. However, when we look at the rollout, 14/7 is the 4th best play.

As a result of Red slotting two points, Blue has the opportunity to leave its outfield blot back for the purpose of containment. Leaving the checker behind stops Red from utilizing 65 as a racing roll and makes 55 a bit of an awkward roll. The race is close enough that Blue does not want to allow Red an easy way to get into a racing game (if it doesn’t have a better option), particular because Red owns the Cube. The two exposed blots in Red’s homeboard effectively act as a free roll for Blue, allowing them to hang back one more time before bringing their checker around.
Red rolls 62 - 8/2, 6/4 (73.3%/2.2%/0.3% - ++).
Blue rolls 62 - 8/6, 8/2 (73.7%/2.0%/0.3% - Rollout of 10,368 games).
Red rolls 52 - 8/3, 6/4 (76.6%/2.0%/0.3% - Rollout of 5,184 games).
Blue rolls 11 - 6/5, 3/1, 2/1 (69.4%/1.8%/0.6% - Rollout of 5,184 games).
O’Hagan plays this one entirely inside his own innerboard and it ends up being a .054 error relative to the 4 plays I rolled out. One issue with playing this roll inside the innerboard is that it leaves 5 outside and allows for an unfortunate 66. On the other hand, and I imagine that his is what O’Hagan was thinking, if Red is likely to run with large numbers on the next roll then Blue probably wants an attractive distribution for attacking the checker Red leaves behind, right?
You can see from the plays we rolled out that the distribution in front of Red’s checkers is not of particular import. More important is increasing the likelihood of a smooth bear-in. Interestingly, had Blue rolled 31, it would play 31 and the plays aren’t particularly close. The underlying reason, which we can derive from the 2nd best play in the roll out (7/6, 5/2 - -.032 Error), is that 31 makes a new inner board point.
With that in mind, we can say that there are four main considerations for Blue: 1) ensuring the smoothest bear in, 2) building an inner-board in preparation for an opportunity to attack Red, 3) blocking Red’s escape and 4) leaving a desirable distribution of spares. The 4th is fourth because it can apply to each of the first 3 in its own way.
Red rolls 53 - 6/1, 4/1 (74.7%/2.2%/0.3% - Rollout of 5,184 games).

Woolsey makes the lone checker Blunder of the match for either player, perhaps deterred by the distribution of checkers O’Hagan left behind on his 7, 6 & 5 points. The issue is that Blue’s homeboard rates to only improve with small rolls, making the next large roll for Red even more dangerous and Red’s racing chances will be damaged if Blue throws large numbers that cause its block to break down. Of course, Blue’s blot plays a crucial role here. If it’s covered, Woolsey’s play is preferred since there are more sequences for Blue after the running play that work out nicely for Blue. Still, it isn’t a huge difference between 6/1, 4/1 and 21/13 with the 3 point covered (-.030 Error), so what is another underlying factor?
I’d argue that these position call for running more often than many of us think, particularly when we are behind 4 primes. Why? Because once you are out from behind the prime you have the full use of your doubles. 44, 33 and even 22 are above average rolls and can help in a relatively close race, but they are often wasted as a player waits for the perfect roll with which to break an anchor.
Blue rolls 54 - 7/2, 6/2 (75.9%/2.6%/0.4% - ++). Not much choice…. Blue clears the spares.
Red rolls 33 - 6/3 (2), 4/1 (2) (81.2%/4.1%/0.1% - ++). Not running has immediate consequences as Red’s board crashes with an unfortunate roll
Blue rolls 54 - 7/3, 7/2 (83.6%/2.9%/0.0% - ++). Not much choice…. Blue clears the spares.
Red rolls 33 - 21/15 (2) (73.3%/0.0%/0.10% - ++). Now, we have a bit of a race.
Blue rolls 55 - 8/3 (2), 5/Off (2) (94.0%/0.0%/0.0% - ++). Now, we don’t have much of a race anymore.
Red rolls 52 - 15/13, 15/10 (95.6%/0.0%/0.0% - Rollout of 2,592 games). This is slightly preferred to 15/8 (-.006) since Red is looking to bring checkers into the final quadrant efficiently and avoid wastage.
Blue rolls 63 - 6/Off,3/Off (97.3%/0.0%/0.0% - ++).
Red rolls 51- 13/12, 10/5 (98.8%/0.0%/0.0% - Rollout of 2,592 games). Red takes two crossovers, which is the preferred play, though the difference is minimal since the game is all but in hand.
Blue rolls 62 - 6/Off,2/Off (99.2%/0.0%/0.0% - ++). The rest of the game is perfunctory as Red gets off the non-existent gammons and eventually resigns.
Red rolls 64 - 12/6, 4/Off (99.3%/0.0%/0.0% - ++).
Blue rolls 53 - 5/Off, 3/Off (99.7%/0.0%/0.0% - ++).
Red rolls 64 - 6/2, 5/Off (100.0%/0.0%/0.0% - ++).
Blue rolls 22 - 5/1, 2/Off (2) (100.0%/0.0%/0.0% - ++).
Red rolls 32 - 3/Off, 2/Off (100.0%/0.0%/0.0% - ++).
Blue rolls 65 - 3/Off (2) (100.0%/0.0%/0.0% - ++).
Red Resigns
Game 4 - O’Hagan 5 Away Woolsey 5 Away
With the match score at 5 Away 5 Away we have adjusted gammon values for both players of 0.7.
Blue rolls 62 - 24/18, 13/11 (50.7%/13.4%/14.1% - Rollout of 46,656 games) Blue opens by splitting with 62.
Red rolls 44 - 24/20 (2), 13/9 (2) (44.1%/5.4%/11.7% - ++). Red responds by anchoring and eliminates the majority of Blue’s gammons. It’s now critical for Blue to either anchor or escape its outfield checker.
Blue rolls 61 - 24/18, 11/10 (43.6%/5.6%/8.8% - ++). Blue anchors and we have a mutual holding game for the moment, with a race that is essentially even (152 for Blue to 151 for Red).
Red rolls 22 - 20/16 (2) (44.8%/3.4%/2.7% - Rollout of 1,296 games). Red has the option to advance its anchor all the way to the 16 point or to move it up to the 18 and make the 4 point in its homeboard. With an advantage in its outfield structure, having made its 9 point, and Blue having an advance anchor its a no brainer for Red to advance to the 16 point. Increase the likelihood of making this holding game one-sided.
Blue rolls 62 -10/4, 6/4 (44.6%/3.4%/2.7% - Rollout of 2,592 games). Straight forward play to make the four point for O’Hagan. It’s relatively close with 13/7, 10/8, but I think we all just make the 4 point and keep moving on. Perhaps, it’s a different story if there are 5 checkers on the 13 point.
Red rolls 42 - 13/9, 6/4 (46.8%/3.5%/2.6% - Rollout of 1,019 games). Woolsey rightly eschews making the 4 points and adds a spare to the 9 point, 13/9, while unstacking his 6 point, 6/4. This is critical to ensure flexibility on subsequent rolls, a trait that is at a premium for both players in positions like these.
Blue rolls 11 - 8/5, 6/5 (43.3%/3.7%/2.6% - Rollout of 2,592 games). This is straight forward in the sense that O’Hagan must make the 5 point, but other than that he is free to set himself up to make more points by slotting the 7 and splitting the 4 to the 3, to make the maximum amount of point by making the 7 point or by keeping a spare on the 6 point. O’Hagan opts to keep the spare on the 6, but it’s not clear even after 2,500+ games rolled out which is preferred.
Red rolls 11 - 16/14 (2) (44.7%/1.4%/1.1% - ++). Woolsey moved his anchor along to make it essentially a second mid-point and gives himself a 7 pip lead after the checker play. For now, the holding game has become one sided.
Blue rolls 44 - 18/10 (2) (58.5%/0.0%/0.0% - Rollout of 2,592 games). That one-sided holding game was short-lived as now there is little contact remaining and the race is on.
Red rolls 44 - 14/10 (2), 9/5 (2) (44.8%/0.0%/0.0% - ++). Woolsey with an excellent response to regain his 7 pip lead (117 for Red to 124 for Blue) .
Blue rolls 51 - 10/5, 8/7 (40.7%/0.0%/0.0% - ++). There are a variety of plays here, all clumped together and O’Hagan chooses to bring a spare checker into the 5 point and then distribute checkers between the 8 & 7.
Red rolls 42 - 8/6, 8/4 (44.6%/0.0%/0.0% - ++). It’s a similar scenario for Red, though our preliminary rollout favors clearing the 13. Regardless, it’s difficult to differentiate between the plays.
Blue rolls 41 - 13/9, 7/6 (38.8%/0.0%/0.0% - ++).
Red rolls 32 - 10/5 (44.5%/0.0%/0.0% - ++).
Blue rolls 53 - 13/5 (44.1%/0.0%/0.0% - Rollout of 5,184 games). There are a whole host of viable plays from this position with this roll, including 13/9 9/6, 10/5 9/6, 13/8 10/7, 9/6 9/3 & 13/10 8/3.
Red rolls 64 - 13/9, 13/7 (40.3%/0.0%/0.0% - Rollout of 2,592 games). Woolsey clears the 13 point and the race is officially on with red having a 9 pip (9.4%) race lead).
Blue rolls 65 - 13/7, 9/4 (45.7%/0.0%/0.0% - Rollout of 4,506 games) The rollout wants O’Hagan to clear the 13 point, 13/8, 13/7, but the difference between the plays is -.002 and it really requires even further rollouts to make any firm determination on a preferred play.
Red rolls 52 - 9/4, 8/6 (47.9%/0.0%/0.0% - Rollout of 10,474 games).
Blue rolls 61 - 13/6 (45.5%/0.0%/0.0% - Rollout of 10,368 games).
Red rolls 54 - 10/5, 9/5 (43.5%/0.0%/0.0% - Rollout of 10,368 games).
Blue rolls 52 - 10/5, 8/6 (40.8%/0.0%/0.0% - ++).
Red rolls 51 - 7/6, 5/Off (45.4%/0.0%/0.0% - ++). Woolsey takes the first checker off, as he still maintains his status as the slight favorite with a 6 pip lead after the roll and neither player having significant wastage.
Blue rolls 22 - 7/3, 4/Off (45.1%/0.0%/0.0% - Rollout of 1,296 games).
Red rolls 32 - 5/Off (52.7%/0.0%/0.0% - Rollout of 10,368 games). This play still was not separated from 6/4, 6/3. Roll it out further to see which is superior.
Blue rolls 43 - 4/Off, 3/Off (50.0%/0.0%/0.0% - ++).
Red rolls 42 - 6/Off (55.3%/0.0%/0.0% - Rollout of 2,592 games).
Blue rolls 33 - 6/Off (2) (65.8%/0.0%/0.0% - ++). O’Hagan rolls the 33 and has a significant advantage.
Red rolls 31 - 4/Off (75.7%/0.0%/0.0% - ++).
Blue Cube Decision:
Blue doubles and Red takes. Not particularly difficult for either play from here.
Blue rolls 43 - 6/3, 4/Off (73.1%/0.0%/0.0% - Rollout of 2,592 games).
Red rolls 31 - 6/5, 6/3 (82.4%/0.0%/0.0% - Rollout of 203,742 games). It took a very, very long rollout to determine that Kit’s play was, in fact, the best play (90%+ confidence), though the difference between it and 4/Off rounds to .000.
Blue rolls 55 - 5/Off (4) (98.1%/0.0%/0.0% - Rollout of 1,296 games). That essentially ends it.
Red rolls 33 - 6/Off (2) (97.3%/0.0%/0.0% - ++)
Blue rolls 42 - 6/Off (96.7%/0.0%/0.0% - ++)
Red rolls 41 - 5/Off (98.7%/0.0%/0.0% - Rollout of 20,736 games). This play is actually third best as Red should set itself for the high doubles that can keep its chances alive.
Blue rolls 61 - 6/Off, 5/4 (98.9%/0.0%/0.0% - ++)
Red rolls 64 - 6/Off, 4/Off (98.8%/0.0%/0.0% - ++)
Blue rolls 44 - 6/Off, 4/Off, 3/Off (100.0%/0.0%/0.0% - ++)
Blue Wins.
Game 5 - O’Hagan 3 Away Woolsey 5 Away
With O’Hagan leading 3 Away 5 Away, there are again adjusted gammon values with O’Hagan (Blue) having 0.5 and Woolsey (Red) having 0.7.
Red rolls 62 - 24/18, 13/11 (49.0%/14.4%/13.2% - Rollout of 46,656 games) Red opens by splitting with 62.
Blue rolls 43 - 24/21, 13/9 (44.1%/11.6%/14.4% - Rollout of 10,368 games). O’Hagan’s play is not separated from the preferred play (24/21, 24/20) by more than .001 after more than 10,000 games rolled out and XG has limited confidence the “double step-up” is correct.
That the play is up for debate makes this very much a “match score” checker play. For money, the play is unequivocally 24/21, 13/9. The double step-up is a play that aims to create a high anchor or to get into a race early on, so it inherently lowers gammons for both players. At regular match scores or when trailing, the double step up isn’t typically the play except in very specific situation. However, when your opponent’s gammons are worth more than yours it can be a fair trade-off to lose a very small fraction of wins to lower both players’ gammons. At the very least, it is a play that is much closer to the preferred play when gammons are elevated for your opponent.
Red rolls 51 - 24/18 (47.1%/9.1%/9.7% - ++) Woolsey anchors.
Blue rolls 55 - 21/6, 9/4 (48.1%/10.2%/11.9% - Rollout of 5,184 games)
O’Hagan rolls 55s and is off to the races, but our rollout shows us that this is, just barely, second best. This is surprising given the match score and the associated gammon values, as well as the race difference after the roll (13 pips). For money, it is clear that the correct play to make the 3 point and slot the 4 point. The issue with the running play is that it leaves a checker behind and Blue with little flexibility against an opponent that is in good position to begin a prime while also owning an anchor that will allow risk taking in pursuit of said prime. The 13 pip lead this early in the game is slightly less than 10%, which just isn’t enough to leave that checker back on the ace point. Paradoxically, in a certain regard, the running play gets more attractive as you move Red’s outfield checker forward (making the race closer). Doing so decreases Red’s priming ability and therefore makes it less dangerous to leave a checker back on the ace point. It also makes it more dangerous to leave the checker on Red’s 4 point, so Blue must bring that piece around the board rather than make its 3 point. The danger comes from either direct contact (moving the outfield checker to the 10 point) or Red’s need to unstack multiple points near its homeboard (moving the outfield checker onto the 8 point).
Regardless, it seems like O’Hagan makes a match score checker player when, just barely, it isn’t warranted.
Red rolls 41 - 11/7, 8/7 (50.6%/8.6%/9.4% - Rollout of 5,184 games)
So, as we mentioned above, Red is free to take some sizeable risks here in attempt to play their preferred game of priming and holding against that loan back checker. Making the 7 point leads, in many, many variations, to a loose hit one one of the next couple rolls as Red has the start of a prime, but Blue is uber-focused on extricating it back checker and those two motivations are going to come to a head quickly. That said, making the 7 point has some nice appeal, one of which is that it creates some uncomfortable rolls for Blue, like 66 and 65. Yet, it’s not enough to overcome the upside of surviving the following roll after making the preferred play.
Blue rolls 22 - 24/22, 13/11 (2), 6/4 (54.5%/9.2%/8.2% - Rollout of 1,248 games)
Blue avoids a full step up to the 20 point (24/20, 6/4 (2)) in favor of making the 11 point. Stepping up to the 20 point in any fashion is inadvisable since it puts Blue’s lone back checker directly on the point Red most wants to make. Red is much happier to lose either their 7 or eight point to make the 5 point then they are the 3 point and they are certainly happier to hit loose from any point when they are hitting on the 5 as compared to the 3. With that in mind, O’Hagan makes the only realistic play available (and the best play).
Red rolls 41 - 13/8 (58.8%/6.5%/5.3% - ++)
Blue rolls 21 - 6/5, 6/4 (53.1%/7.2%/7.5% - ++) A second straight roll that results in a passive play as both players set up for some action, whether it come in the form of an attack from Red or an escape by Blue.
Red rolls 43 - 7/3*, 6/3 (51.9%/8.5%/9.0% - ++) And there is the attack:
Blue rolls 42 - Bar/21, 8/6 (48.3%/9.5%/11.7% - ++) Blue enters with ease and adds a spare onto its 6 point. They will hope to survive the next roll, which will likely include an attack from Red, and then complete their escape.
Red rolls 41 - 8/4*, 4/3 (52.4%/9.9%/9.3% - ++) Red picks and passes.
Blue rolls 62 - Bar/23, 11/5 (50.8%/12.4%/9.9% - ++) Blue enters on a low point and makes its 5 point leaving a blot in its outfield
Red rolls 52 - 6/1, 3/1 (59.0%/17.0%/7.6% - ++) An unfortunate roll for Woolsey and he can neither point on Blue’s blot or make a point in front of Blue’s blot. Making the ace is clear as priming (13/8, 7/5) is not a particularly strong option (-.045) with the 3 point already made. The plan for Red is to hope to survive a roll and attack with 3 inner board points.
Blue rolls 65 - 23/18*, 11/5 (71.3%/26.7%/5.9% - ++) O’Hagan scuttles those plans with an excellent roll and his winning chances and gammons soar. In fact, the vast majority of the wins (+12.3%) he ads from this roll are gammons (+9.7%).
Red rolls 31 - Bar/22, 8/7* (69.0%/29.6%/6.9% - ++) An OK response for Red, though it leaves Woolsey in the unenviable position of having to come in on the 22 in order to break his 8 point and hit. There are quite a few blots for Red.
Blue Cube Decision (No Double. Double/Take is -.014 Error after 2,592 game Rollout) O’Hagan is on the verge of a good Double despite the match score. He’s correct to hold off, but we should note that this is a Double/Pass for Money. With so many blots for Red, Blue still has roughly 30% gammons and Red’s gammons are relatively low because of its board and lack of ammunition to sustain a blitz. Those two factors combine to almost negate the effect of the gammon value differential. It is very worthwhile to take account of the fact that Blue had roughly 30% gammons with Red on the bar and a 3 point board and it has roughly 30% gammons while one the bar itself because of its checker distribution and Red’s blots.

Blue rolls 54 - Bar/16 (69.5%/22.5%/6.1% - ++) O’Hagan does not get to attack any of the blots and plays quietly into the outfield. Gammons drop precipitously.
Red rolls 33 - 13/4, 7/4 (70.4%/21.0%/5.1% - ++) Woolsey misses Blue’s blot, but makes his 4 point.
Blue Cube Decision (Double/Take. No Double is -.036 Error after 5,184 game Rollout) O’Hagan has yet another decision, but this time he choose wrong by holding onto the cube. If we experiment with this position, we find that both Blue’s blot in the outfield and its beautiful and threatening distribution of spares are critical components. Keep the distribution and safety the spare and this is an obvious cube. Safety the checker, but damage the distribution? Still a slight double. Damage the distribution and keep the checker semi-escaped and you don’t have a double. Essentially, what we find from looking at this position is that a full distribution of checkers ready to attack a singular blot in the back is enough to out weight the variability caused by having only semi-escaped a checker. You can take it further and see that, given the race, safety-ing both Red’s and Blue’s blots will get you a holding game double. Since gammons are quite low in holding games there isn’t much of an adjustment to make.
Blue rolls 42 - 6/2, 4/2 (64.2%/22.5%/8.1% - ++) O’Hagan is unable to safety his back checker and, instead, uses the roll to make an additional inner-board point. This is far superior to running the back checker along, though that may seem tempting to some. You must consider the consequences of a back and forth hitting sequence. From where it is, Blue’s blot must be hit by breaking a stripped point (except with doubles), so if Red hits there will likely be hitting opportunities. Shouldn’t Blue strengthen its board in case that occurs? Still, this roll isn’t desirable for O’Hagan as he is now less than a 65% favorite.
Red rolls 62 - 22/16, 8/6 (71.4%/15.2%/3.8% - ++) Woolsey fails to hit Blue and is forced to step out from the threat of Blue’s spares and into the outfield. O’Hagan’s winning chances rise while his gammons drop.
Blue Cube Decision (Double/Take. No Double is -.122 Blunder after 5,184 game Rollout) O’Hagan, for the 3rd straight roll is faced with a cube decision, and for the third straight roll he holds onto his cube. We are confronted with a similar theme as the one before in which the threat to Red seems to outweigh the semi-escaped checker Blue is still trying to bring to safety. It is useful look at a variety of positions that are on the verge of turning into a holding game, but which still hold the extra gammons associated with there being blots to attack. This is already a bit too long for us to go into a variety of positions, but the theme does seem to hold and might be a variety worth revisiting at a later point.

Blue rolls 32 - 16/13, 5/3 (68.1%/2.1%/1.4% - ++) Blue reaches safety and does not hit. Most of the gammons are gone and we are into a fairly tradition holding game.
Red rolls 62 - 16/8 (68.5%/2.1%/1.4% - ++) Woolsey crosses-over his own blot to safety and the holding game is on.
Blue rolls 21 - 6/3 (64.8%/1.9%/1.1% - ++) This really isn’t much of a cube decision for O’Hagan because his flexibility is dwindling. He rolls on and throws a 21, making his 3 point.
Red rolls 63 - 13/10, 13/7 (65.0%/1.3%/1.9% - ++)
Blue rolls 66 - 8/2 (2) (64.6%/0.9%/1.1% - ++) Forced.
Red rolls 42 - 7/5, 6/2 (65.0%/0.9%/1.2% - ++) Woolsey slots both of his empty innerboard points.
Blue rolls 62 - 13/5 (61.4%/1.2%/1.5% - ++) Forced.
Red rolls 63 - 10/4, 8/5 (62.3%/1.2%/1.4% - Rollout of 5,184 game)
Woolsey makes his 5 point and the 6 is forced. The play is actually a -.024 Error since the primary consideration for Red is maintaining its 18 point anchor for as long as possible. The preferred play is to make the 2 point and play 10/7 with the 3, which leaves Red capable of playing every 6 without breaking the 18 point, though it does make it much less likely that Woolsey will make the 5 point.
Blue rolls 41- 5/1, 2/1 (67.0%/1.1%/0.6% - ++)
Red rolls 62 - 18/10 (80.9%/2.5%/0.3% - ++) Forced and not a great roll for Red.
Blue Doubles (81.3%/2.3%/0.2% - ++ after Double/Take). Clear double for Blue. If O’Hagan hits his wins go way up and if he misses he won’t need to give a shot and will still have a race lead (70 pips to 78 pips before the roll).
Red Cube Decision
The score is 3 Away 5 Away with Red trailing, which is probably the only reason this would be considered. It is still a pass and a blunder (+.200) to take, but the match score can certainly seduce lots of us into a take here. Let’s consider the best case scenario, though: Blue misses and is forced to break its 6 point. Red then rolls and turns this into a race where they possess the cube. That’s not awful, but Red trails here by more than 10% prior to Blue’s roll, so not only are all the 6s (11 rolls plus 6 combination rolls) that hit devastating, but so are 55 and 44. That makes for 19 devastating rolls, but none of the other 17 are that bad, since they are either small rolls that don’t gain much ground in a race Blue already leads or they are larger rolls that create some wastage. Yet, the temptation is to take the cube since, if Red can get into a race, the recube is so powerful. In the end, Woolsey took the cube and the two Giants played on.
Blue rolls 21 - 6/3 (61.3%/0.3%/1.2% - Rollout of 5,184 game) So, after all that “ink” spilled about how Blue could avoid breaking the 13 point with any roll and that there really weren’t any particularly bad rolls, O’Hagan throws his worst possible combination. Additionally, playing 6/3 is a slight misplay (-.024). The primary reason is that there are some rolls for Red that don’t clear and then Blue will be left with opportunities to hit and safety the blot on their 6 point. The downside of this is that it leaves a checker on the mid-point and a blot in the outfield for Blue after the hit and safety play. As a result, Red can enter and hit or at least enter and be a thorn in Blue’s side as it tries to come home.
Red rolls 66 - 10/4 (68.8%/0.7%/1.8% - ++) Forced.
Blue rolls 22 - 13/7*, 6/4 (82.8%/1.2%/1.4% - ++) Blue hits and the downside of the 21 play is immediately apparent.
Red rolls 62 - Bar/19, 4/2 (76.7%/0.3%/0.9% - ++) Red enters, but doesn’t hit and Blue now has a few variations where it is difficult to come home. Still, O’Hagan is the heavy favorite.
Blue rolls 65 - 13/2 (59.9%/0.0%/0.8%- ++) Only two options for this weak roll, but this is obviously the better of the two.
A shot if left and Woolsey will roll, essentially, to win the game.
Red rolls 31 - 19/18*, 4/1 (4.6%/0.0%/2.5% - Rollout of 5,184 game) Woolsey rolls 31 and hits with the ace. He then has to make the decision between playing 18/15, 4/1 and 6/3. 4/1 avoids any immediate rolls that would create a forced shot, but it makes for an unattractive distribution later on. 18/15 does leave 66 as a roll that leaves a shot, but it that is the only one and the distribution is much stronger. There is very little difference between the two plays.
Blue cannot Move
Red rolls 42 - 18/14, 6/4 (4.3%/0.0%/2.2% - ++)
Blue cannot Move
Red rolls 21 - 14/12, 4/3 (4.8%/0.0%/2.2% - ++)
Blue cannot Move
Red rolls 41 - 12/8, 3/2 (8.4%/0.0%/2.0% - ++) Red fails to bring their checker from the 12 point in to the homeboard and is left with an undesirable distribution of checker for their next roll. With very few gammons available, Woolsey will likely end the game rather than play-on.
Blue cannot Move
Red Redoubles. Blue Passes.
Game 6 - O’Hagan 3 Away Woolsey 3 Away
Both players are 3 Away, which leaves them with gammon worth .5 and a take point of 25%.
Red rolls 43 - 13/10, 13/0 (50.2%/14.4%/15.9% - Rollout of 46,656 games) Woolsey opens by bringing two down from the bar.
Blue rolls 53 - 24/16* (53.7%/14.8%/12.9% - ++) O’Hagan hits.
Red rolls 32 - Bar/23, 13/10 (55.5%/15.0%/12.2% - ++) Red enters and makes an outfield point.
Blue rolls 33 - 16/10, 13/10 (2) (57.9%/16.8%/11.2% - Rollout of 2,592 games) O’Hagan’s double 3s further his early advantage, but his misplay brings up an opportunity to wonder about a potential rule of thumb:
In looking at this, there is an urge to classify these types of plays where you opt to leaves a shot when there is an opportunity to protect the blot in some manner because you’d rather make a productive play elsewhere, particularly when that productive play elsewhere is an innerboard point. I add that last caveat because there is often a significant difference between the reasons one might make an anchor, while leaving a blot and the reasons one might decide make a more offensive play while leaving a blot. Here’s an example which comes from after Blue escapes early on using a 65, Red responds with 55 blitz and, after Blue enters from the Bar, Red decided to make an anchor rather than continue their blitz (21-65-55-42-65-31):
Playing 13/9 is a -.056 error (after a 1,296 game rollout), as Blue would much rather make the 5 point despite still being susceptible to a blitz from Red. Without going through position after position, I’ll suggest that the critical factor in these types of plays are stripped points for, in this case, Red. In both positions, the one from the O’Hagan-Woolsey match and the example above, Red has stripped points in front of which Blue is leaving the blot, while making the more offensive (productive) play. If you go to the position above and add a spare to Red’s 18 point, 13/9 becomes the clear preferred play. This is worth more examination, but it may well be a good rule of thumb.
Red rolls 65 - 24/18,m23/18 (55.9%/13.1%/9.5% - ++) Red anchors and O’Hagan’s advantage takes a hit, while both players’ gammons drop.
Blue rolls 32 - 24/22, 13/10 (52.5%/13.0%/13.0% - Rollout of 1,557 games)
O’Hagan brings a checker down and steps up in the back, which is a slight error. This is really about optimizing gameplan. It’s easy to see when we know the pip count and can sit and think about it for an unlimited amount of time and not quite as easy to make the decision when a clock is running in the 6th game of a tightly contested match. Stepping up plays into Woolsey’s gameplan. Blue leads 142 pips to 160 pips after the roll, if they don’t hit, so stepping up plays into Red’s plan which will have to be to attack or prime that lone back checker when given the chance. Blue, on the other hand, wants to escape the back checker and then play against a holding game without Red’s ace point “goalkeeper”. That’s why 6/1* has such high appeal in this scenario. This, along with the 63 from Game 3 where the tempo hit off the ace was 2nd best, would make a good basis for an examination of ace point hits.
Red rolls 64 - 10/4, 8/4 (55.3%/12.4%/11.5% - Rollout of 1,159 games) Woolsey opts to make the 4 point, though the 2 point is slightly preferred, seemingly because Red’s gameplan is shifting to an attacking gameplan and making the 2 doesn’t expose a checker.
Blue rolls 31 - 8/5 ,6/5 (54.2%/10.1%/10.1% - ++) O’Hagan makes the 5 point.
Red rolls 41 - 13/9, 10/9 (57.2%/13.4%/9.6% - ++) Woolsey comes down from the mid-point to make the nine point, blocking 6s as an exiting number for O’Hagan’s back checker. That’s the good part. However, Red has to expose a new blot on its mid-point, which is reflected in the increased wins and gammons for Blue, despite the improved prime.
Blue rolls 52 -22/15 (55.6%/7.8%/8.4% - ++) O’Hagan fails to hit, but makes a run for it from the back.
Red rolls 42- 13/7 (62.5%/8.8%/5.6% - Rollout of 5,184 games) Woolsey misses and brings his own blot into the Bar point. As a result, the game is start to take the shape of a holding game for Red with a goalkeeper. Blue leads 131 pips to 145 pips after Red’s roll.
Blue rolls 65 -15/9, 10/5 (61.6%/11.1%/7.2% - ++) The back and forth continues as O’Hagan moves forward but must leave a shot while doing so.
Red rolls 61 -9/3, 6/5 (65.7%/9.9%/4.9% - ++) Woolsey misses, so he slots two points.
Blue rolls 43 -13/10, 13/9 (68.4%/7.6%/3.3% - ++) O’Hagan might have momentarily considered a cube prior to this roll, but the blot and awkward distribution combine with the Red’s goalkeeper to make this a pretty clear No Double. Once the dice are rolled, O’Hagan makes the obvious play, brining two checkers down from the mid-point and covering his blot in the process. Blue leads 113 to 132 pips after the roll.
Red rolls 42 - 8/4, 7/5 (71.8%/8.5%/2.9% - ++) Woolsey strengthen his board with this roll by making the 5 point.
Blue Cube Decision (Double/Take. No Double is -.112 Blunder after 2,592 game Rollout)
O’Hagan has an opportunity to Double here. He has an 11.5% lead and 8 rolls that expose a blot. That may seem like quite a few, but each of those eight rolls is productive in its own right and Red has some issues with its own board that it may or may not be able to tend to while hitting Blue on the following roll. That makes for a good deal of market losers for O’Hagan.
O’Hagan holds onto the cube.
Blue rolls 66 -10/4 (2), 9/3 (2) (86.1%/10.3%/1.0% - ++) O’Hagan throws one of those market losers and makes two new inner board points.
Red rolls 64 - 24/14 (89.6%/0.9%/0.2% - ++)
Blue Doubles. Red Passes.
Game 7 - O’Hagan 2 Away Woolsey 3 Away
O’Hagan is 2 Away, so his uncubed gammons are worth 1.0, but any double will wipe out the value of his gammons.
Red rolls 43 - 13/10, 13/9 (50.2%/14.4%/15.9% - Rollout of 46,656 games) Woolsey again opens by bringing two down from the bar.
Blue rolls 54 - 24/15* (54.0%/15.5%/13.0% - ++) O’Hagan, for the 2nd consecutive game, counters Woolsey’s opening by hitting one of the two checkers he brought down from the mid-point.
Red rolls 31 - Bar/24, 13/10* (53.3%/15.8%/13.8% - ++) Woolsey enters from the Bar and hits right back.
Blue rolls 43 - Bar/21, 24/21 (55.1%/15.4%/10.3% - ++) O’Hagan anchors and Blue will wait and see if Red can clean up its blots.
Red rolls 11 - 24/23, 10/9, 6/5 (2) (46.5%/11.6%/10.9% - ++) Woolsey throws an excellent roll. He manages to split his back checkers, make the 5 point and make the 9 point, all of which leaves zero blots in his outfield. The strength of the roll is reflected in the change in winning odds, which, all of a sudden, favor Red.
Blue rolls 66 - 21/15 (2), 13/7 (2) (63.5%/17.5%/9.2% - Rollout of 2,592) O’Hagan turns the tables with an excellent roll of his own. There may be a temptation to keep the running play going by playing 21/9 (2), but O’Hagan does the right thing which is to make the 7 point after playing 21/15 (2). Owning the bar is extremely helpful when bearing in, so it would be a significant mistake to pass up the chance to make simply to clear the 15 point. This is particularly true because the worst case scenario for that 15 point, isn’t so bad. It simply becomes a 2nd mid-point and the 13 point is cleared first.
Red rolls 33 - 24/21 (2), 9/3 (63.5%/16.4%/9.5% - Rollout of 10,368) Woolsey makes his own anchor and then slots the 3 point. However, the preferred play is to split in the back with one checker and then either make the 3 point (24/21, 9/3, 6/3) or step another checker up, slot the 3 and bring a spare onto the 5 point (24/21, 23/20, 8/5, 6/3). These are tricky plays, but the flag to avoid the anchor is typically a lax of flexibility in your opponent, as Blue currently has.
Blue rolls 54 - 13/8, 6/2* (58.8%/13.3%/11.4% - Rollout of 5,184) O’Hagan’s play here is -.059 error as he should simply clear the 15 point. This is a concept I get into a bit in Match Analysis #6, but it essentially has to do with why hitting off the 2 point is so different than hitting off the ace point. Having a goalkeeper on the deuce point is not nearly as effective as having it on the ace, since your opponent can play behind you. Further, hitting that checker brings forth the possibility that your opponent can either hit or enter on the ace, both of which strengthen their position. So, in this instance, O’Hagan should take the opportunity to clear the 15 while volunteering a direct shot, while Red’s board is relatively weak.
Red rolls 63 - Bar/22, 9/3 (63.9%/9.9%/7.5% - ++) Woolsey enters and makes the 3 point and O’Hagan has gotten what he wanted out of hitting the checker on the deuce, as Woolsey’s game is weaker for sure.
Blue rolls 22 - 15/13 (2), 7/5 (2) (72.4%/8.5%/2.6% - Rollout of 1,296 games) Blue has two excellent options here and chooses to clear the 15 point and make the 5 point. The preferred play after the roll out is to make the 11 point.
Red rolls 52 - 8/3, 6/4 (72.8%/15.5%/2.8% - Rollout of 2,592 games)
Blue Cube Decision (Double/Take. No Double is -.009 Error after 3,325 game Rollout)
This is the slightest of Doubles for O’Hagan and a tricky one to pull the trigger on given the match score. It’s further evidence that holding games are generally only mildly impacted by match score because of their low gammons.
Blue rolls 66 - 13/7 (4) (88.4%/6.3%/0.5% - ++) That’s certainly a market loser.
Red rolls 43 - 13/10, 8/4 (86.7%/8.9%/0.7% - ++) Woolsey makes his 4 point and draws a checker down from his mid-point.
Blue rolls 51 - 8/3*, 3/2 (88.4%/6.3%/0.5% - Rollout of 5,184 games) The same concept arises here for O’Hagan as he picks and passes. We are all tempted to hit as the idea that we might win a gammon and the match is appealing. However, the chance that Red may come back in on the ace and strengthen their position is not worth the reward in this situation. The preferred play is 61, 2/1 and the 2nd best is 7/2, 6/5, though they are all closely bundled because Blue can end the game with the cube.
Red rolls 31 - Bar/21 (90.1%/5.1%/0.3% - Rollout of 2,592 games) Woolsey enter on the ace and immediately steps up to the 21 point, which is the 4th best play and -.008 error. If Blue is going to play on, Red should enter on the ace to give them more problematic sequences. It may add slightly more gammons, but it is more likely to lead to Blue either ending the game or getting punished for playing on.
Blue rolls 41 - 8/3 (90.0%/4.5%/0.4% - ++)
Red rolls 62 - 21/15, 8/6 (90.5%/3.6%/0.3% - ++)
Blue rolls 52 - 8/6, 8/3 (91.2%/3.3%/0.3% - ++)
Red rolls 42 - 13/11, 10/6 (91.4%/3.4%/0.3% - ++)
Blue rolls 44 - 7/3 (4) (93.1%/4.6%/0.0% - ++)
Red rolls 66 - 21/9 (2) (97.6%/0.0%/0.0% - ++)
Blue Doubles. Red Passes.
Game 8 - O’Hagan 1 Away Woolsey 3 Away - Crawford
O’Hagan and Woolsey will play a Crawford game and see if O’Hagan can finish it off in a cubeless game.
Blue rolls 63 - 24/18, 13/10 (50.3%/15.4%/14.5% - Rollout of 15,552 games) O’Hagan starts with the split, though it’s nearly indistinguishable from 24/15.
Red rolls 51 - 13/7* (51.6%/17.4%/14.1% - Rollout of 525 games). Wolsey passes on the double hit, though its close.
Blue rolls 64 - Bar/21, 24/18* (54.3%/15.7%/11.8% - ++) O’Hagan enters and hits.
Red rolls 22 - Bar/23, 24/22, 6/4* (2) (46.4%/14.0%/18.2% - Rollout of 1,296 games). Woolsey responds by entering and pointing on O’Hagan, while also splitting. This is slightly preferred (-.014) to retaining the ace point and stepping up to the 4 point.
Blue rolls 64 - Cannot Move (36.3%/8.3%/25.0% - ++)
Red rolls 51 - 23/18, 8/7* (38.3%/9.5%/22.0% - ++). Woolsey puts a second checker on the bar while stepping a checker out to the 18 point.
Blue rolls 66 - Cannot Move (30.0%/6.1%/29.4% - ++)
Red rolls 11 - 22/21, 7/5, 6/5 (28.0%/6.0%/33.8% - Rollout of 1,296 games). O’Hagan’s wins are dwindling as Woolsey’s gammons soar.
Blue rolls 65 - Cannot Move (23.2%/3.7%/35.8% - ++)
Red rolls 32 - 18/15*, 13/11 (24.0%/3.9%/36.1% - ++). Woolsey puts a 3rd checker on the bar.
Blue rolls 65 - Cannot Move (20.5%/2.9%/42.4% - ++)
Red rolls 65 - 15/10, 13/7 (20.5%/2.9%/45.1% - ++)
Blue rolls 65 - Cannot Move (17.8%/2.2%/53.9% - ++)
Red rolls 61 - 13/7, 10/9 (18.3%/2.4%/52.9% - ++) Woolsey is closing in with plenty of checkers in the zone and a substantial prime. He actually has 3.8% backgammons after the roll.
Blue rolls 33 - Bar/22 (3), 13/10 (21.5%/2.9%/37.7% - Rollout of 1,296 games) O’Hagan throws a miracle roll, bringing in all 3 checkers from the Bar. Unfortunately, he misplays the last 3, playing 13/10, rather than 6/3. The extra shots plus the opportunity cost of not unstacking the 6 point make O’Hagan’s play a -.042 mistake.
Red rolls 62 - 21/15*, 11/9 (17.7%/1.6%/36.5% - ++) Woolsey hits and creates a 6 prime. The wins for O’Hagan are now back to where they were prior to his 33s, though Red’s gammons and backgammons have dropped significantly.
Blue rolls 54 - Cannot Move (17.6%/1.3%/33.7% - ++)
Red rolls 31 - 24/20 (17.9%/1.6%/35.8% - ++)
Blue rolls 65 - Cannot Move (17.6%/1.2%/35.1% - ++)
Red rolls 55 - 20/10, 15/10, 13/8 (17.8%/1.3%/44.0% - ++) Woolsey brings everything around while maintaining the 6 prime.
Blue rolls 43 - Bar/22, 13/9 (14.4%/0.8%/32.0% - ++) Blue finally enters and plays 13/9 to finish the play.
Red rolls 54 - 10/6, 10/5 (15.0%/0.5%/42.5% - Rollout of 1,296 games). Woolsey clears the 10 point, but the preferred plays is to clear the 9 point. There is just very little point to maintaining the prime for an extra roll and much to be gained from avoiding some especially terrible rolls down the road if the 6 prime gets stripped somehow.
Blue rolls 33 - 8/5 (2), 6/3 (2) (14.9%/0.8%/29.4% - ++) Blue gets an insta-board.
Red rolls 41 - 9/8, 9/5 (14.2%/0.6%/34.9% - Rollout of 1,296 games). Woolsey clears the 9 point.

Blue rolls 62 - 22/16, 6/4 (13.9%/0.6%/25.4% - ++) Blue escapes a checker and slots the 4 point.
Red rolls 61 - 8/7, 8/2 (13.9%/0.5%/24.2% - ++) Red moves two spares from the 8 point forward.
Blue rolls 42 - 9/7, 8/4 (13.8%/0.5%/26.2% - ++) O’Hagan makes his four point and slots the back of the prime, as his board begins to take shape.
Red rolls 65 - 7/1, 6/1 (16.9%/0.8%/27.2% - ++) Red uses its remaining spares on the 7 on 6 points.
Blue rolls 21 - 16/14, 13/12 (17.0%/0.9%/32.1% - ++) O’Hagan spreads out some checkers in preparation of making the back of the prime.
Red rolls 32 - 8/6, 8/5 (14.0%/0.4%/32.9% - ++) Red clears the 8 point.
Blue rolls 43 - 14/7 (13.8%/0.4%/32.9% - ++) Blue makes a 5 prime. A rollout might show that slotting the 8 point is stronger, but I’ll leave that for another day. It’s worth looking at, so I’ll drop the position below.
Red rolls 62 - 7/5, 7/1 (11.5%/0.0%/38.6% - ++) Red clears the 7 point.
Blue rolls 52 - 22/15 (11.4%/0.0%/37.2% - ++) Blue escapes a checker from the back, though this is pretty far down the distribution at ++ and it deserves a rollout.
Red rolls 64 - 6/Off, 5/1 (14.0%/0.0%/40.2% - ++)
Blue rolls 51 - 15/14, 13/8 (14.0%/0.0%/44.1% - ++)
Red rolls 64 - 6/2, 6/Off (12.9%/0.0%/52.0% - ++)
Blue rolls 32 - 14/9 (12.9%/0.0%/55.5% - ++)
Red rolls 52 - 5/Off, 2/Off (9.2%/0.0%/61.4% - ++) The situation is looking particularly dire for O’Hagan as his wins tick down and Woolsey’s gammons creep up.
Blue rolls 54 - 9/5, 7/2 (9.1%/0.0%/59.4% - ++)
Red rolls 63- 5/2, 5/Off (7.6%/0.0%/61.7% - ++)
Blue rolls 42 - 8/2 (7.7%/0.0%/67.3% - ++)
Red rolls 62- 5/Off, 2/Off (27.3%/0.0%/49.0% - ++) The door has cracked open for O’Hagan as Woolsey gives a shot.
Blue rolls 52 - 8/2 (75.5%/0.0%/2.1% - Rollout of 2,592 games) O’Hagan hits and makes the prime. The tables have turned
Red rolls 65- Cannot Move (74.8%/0.0%/1.9% - ++)
Blue rolls 52 - 20/13 (73.5%/0.0%/1.8% - ++) O’Hagan begins making his way around the board.
Red rolls 64- Cannot Move (73.5%/0.0%/2.0% - ++)
Blue rolls 41- 13/13, 5/1 (75.4%/0.0%/1.1% - ++) O’Hagan slots the ace, giving him the ability to, potentially, get hit and hit the remaining Red blot.
Red rolls 54- Cannot Move (73.5%/0.0%/1.3% - ++)
Blue rolls 53 - 12/4 (73.1%/0.0%/1.2% - ++)
Red rolls 61- Bar/24* (80.4%/0.0%/1.4% - ++) Woolsey gives O’Hagan a chance to send a second checker back.
Blue rolls 55 - Bar/5 (71.2%/0.0%/1.6% - ++) O’Hagan fails to take advantage
Red rolls 55 - Cannot Move (70.5%/0.0%/2.1% - ++)
Blue rolls 63 - 22/16, 4/1* (71.5%/0.0%/1.3% - ++) O’Hagan hits on the ace with Woolsey’s blot still hanging back in his homeboard.
Red rolls 43 - Cannot Move (68.7%/0.0%/1.2% - ++)
Blue rolls 61 - 16/9 (69.5%/0.0%/1.5% - Rollout of 2,592 games)
Red rolls 54 - Cannot Move (65.5%/0.0%/0.7% - ++) Failing to enter is bringing Woolsey closer to victory, even though he’s still the underdog.
Blue rolls 43 - 92 (65.6%/0.0%/0.8% - Rollout of 1,296 games) O’Hagan still resists covering, though the correct play is to break the 7 point. O’Hagan wants as many cracks at that 2nd checker as he can possibly get with Woolsey have 7 checkers off the board. Here’s the preferred play:
Red rolls 22 - Cannot Move (60.9%/0.0%/0.5% - ++) Woolsey, through veteran ability to not roll aces, has this game down to a 60/40 split. Also….luck, both good and bad. If you can’t tell, I’m quite tired.
Blue rolls 52 - 7/5, 7/2 (57.1%/0.0%/0.9% - Rollout of 2,592 games) O’Hagan clears the ace point, but, again, should leave a checker on the 7 point. He isn’t concerned with avoiding gammons, only winning the game.
Red rolls 51 - Bar/24* (64.1%/0.0%/3.4% - ++) That entry was worth 7% wins to O’Hagan.
Blue rolls 61 - Bar/19, 2/1* (64.6%/0.0%/2.8% - ++)
Red rolls 62 - Cannot Move (63.7%/0.0%/1.8% - ++)
Blue rolls 65 - 19/8 (61.9%/0.0%/1.4% - ++)
Red rolls 65 - Cannot Move (60.9%/0.0%/0.2% - ++)
Blue rolls 51 - 8/3, 2/1 (61.3%/0.0%/0.0% - Rollout of 5,184 games) O’Hagan decides to end the game of cat and mouse by closing out his board. It is a .009 error upon a rollout, but an understandable decision. 8/3, 5/4 is the preferred play. Here is O’Hagan’s play:
Red rolls 41 - Cannot Move (61.3%/0.0%/0.0% - ++)
Blue rolls 51 - 5/4, 5/Off (65.5%/0.0%/0.0% - Rollout of 5,184 games) O’Hagan may have been tempted to attempt a trap play by taking two off, but it would have been wrong by .011.
Red rolls 31 - Cannot Move (65.4%/0.0%/0.0% - ++)
Blue rolls 52 - 5/3, 5/Off (54.1%/0.0%/0.0% - Rollout of 5,184 games) O’Hagan is struck by a weak roll and decides to clear the 5 point. Interestingly, while the trap play was incorrect on the previous roll, the roll out is calling for it here. This is something that would take far more examination than I currently have the bandwith to come to a settled conclusion. I would guess that this comes down to opening a hole for Red to enter up high at this juncture is actual better for Blue with a checker slotted in it. The way O’Hagan played, he has no recourse of Woolsey throws a 5.
Red rolls 31 - Cannot Move (65.0%/0.0%/0.0% - ++)
Blue rolls 21 - Cannot Move (64.7%/0.0%/0.0% - ++)
Red rolls 42 - Cannot Move (74.7%/0.0%/0.0% - ++) Woolsey can’t buy an entry now that he needs it and it’s beginning to cost him.
Blue rolls 42 - 4/Off, 3/1 (75.1%/0.0%/0.0% - ++)
Red rolls 64 - Cannot Move (82.2%/0.0%/0.0% - ++)
Blue rolls 33 - 6/Off (2) (93.4%/0.0%/0.0% - ++) O’Hagan essentially finishes the match with that roll.
Red rolls 54 - Bar/16 (94.1%/0.0%/0.0% - ++) Woolsey enters but it’s too little and too late.
Blue rolls 52 - 4/Off, 2/Off (93.3%/0.0%/0.0% - ++)
Red rolls 61 - 16/10, 4/3 (97.5%/0.0%/0.0% - Rollout of 5,184 games)
Blue rolls 42 - 4/Off, 2/Off (97.0%/0.0%/0.0% - Rollout of 5,184 games)
Red rolls 42 - 10/6, 2/Off (98.7%/0.0%/0.0% - Rollout of 5,184 games)
Blue rolls 53 - 3/Off (2) (98.6%/0.0%/0.0% - Rollout of 5,184 games)
Red rolls 31 - Woolsey Resigns a Single Game. O’Hagan Wins the Match.
Summary
There was a ton discussed while writing up this match. First, it was a joy to do because these guys are such excellent players and the types of plays that come up are usually so nuanced that you have the opportunity to learn quite a bit.
In regards to easily categorizable subjects:
Not slotting with split checkers
Unsplit Doubles
Assessing Blots role within Your Gameplan
Hitting Off the Deuce Point
Making a Point while Leaving a Blot
Running Early to Take Advantage of Middle Doubles
There are others but they come up as we go over specific plays.
Anyways, this was fun.
-Clem
Senkiewicz, Slot that Checker: A Basic Guide to Slotting, Backgammon Times, Volume 2, Number 4, 1982, https://bkgm.com/articles/Senkiewicz/TakingRisks-SlotThatChecker/