The Rule of Four (Not that One)
When it Works and When it Doesn't

Man, does this “Rule of Four” confuse me…. not the “Rule of Four” that helps many of us navigate holding games at a very basic level (see Phil Simborg’s video for a explainer), but the “Rule of Four” that helps navigate situations in which we are on the Bar and our opponent is bearing off. Honestly, I’m not even sure if this is a thing or if I’ve just confused it in my head. Regardless, let’s walk though some positions to get a feel for these bear off positions.
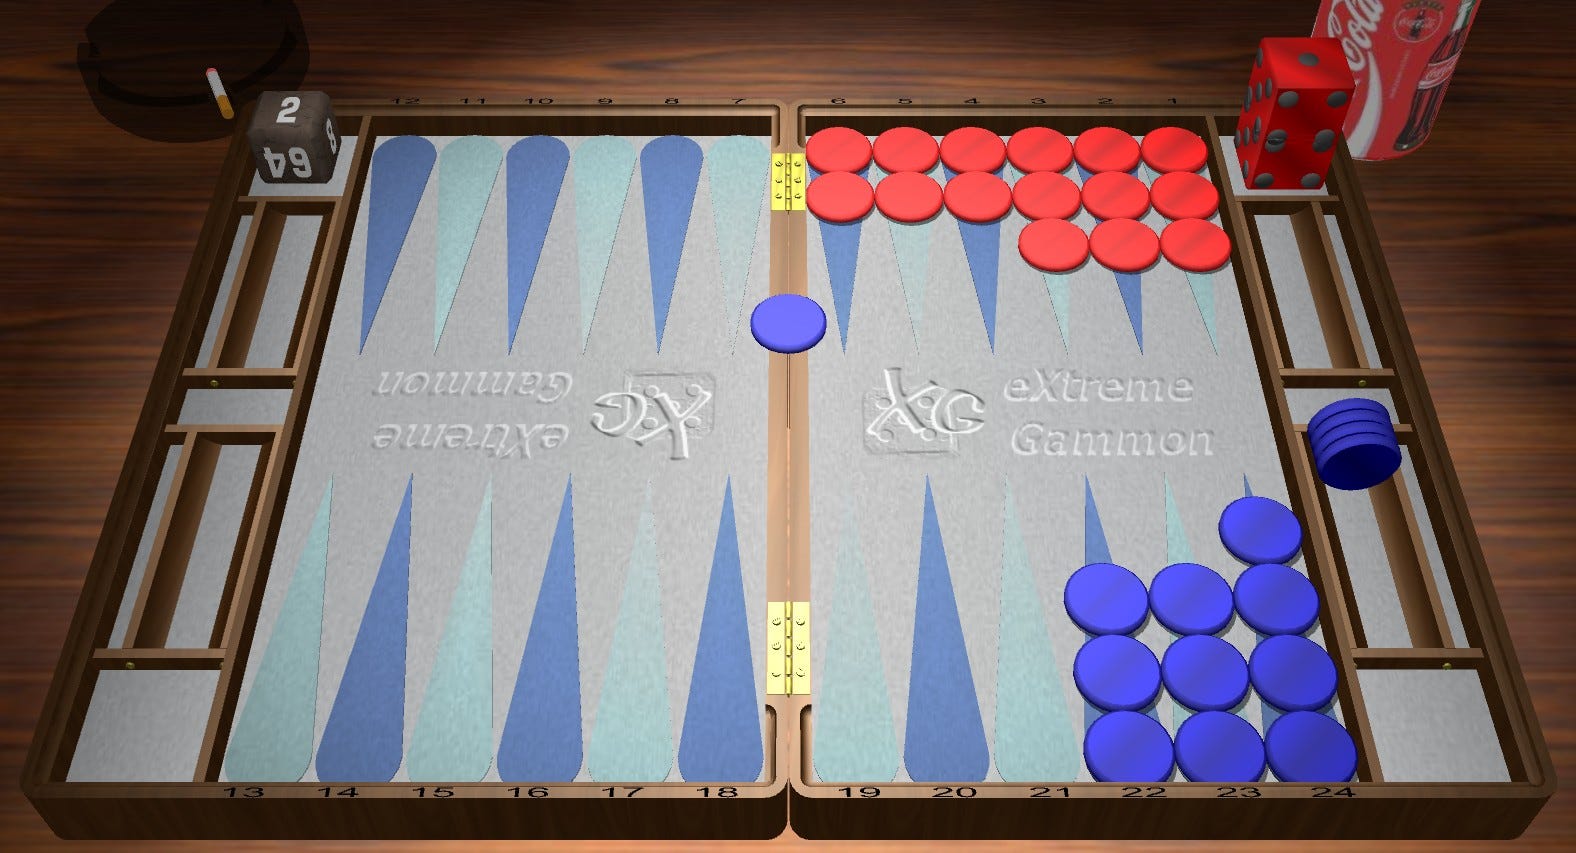
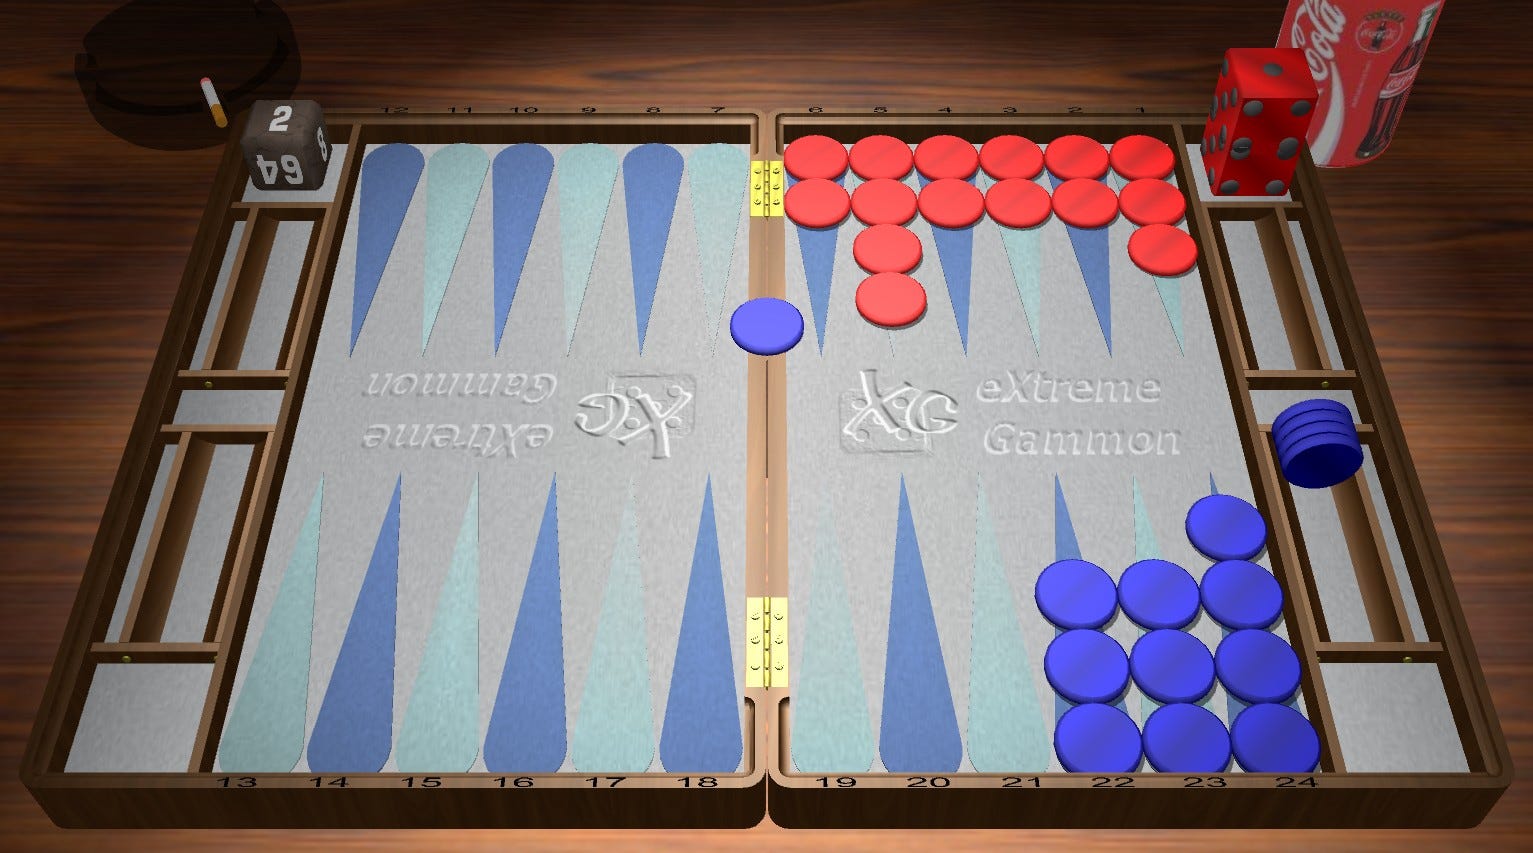
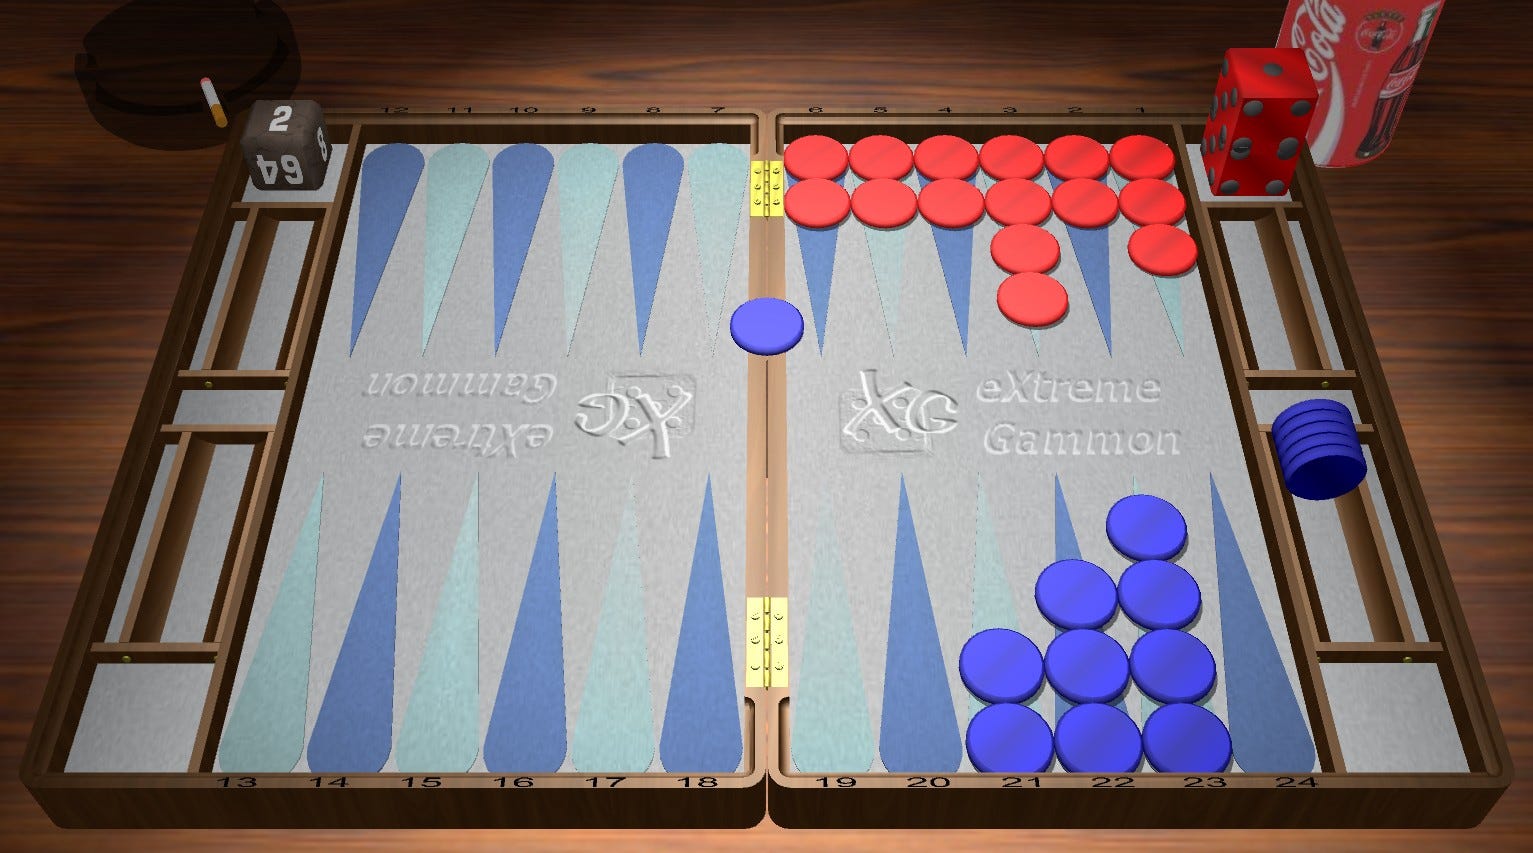
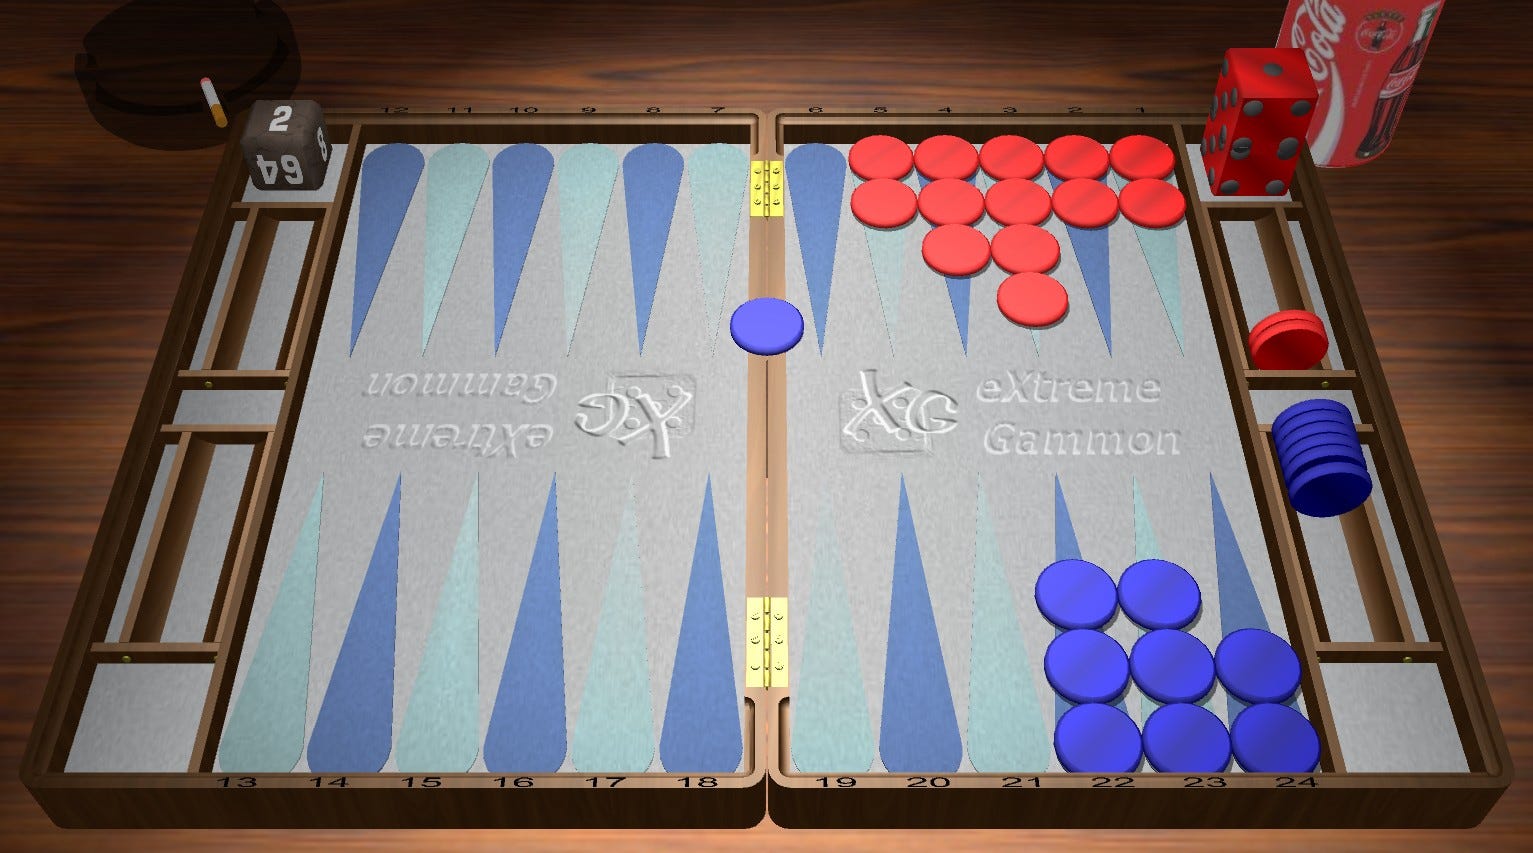
Red has the least efficient bear off without putting more than three checkers on any one point, while Blue has taken 4 checkers off and has little to no possibility of having another checker sent back. Even with this unattractive distribution, the cube action for Red is a Double/Pass (+.028 if Blue Takes) after a 5,184 game rollout, assuming the score is 7 Away 7 Away. If we give Red a lead in a match to 7 of even 6 Away 7 Away, then this becomes a Take for Blue (+.022 if Blue Passes). Unsurprisingly, if the score were 4 Away 7 Away this isn’t even close to a Recube for Red (-.194 if Blue Takes a Recube). Instead of going through every match score, it’s more helpful to show the position again with the spits for money and then move on to other positions:

The key thing to know from this reference is that Red wins 78% of the time. From there, if you know your match play Take Points, it shouldn’t be too difficult to work out what’s a Take and what’s a Pass at particular match scores.
Here is a table of ReDouble (to 4) Take Points for Blue that aren’t really special scores. This isn’t meant as something to commit to memory, but more as a way to set some guideposts in your head that can be used to make adjustments when deciding on a particular position. These aren’t calculations that are meant to be done over the board, so better to have some gammonless (which the below are) take points in your head that can then be reference in real time. This table should help someone, or at least it helps me, understand the degree to which the Take Point changes as a lead or deficit grows or shrinks. The directionality was already intuited, if Blue trails or trails by a greater amount, they have more leeway to Take a Redouble, but the degree is what helps more when making adjustments over the board.
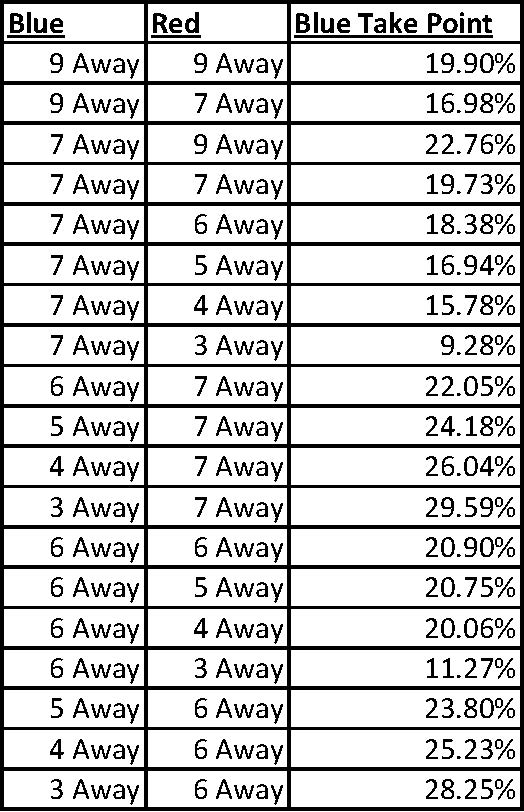
It’s instructive to note many more wins Red needs to Redouble to 4 when leading 3 Away as opposed to 4 Away. That difference is the result, at least in part, of the Crawford rule and the cubeless game the two players would play after a win by Red at 3 Away. Red doesn’t get that reward after a win at 4 Away, so a straight win isn’t as appealing and it therefore needs less equity to Recube. This doesn’t changes as special scores come into play:
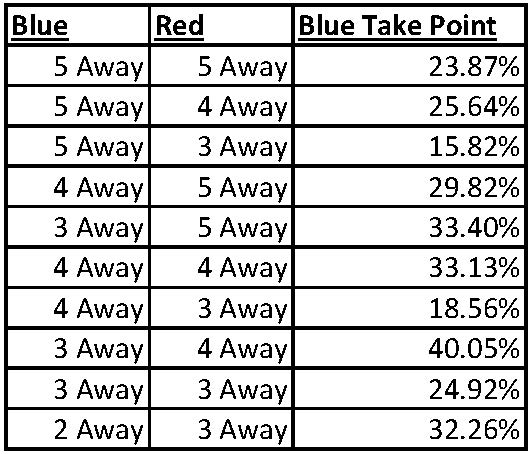
However, the degree to which Blue’s take points decreases as Red goes from 4 Away to 3 Away increases as the match gets shorter. Also worth noting, When Red moves from 5 Away to 4 Away *again holding Blue’s score constant), Blue’s take point stays roughly the same, except at 5 Away 5 Away vs 5 Away 4 Away, where Blue’s Take point actually rises. This is one that is worth memorizing.
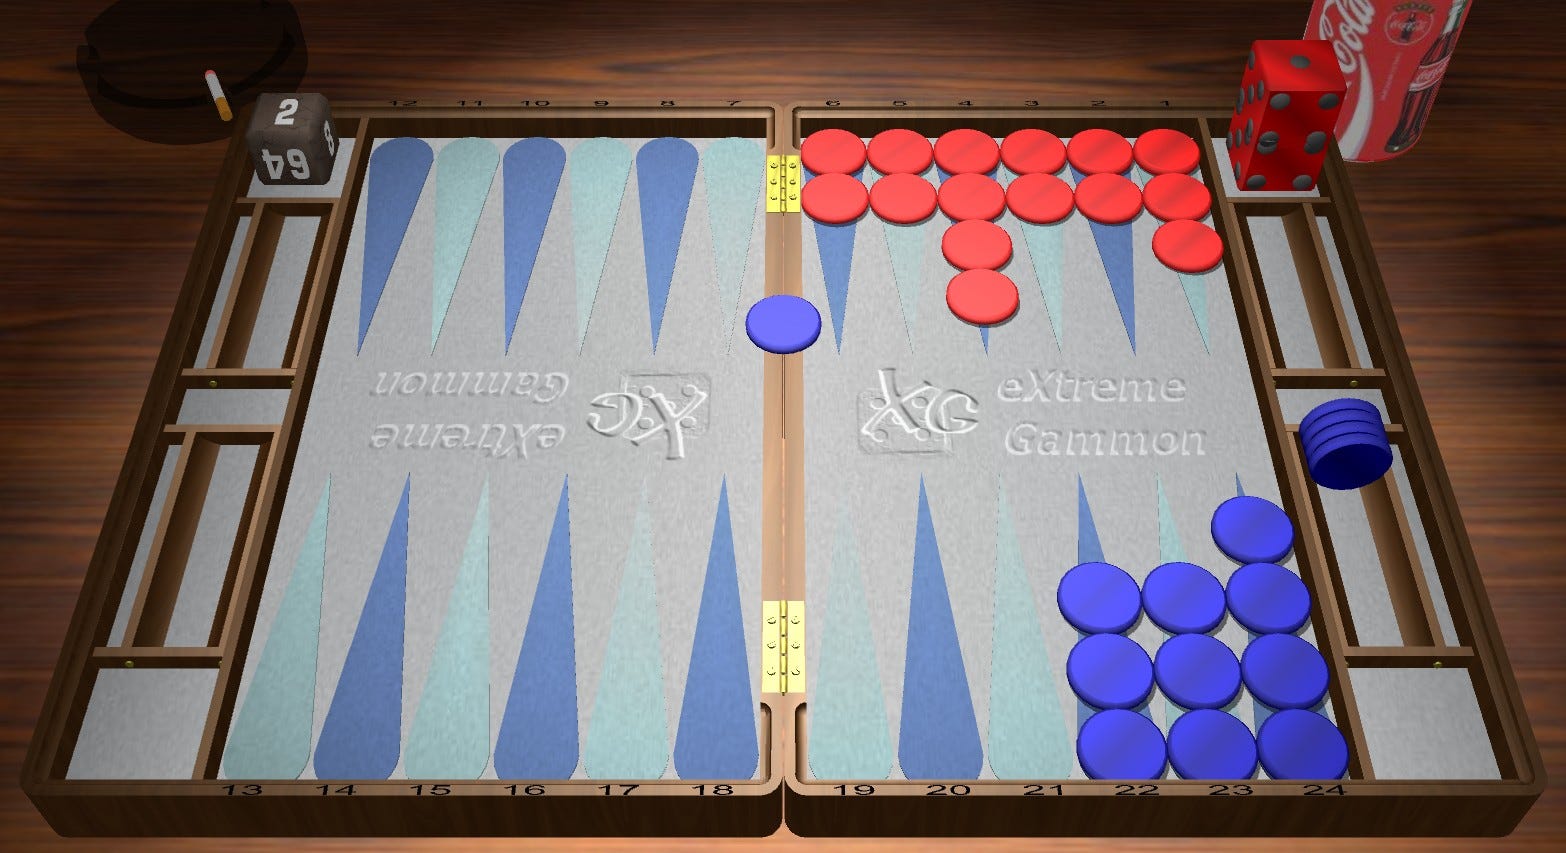
So, how do things change as Red’s distribution changes? For example, if it has two spare checkers on a particular point:
This on the borderline of Take/Pass for Money, as Blue’s wins have barely shifted. However, it is instructive since moving the “mini-mountain” in one direction or another makes this an easy Pass or a big Take.
And, if the checkers are moved in the other direction….
Giving Blue a less desirable bearoff, by, for example, using its spares to make the 4 point, would make this position closer, but still a Take.
So, is the idea that if you have four more checkers off than your opponent and their bear-off distribution is inefficient, you are probably pretty close to a Take for Money? Yes, but……with some caveats. First, that distribution part is critical and hinges on small differences, as shown above. As a result, really, really good distribution, seems to be worth an entire additional checker off the board:
The above is at 7 Away 7 Away. The final decision holds true at Money, though its a shade closer to a Take. We could go a number of directions from here. One is to determine the impact of a gap in Blue’s board, one presumably left by the anchor Red has since vacated. Another is see how things might change as we shorten the remaining game, by taking more of Blue’s and Red’s checkers off the board. A third is to go in the other direction and give Blue fewer checkers off the board, but make Red’s game weaker in some meaningful way. However, we will start with a quick look at how Blue’s cube decision is impacted by Red having checkers in the outfield.
The above is at 7 Away 7 Away, though putting the position at Money makes it an even narrower Double and a bigger mistake to Pass. If you move the two outfield checkers closer to the homeboard without moving them into the homeboard, this becomes a No Double on account of the low likelihood that Red will be able to achieve a pure bear off. If the outfield checkers are on the other side of the board, in Blue’s outfield, this becomes a borderline Double with almost difference in equity between Doubling and Not Doubling. Frankly, it’s probably worth a Double a bit earlier in these positions if you think there is even a small chance your opponent will Pass.
As we’d expect with a higher take point, if we give Blue a match lead, say 6 Away 7 Away, then the Double is clear cut. Given how small the difference is between Take & Pass here, it makes sense that even a small lead makes this a Pass for Blue. here is the same position with Blue leading 6 Away 7 Away:

Not Redoubling isn’t an error only because there are not bad rolls. Red will have a Double/Pass on the next roll no matter what.
With the above in mind, we can be fairly confident that Recubing when our opponent has 4 off, but a checker on the Bar and we have a closed board should result in a Pass in all but a handful of Match Scores (Red 3 Away v Blue 7, 6 or 5 Away & Red 4 Away v Blue 7 Away). Positions like this start hammer home the significance of and impact of 3 Away scores.
Now, let’s start on the impact of a gap in Blue’s homeboard, by imagining that Red has put Blue on the Bar using a well-timed ace point game. As Red works its way around the board in a 7 Away 7 Away situation, where does it find a good Double? Well, that depends on how many checkers Blue has off and how likely Red is to achieve a pure bear-off. Take a look at this position:

Note two things: 1) It isn’t much of an error at all for Red to hold onto the Cube in this scenario since so few rolls lead to a loss of market and 2) Blue now has 6 checkers off the board.
If we look at another position we can start to develop a rule of thumb about ace point gaps and then see how other gaps may differ:

So, it seems, just as an efficient bear off is worth an extra checker off for Blue, an extra checker off is needed if there is a gap on the ace. The logical follow up would be whether taking the above position and making Red’s bear off inefficient would be worth a putting a Blue checker back on the board, though, given the previous position, it might be tough to get there without a ReCube/Pass. The answer is that an inefficient board is worth a checker back on the board, but it would likely take a number of Blunders by your opponent to get there.
Ok, so that kind of establishes a framework for adjusting for inefficient bear offs and ace point gaps at normal scores or Money, at least when there aren’t all that many checkers off the board. Before adding a gap to Red’s board, let’s remove Blue’s gap and see when Red has a Double against Blue when they have 6 checkers off the board.
At 7 Away, 7 Away this position is nearly a ReDouble for Red, but doesn’t quite get there. Where it might get close to a drop for Blue is at 4 Away (Blue) to 7 Away (Red) and given what we know about 3 Away scores, matches where Blue is 3 Away and leads by a wide margin are likely to result in a drop for this position. Interestingly, by removing a spare Red checker from the board this position actually gets worse for Red.
There just aren’t a lot of good roll for Red, especially as compared to the previous position. That said, in this position, with on additional checker off the board, if Red rolls and Blue dances Red will have the opportunity to cube and end the game pretty much no matter how their board looks. Whereas, the position before, where Red has just one checker off the board, Red needs to do a bit more work to end the game.
To that end, above is Red’s board after they roll 44 and Blue dances from the position two positions previous (that’s a bit wordy… go two positions previous, play 44 and then have Blue dance). Blue is clearly not done, but this is where the “Rule of 4” begins to kinda, maybe, perhaps take shape. If Red owned the 4 point instead of the 6 point AND has some distribution issues, Blue can rely on a “Rule of 4” at normal scores. I say “some” distribution issues, but what “some” means is dependent on match score, right? At Money, it’s quite subtle. At 7 Away, 7 Away, the issues have to be a little more significant. This position is is a borderline Take/Pass at 7 Away, 7 Away:
There is just enough risk involved for Red to make this position a Take for Blue, which is why I write above that these 7 Away 7 Away scores require a more significant distribution issue as compared to the issue required of a borderline position at Money:

This “Rule of 4” is really the “Rule of 4 plus another issue”. Keeping that in mind, we can make adjustments as we figure out what “issues” are equivalent to each other. For example, if we go back up to the position from above:
This fits into this new construct as Red has an efficient bear off (an issue for Blue) and Blue has a gap on the ace point (another issue for Blue) and Blue has 6n checkers off the board to Red’s zero. The questions then becomes, what causes this construct to lead us astray. The answer is: A shorter and shorter game, but that really is a part of the construct. As the game shortens, Red’s distribution is likely to be very good which counts as an “issue” for Blue and adds a checker to the “Rule of 4”.
So, the adjustments have to do with the things we might expect: distribution, gaps and, most difficult of all, match score. There are, of course, other avenues to go down, but it is worth limiting this exercise to just this “Rule of 4 plus an issue” in order to keep this from running on too long.
Happy New Year.