

Match Analysis #6 - RyanRebel

In April of 2022, I played a match with a Backgammon Galaxy player named RyanRebel. We both played well and I thought it would be worth looking at some of the more interesting positions.
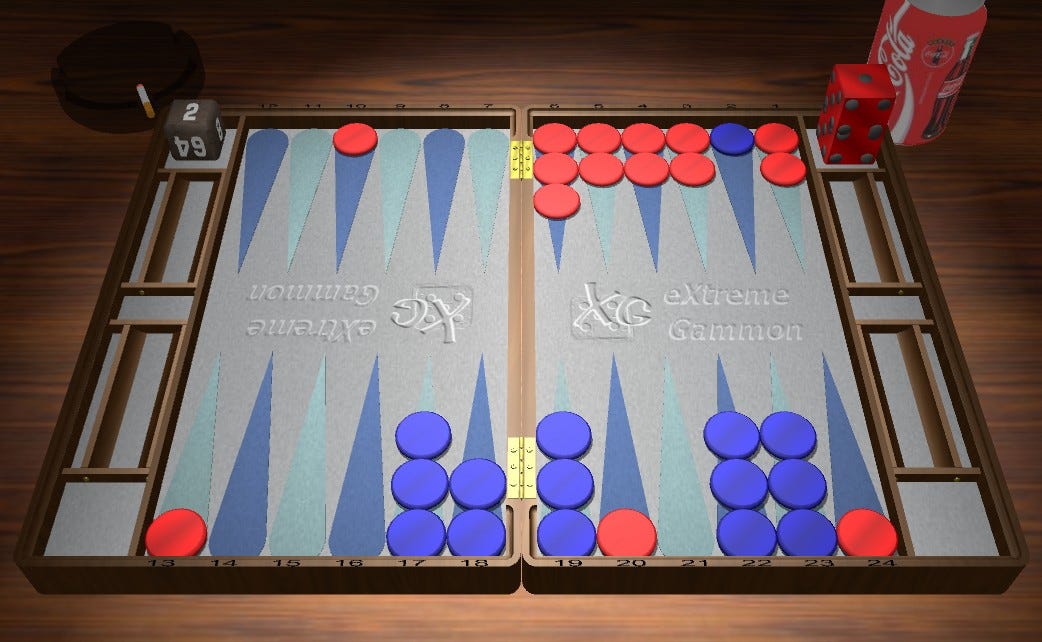
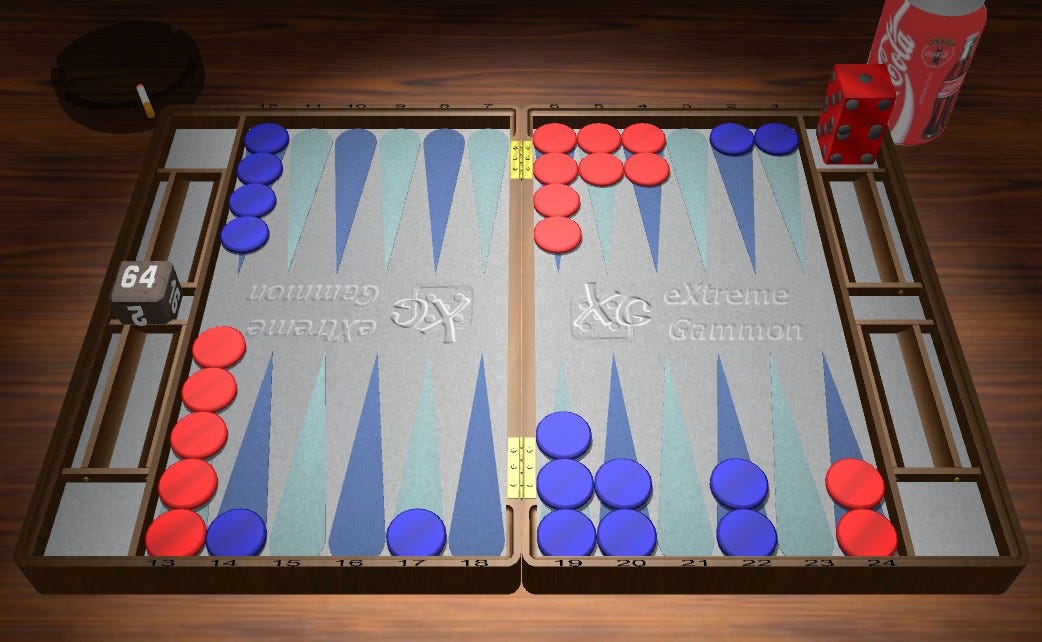
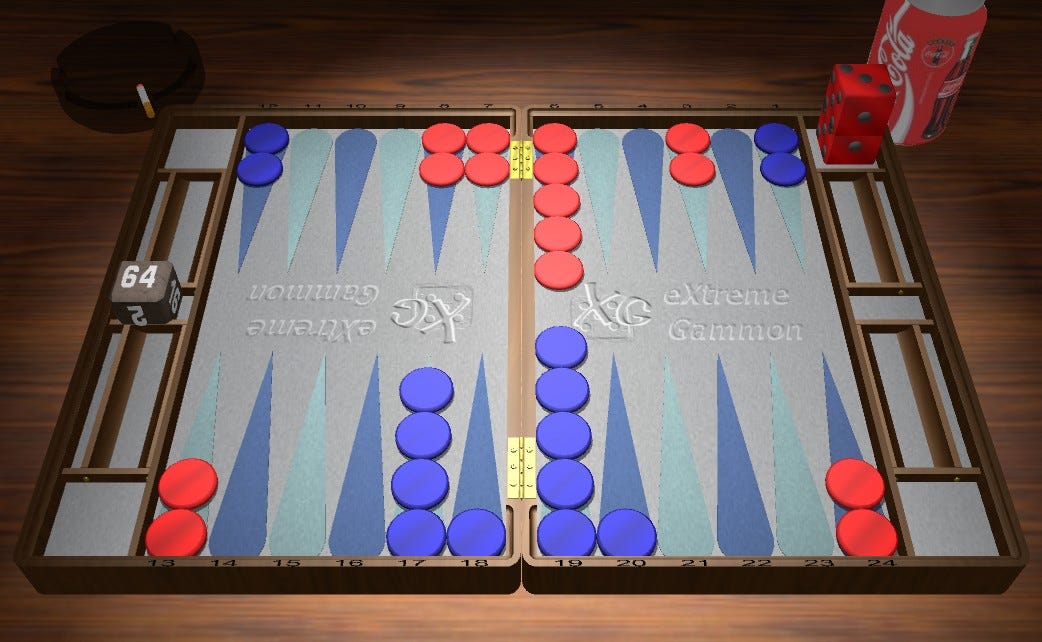
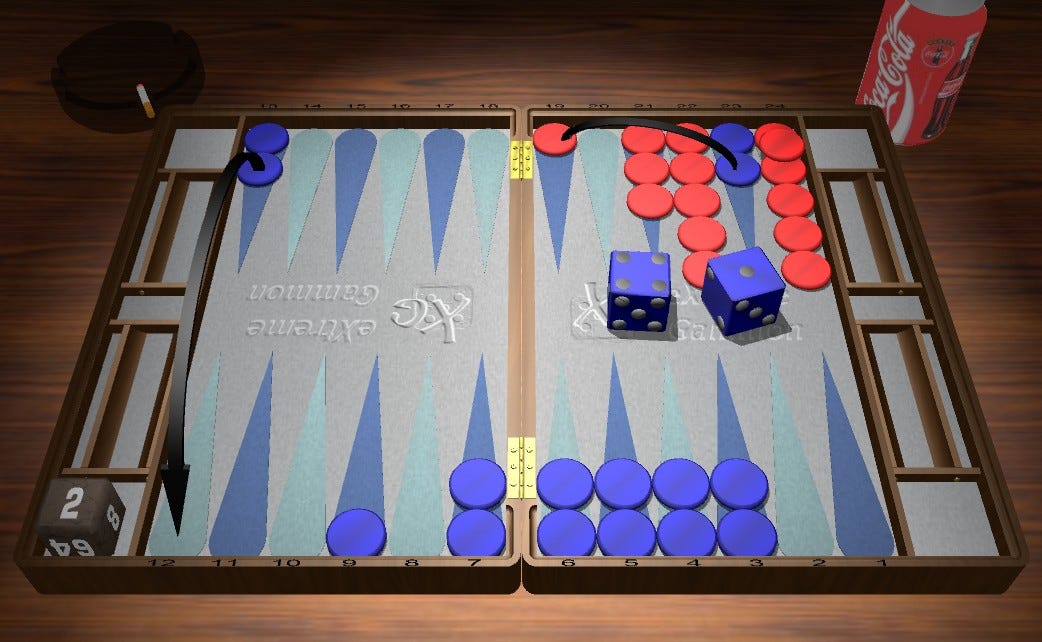
Position 1 (ClemM rolled 55 - 7 Away 7 Away)
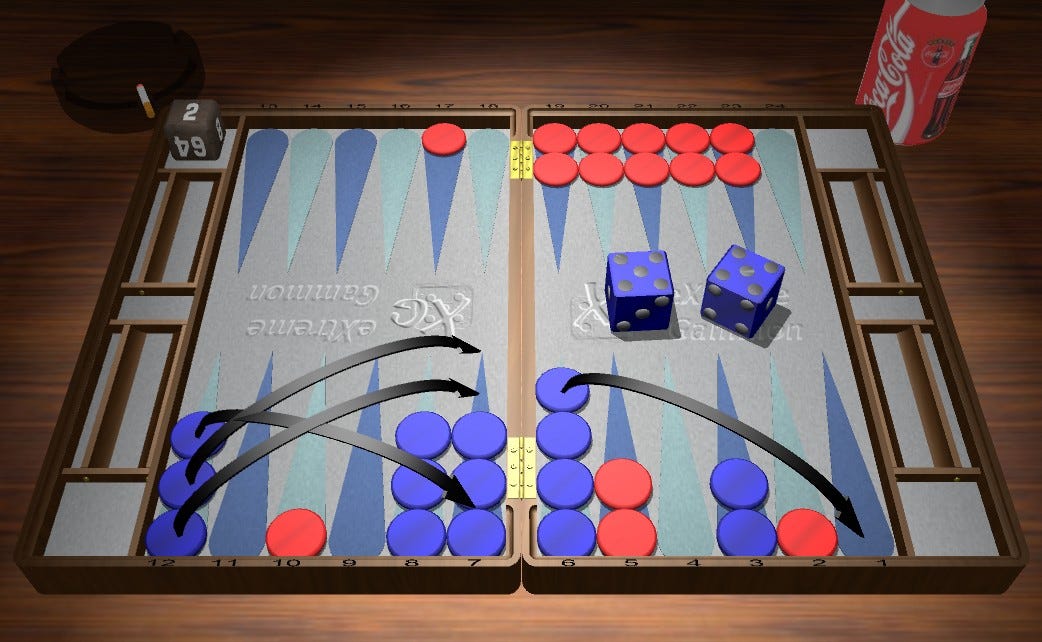
Over the board, I made the 3rd best play, thinking that, not only would I add gammons, though there still wouldn’t be that many, but I would also potentially knock Red’s goalkeeper (to borrow a term from Marc Olsen) higher up the inner board. Removing the goalkeeper would help with the bear in and the extra gammons would compensate for the challenge of clearing the 12 and the possibility that Red might enter on the ace, thus providing them with an even better goalkeeper.
It is worth noting that the top two plays involve clearing the 12 point, underlining its importance. The benefits of a slight addition to gammons is not enough to outweigh the clearance of this point. The reason, it seems to me, is that by making the hitting play Blue has created a scenario in which all ones are pretty good for Red on a relative basis and that just isn’t what Blue wants to do. When Blue clears the 12 point, it leaves Red with a scenario in which essentially nothing outside of 66, 55 & 44 are decent rolls. Blue can think of this as an opportunity to enter a racing game against someone who is behind 35 pips when they roll their dice. By hitting, Blue keeps contact around for quite a bit longer in this game. Given that when Red enters from the bar after the hit, which it is favored to do, Blue is very likely to be entering a racing game. That’s another reason why clearing the 12 point is more desirable: it fits better with the primary gameplan.
You might wonder about the dancing rolls. Don’t they balance out the “good” 1s by being simply terrible for Red? Sure, they’re bad, but there is still contact and Blue will have to roll and clear the outfield points, making it not quite terrible enough to carry the hitting play to preferred status.
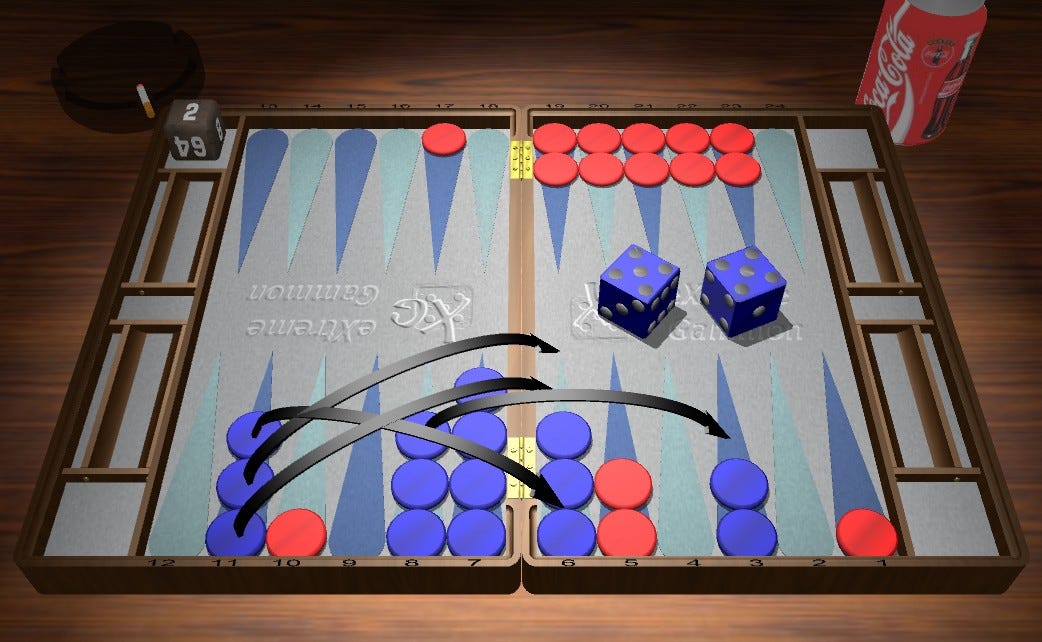
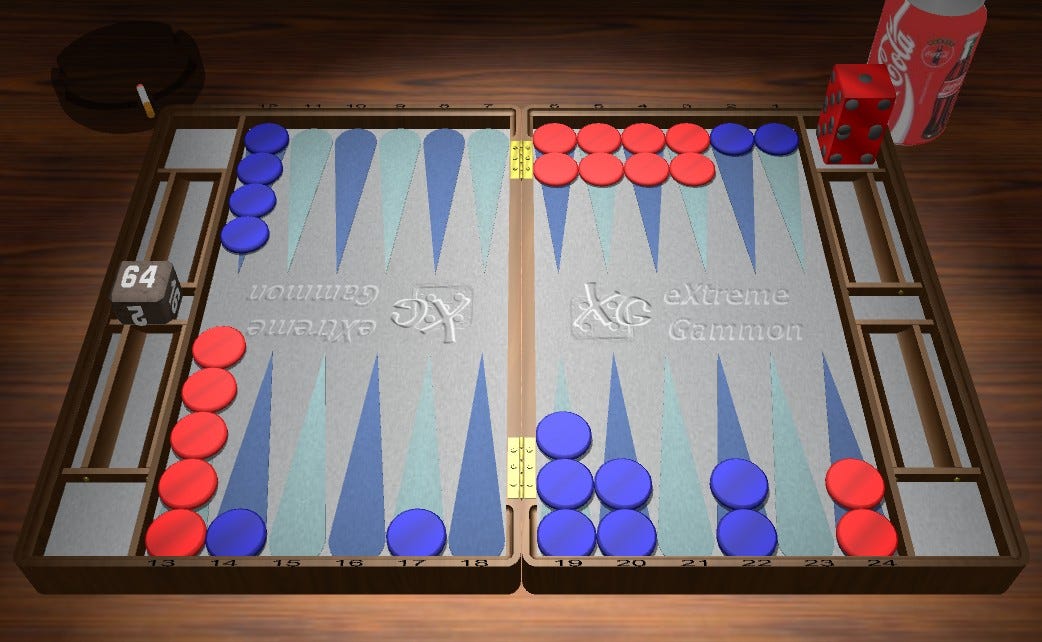
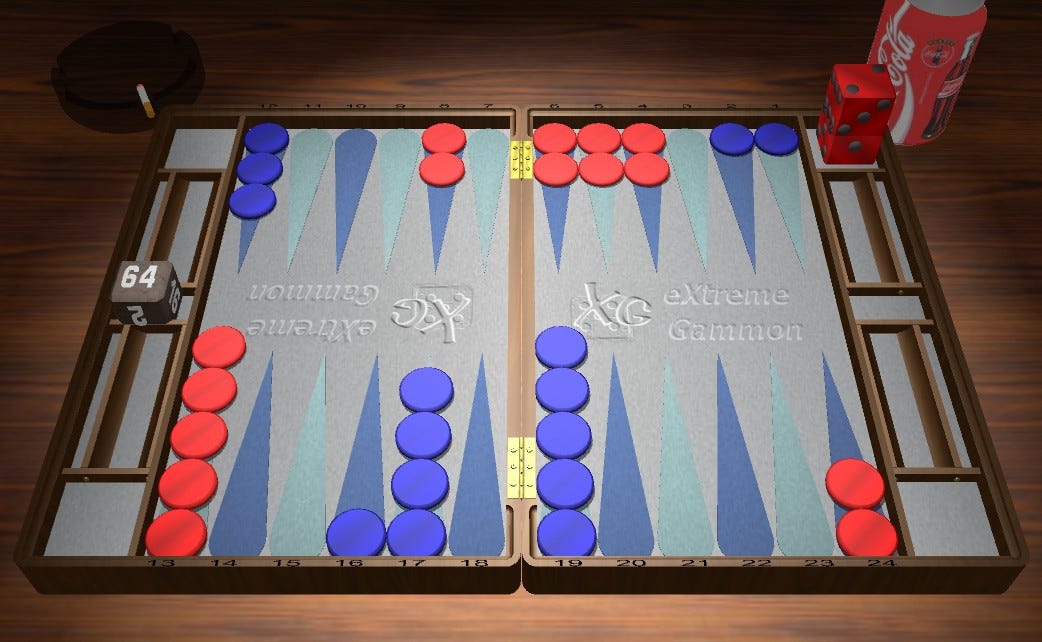
What about if Red’s goalkeeper is on the ace point, a more traditional spot for it?

Once that checker is moved to the ace, hitting becomes preferred and clearing the 12 is a blunder (-.116). The first element this brings to light is the importance for Blue of having the ability to play behind Red, if it is going to make a racing play. That ability give Blue much more flexibility than the same position without the chance to play behind. Tied in with that ability to play behind (or not) is that hitting is more attractive above because Red’s position cannot improve upon entering (as compared to where it stands now). This just isn’t true with the original position where Red can enter on the ace point.
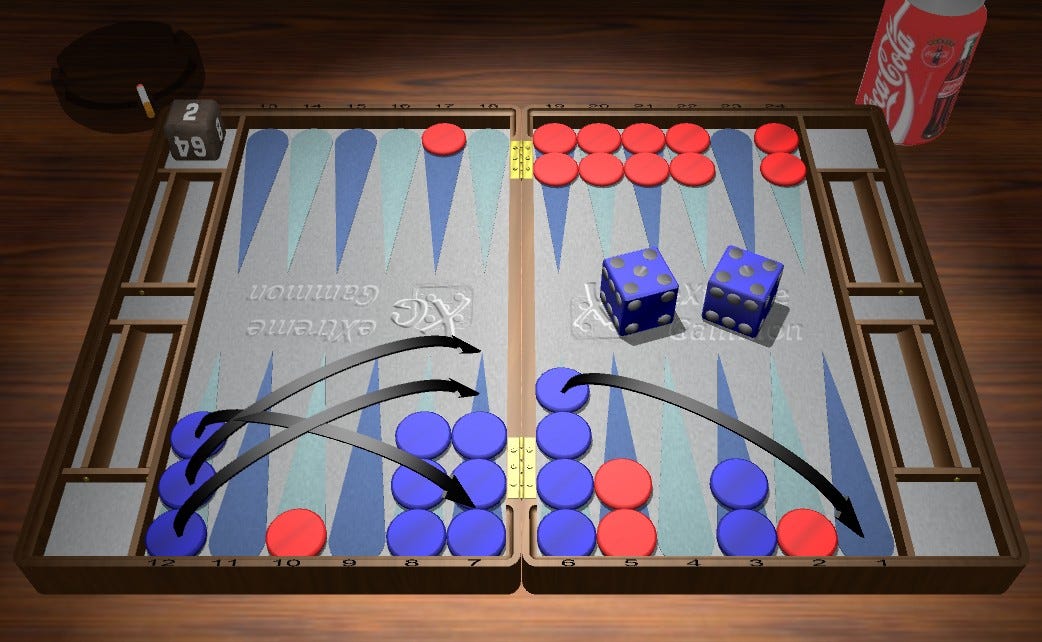
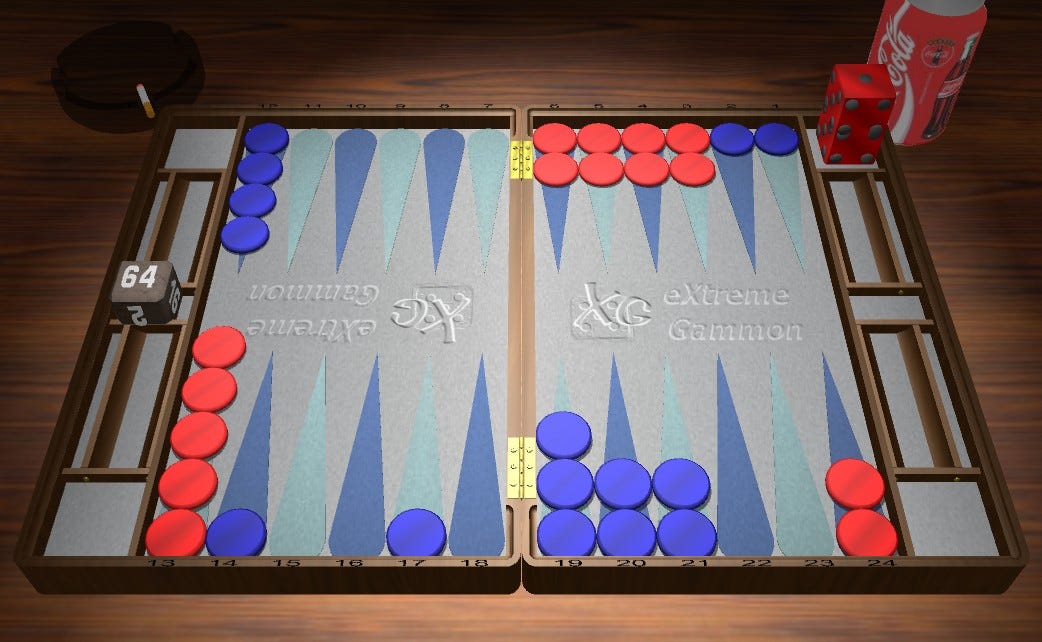
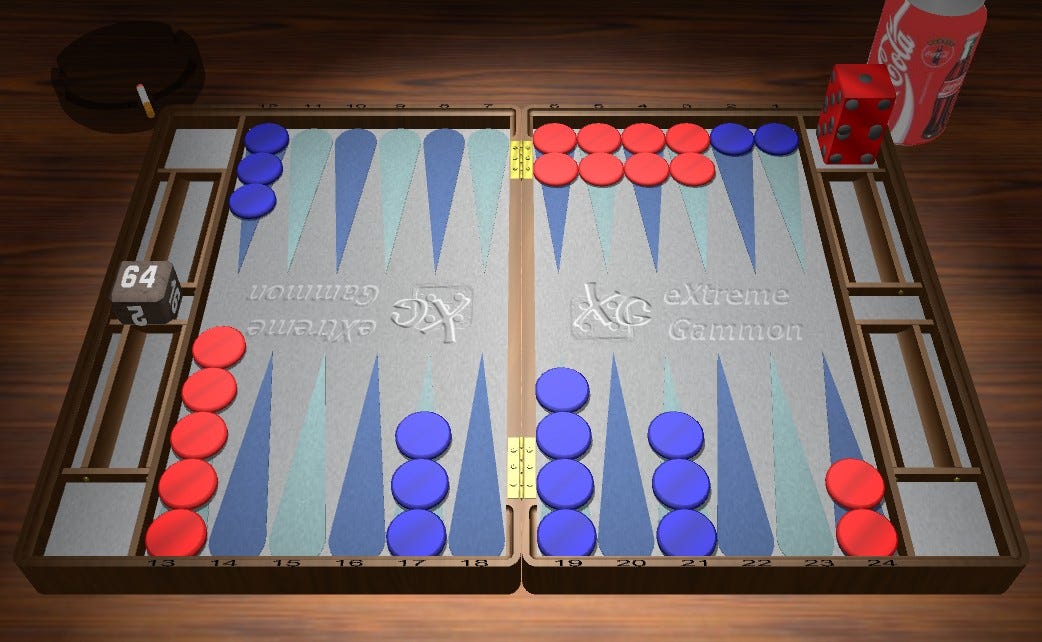
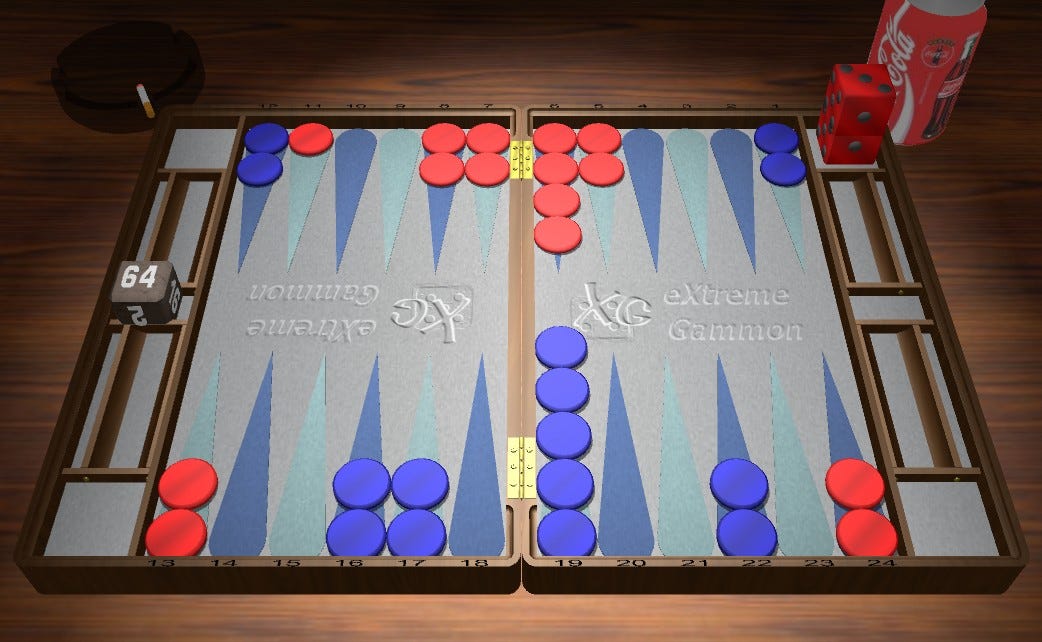
Next is a variation in which Blue would eschew the ace point hit, despite the opportunity to knock Red off the ace point.
Here the increased contact caused by putting the back point (now the 11 as opposed to the 12 in previous variations) within a direct shot of Red’s anchor is part of what pushes Blue towards racing. Obviously, it is more difficult to clear that 11 point than it is to clear the 12 point when their is direct contact like this. The racing play is a blunder in the previous variation and is now the preferred play by .03. However, there had to be a bit more manipulation than simply moving the point since the distribution of Blue’s spare checkers in this variation means that the 6 point will be left stripped if Blue makes the hitting play. If the position above has the same distribution of spares as the previous two positions then Blue opts for the hitting play, though the racing play is closer than when Blue’s back anchor. Therefore, we can surmise that the distribution and the stripping of the 6 point that goes along with the hitting play are likely the driving factor behind the play selection.
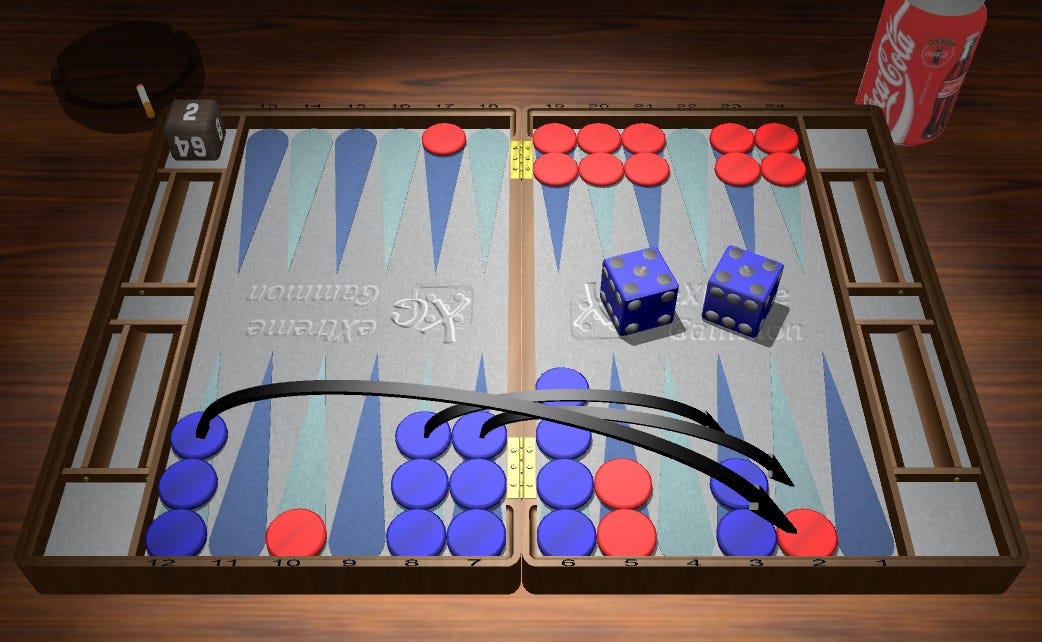
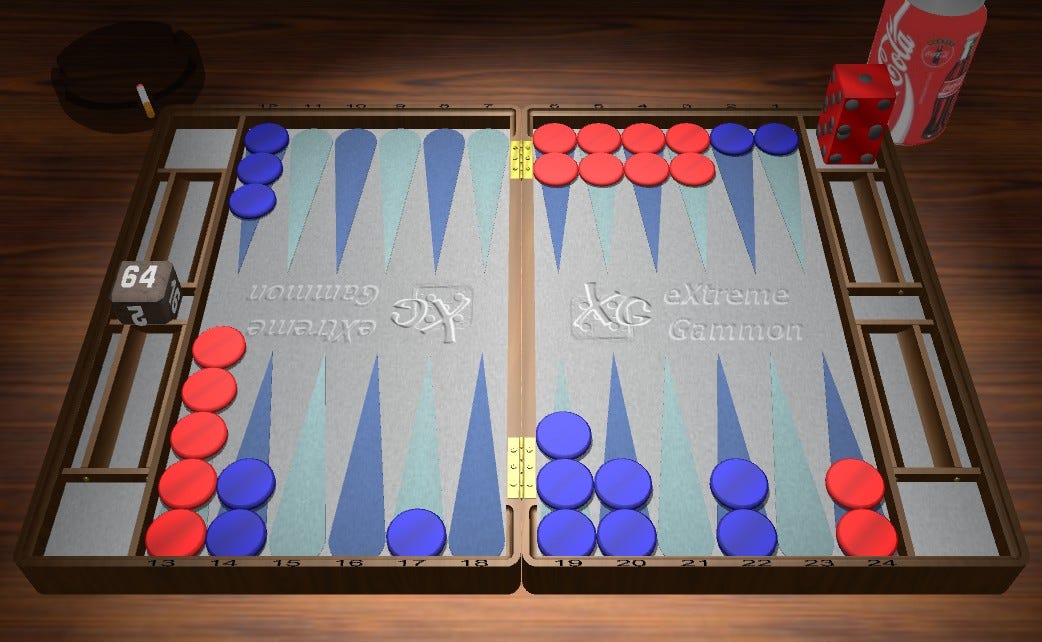
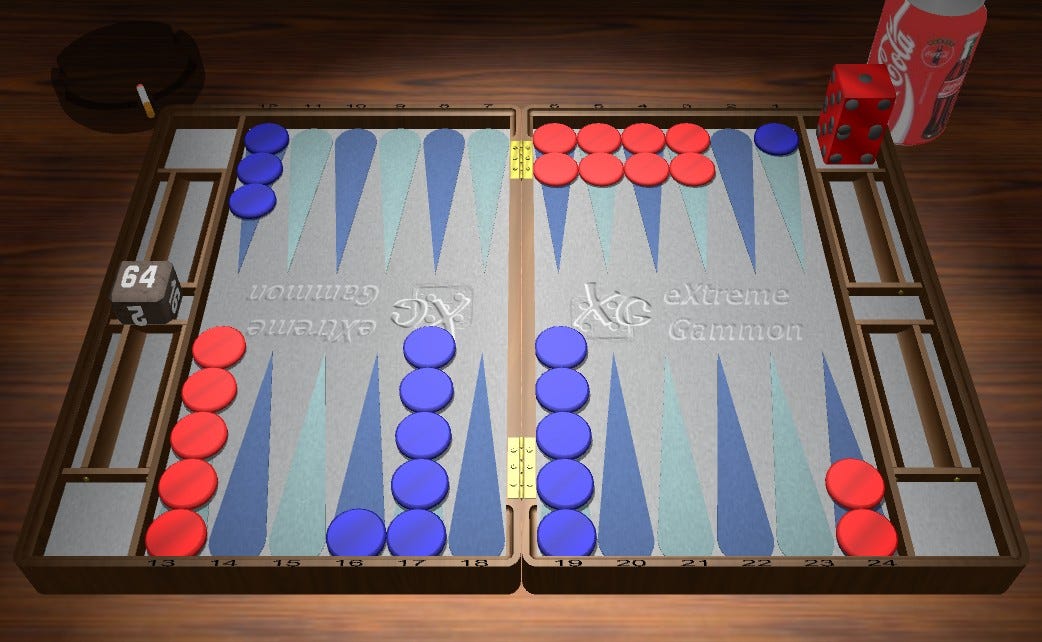
In each of the above variations, Red’s board is beautifully set up and likely means a Recube/Pass for Blue if it is hit during the bear in. But what happens to the preferred plays if Red’s homeboard isn’t quite so well situated?
Here is the original position, but with the hole in Red’s board shifted from the ace to the deuce point. With that subtle change, the racing play and the hitting play become nearly inseparable and with another shift the hitting play is preferred.
Of course, the same pattern continues as the point get’s higher up the board. If Red’s board is weaker still, say a 4 point board, the hitting play is even more compelling. Part of the reason for the change in play is the difference for Blue when it is hit and enters from the Bar. Entering on the ace point means a ReDouble/Take in match to 7 at 7 Away 7 Away, while entering on the deuce point means No ReDouble. Here’s the ace point entry:

Compare that to entering on the deuce point:
That difference tells us quite a bit about the position of the hole in our opponent’s board. Coming in on the ace point of a 5 point board is worth 10% winning odds as opposed to coming in on the deuce point of a 5 point board. That difference and the additional differences if the entry comes on the 3, 4 or 5 (which aren’t as substantial as that first drop in wins when shifting the entry from the ace to the deuce) make the risk associated with the hitting play more palatable for Blue. There is a greater chance of taking advantage of the additional gammons that result from hitting.
Essentially, the choices in this position are going to come down to a handful of factors, but you can add these questions to your process to determine the correct play:
Does my opponent have the ability to improve its game when coming in from the bar with a large number of rolls?
Might I lose the ability to play behind my opponent?
What is my checker distribution after my considered plays?
How much contact remains?
What is the state of Blue’s homeboard and does a hit shot by Red mean the end of the game?
Position 2 (RyanRebel Cube Decision - ClemM 3 Away RyanRebel 7 Away)
Here, we have what we might call a match play cube decision. This wouldn’t be a decision at a normal score or for Money, but with Red trailing 7 Away 3 Away there is something to think about. First off, Red has winning rolls when it hits with 64, 61 and 43, but it also has a ton of winning sequences after 66, 33, 22 & 11. Given the match score, the value of gammons for Red is .6 and for Blue it is .4. Further, the doubling window opens up a bit earlier than it would at a normal match score. At 3 Away 7 Away the trailer has a non-gammon adjusted doubling window between 51% and 78%, so if we look at this position with those two facts in mind, the idea behind doubling begins to take shape. With enough market losers, Red can find a double in these low equity moments since there is great sensitivity for Blue to any bad roll.
Still, it seems easy to miss this double. It’s hard to see when your back checkers aren’t split. One way to understand it is to adjust the position incrementally to see how it impacts wins and gammons. Another way is to look at a variety of positions in which someone has a double without splitting their back checkers. We’ll do both, starting with the former. It isn’t important to worry too much about match score as we move through these positions. The more important thing is take note of how the splits change. If the match score were to change one would simply use different gammon values to adjust.
The changes to gammons for both players are minimal, though wins for Blue improve slightly with the improvement to its board. The critical component to the gammons are the number of shots and the checkers being split in the back.

As Red’s board weakens it not only negatively impacts its own gammons, but also increases Blue’s gammons. Thus far, all the positions have featured Blue with split checkers, a factor which I mentioned as potentially being important to Red’s doubling decision. But perhaps it isn’t as significant factor as we may have thought:

The splits are fairly similar to the original position, with the exception of Red’s gammons which have dipped slightly. That said, Blue’s board is stronger in this variation than it is in the original. It seems that having unsplit backcheckers is a detriment for Blue when it comes to win and not the driving force between gammons. What about those blots in the outfield? They obviously play a role, so what happens when we take one of them away?
This position is the same as the original except that Blue has made the 11 point as opposed to having a blot. Gammons suffer a bit for Red and increase a bit for Blue, but really aren’t changed all that much. So, what does this tell us? It suggests that the primary driver of gammons are those 4 inner-board points Red possesses.
Here, we have a “No Double”. Red has the same number of shots as the original, but Blue comes in with much more ease, so it is unsurprising that we see both Red’s gammons decline and Blue’s increase.
Essentially, the incremental changes for which to keep an eye out, particularly in matches where you are trailing by a healthy margin and might have favorable gammon values, are pretty straight forwards:
Inner board points for both players
Split Checkers or Not
Blots
Pretty obvious stuff. Let’s look at some sequences that provide references for cubes without having split the back checkers and which don’t feature an active attack. Here’s 31-41-11-32:
This sequence quickly leads Red to an advantageous position in which they have a strong inner-board and Blue is inflexible and hoping for a series of fortuitous rolls or an opportunity to attack. Red will use almost all of its rolls to either attack or bring at least one checker into the zone, including 65 which plays 13/2*. Rolls such as 64 and 64, which one might have an urge to run all the way out from the back, actually play one checker down from the mid-point and bring another from 24/18. Red is setting up to attack and needs a 9th checker in the zone. The position is a bare No Double at 7 Away 7 Away or Money. The slightest improvement for Red or change to the match score will push the into a double.
Here’s 42-42-31-51-53-54:
One similarity between these two sequences is that Red’s board has two more points than Blue’s and Blue is split in the back. These sequences give us a chance to test what we saw in the variations on the live match positions. Will giving Blue unsplit back checkers be of benefit to Red as it clearly was above?

Though it isn’t the most realistic position, it does confirm what we have seen about the difference between split checkers and an intact ace point in these types of positions. Here’s another sequence: 31-65-53-54-42-32…
This differs from what we’ve established in that Red has 4 points in its home board to Blue’s single point, whereas the emerging rule of thumb seemed to be that you wanted a two point difference to double without splitting the back checkers. Perhaps, the above position tells us that the two point difference is a reference point from which to make adjustments. In this case, Blue has escaped a checker, so Red needs an additional point. Here’s a sequence where the adjustment goes in the opposite direction, but still brings the position onto the razors edge of a Double/No Double. The sequence is 62-61-61-55-65:
Here, Red has just one more inner board point than Blue, but it has a slight race lead and a double shot. Interestingly, a sequence with a similar start also ends ups in a close double, though without the high threat level. The sequences is 63-61-61-31-54-52-41:
This position is a departure from the others in the sense that there is no threat to Blue and both sides’ best gameplans revolve around priming with blitzing or racing floating off in the future somewhere. So, it seems, that “rule of thumb” regarding how many inner board points you need to have in order to justify a double without splitting your back checkers applies to positions where blitzing is a near-term possibility. So, here’s the Caveat: Games without a realistic blitz gameplan require a large advantage in some other gameplan (priming in the position above) and that doesn’t neatly fit into the “2 more inner board points” Rule of Thumb. Finally, here is a sequence that brings us back to our Rule of Thumb.
The sequence is 31-32-42-41 and it leaves Red with a bare Double and Blue with an easy take. It’s quite similar to the first sequence (31-51-11-32) we looked at since departing from the positions based on the one that actually occurred in the match played with Ryan Rebel, with the difference being that Red is not split in the back, Red has a blot on the 8 instead of a made point and Blue has two blots in its outfield as opposed to one. Those differences, on net, are enough to push the decision from a bare No Double to a bare Double, once again underlining the importance of the possibility for a blitz for Red in these positions.
So, how did the 3 factors we identified by creating variations on the “over-the-board” position hold up? Quite well it seems, though it isn’t much of a surprise as you can probably say the same thing about many, many early positions. Here’s what we think we know:
These “unsplit” Doubles typically require a two inner board point advantage for the Doubler. That advantage can be adjusted up or down based on another disadvantage or advantage for the Doubler.
Whether the opponent has split their back checkers is important. Split checker are typically to the advantage of the opponent.
Loose blots in the outfield for your opponent is a signal that there may be a double on hand, particular because it may give you enough market losers to turn the cube.
It is important to consider whether your opponent has an inflexible position. Inflexibility will make it difficult to prime your unsplit back checkers, which limits the downside of the next rolls.
That’s essentially what I think we know at this point. On to the next position.
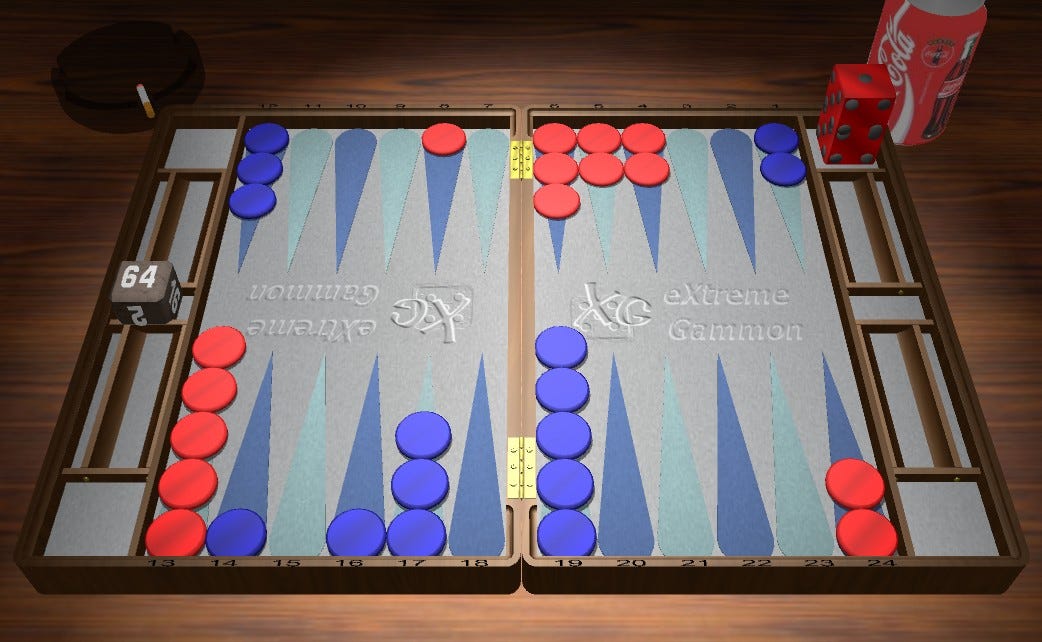
Position 3 (ClemM to play 41 - ClemM 3 Away RyanRebel 7 Away)
I made the third best play during the match, slotting the back of the prime, but that just doesn’t provide enough reward in exchange for the extra two hitting rolls it adds. First, say Red comes in on the deuce point, it’s now easier to escape if you make the slotted point (the 7 point with my play as opposed to the 8 point with the preferred play) and Blue has less ammunition with which to make said point, given that it doesn’t split from the 13 point with my play. Further, and this is related to the first point, even if Red dances or enters and doesn’t exit, Blue isn’t in that great position to make the 7 point with just 50% rolls creating a 5 prime. Finally, though we’ve already mentioned the extra hitting numbers, we have also made 62 a pretty good number for Red because it jumps to the outfield and gives only a single shot. This is in contrast to rolls like 61 and 52 after the preferred play, which offer triple shots to Blue.
Essentially, the best that could be gained by slotting the back of the 4 prime is a dance or entry on the ace followed by making 7 point. What are the chances? It’s the odds of a dance plus the odds of an entry one the ace without escape multiplied by the chance of making the point ((9/36 + 8/36) x 18/36), or 23.6%. For that roughly 1 in 4 chance, we are giving our opponent an extra 5.6% they hit us on the next roll plus an addition 2 rolls to semi-escape into a single shot. Basically, it’s a 23.6% chance of the “ideal” outcome against an extra 8.4% of objectively bad outcomes. That might seem like an OK exchange if we stopped there, but the analysis doesn’t and the trade isn’t that good. We need to understand how much stronger the uninterrupted 5 prime is than the 4 prime with the 8 point made. If our opponent comes in on the two point we’d actually rather have the latter.
Let’s see if we can determine when it’s correct to slot the back of a prime in a containment game following a hit and, hopefully, along the way, we can determine the relative strength of those two primes.
First, it becomes apparent pretty quickly that it is rare in these type of one back contain positions where the opponent isn’t totally broken yet to slot the back of the prime. It does happen, but the containing player needs a 5 point prime for it to make sense, yet the risk is often deemed not worth the reward. Here’s a quick variation on the original position:
Above, the match score is making the plays look closer than they would otherwise appear. At money the play slotting the back of the prime is much more distant. The position has some similarities to the original position. Blue will rely on too few rolls to make the 6 point prime after Red’s next roll, assuming Red does not roll 62 off the bar and hit right back. But, none of that matters in this situation, since when Red either dances or comes in on the ace its a Double/Pass regardless of whether the back of the prime is slotted or not. As a result, there isn’t much incentive to take the additional risk of slotting the back of the prime. Even with additional opportunities to cover, the risk of the fly shot or not making the point if Red enters on the deuce point is enough to stop Blue from slotting the back of the 5 prime at money or at the current match score. The extra gammons and the gammon values make the slotting play closer than at money in these particular situations.
To return to the original position, this is the cube action in the even that Blue slots the back of the prime and ends up making that 7 point to form a 5 prime, while Red enters on the ace point. While we said Blue had ReDouble/Passes both at Money and at the Match Score when they had a 5 prime and we considering slotting it, this next position is not so clear since there is much less in the way of support:
As you can see, the position is now a Double/Take, by the barest amount. It’s also worthy of noting an expected outcome at this match score, that the window between not redoubling and passing is miniscule.
With this position, I set up some ambitious goals, but only got a loose handle on one of them. It seems, from all the variations I looked at, and there were many i didn’t bother including here, that the general rule is that it hard to justify slotting the back of the prime in contain situations where you are nearing a double and particularly challenging to justify on the back of a four prime. That latter bit suggests that, perhaps, the broken 6 prime (one point, a gap, followed by four consecutive points, is similarly powerful as a block to the 5 prime.
Summary
The first set of positions dealt with the decision of whether to attack a “goalkeeper” checker. That, we find, depends on where it’s located and what our opponent’s board looks like, as well as match score. If the checker is on the ace point, attacking is inherently more attractive since it creates the possibility that your opponent will weaken its game simply by entering from the bar. The opposite is true when the checker is higher up the board, even if it is only on the two point, because your opponent can now improve by entering on the ace point, so any increase in gammons may not be worth it. That risk-reward analysis depends significantly on your opponent’s homeboard so make sure to give a look across the board.
The 2nd set of positions deals with doubling without having split your back checkers. This quick look did not include any common blitz positions, but instead try to see if sequences that ended in this sub-category of double shared some common threads. Generally speaking, the player considering a double wants to have a 2 point homeboard advantage as compared to their opponent and some blots at which to shoot. If the advantage isn’t quite so big, there should absolutely be some other advantage, such as inflexibility for the opponent or a preponderance of blots.
The final grouping had to do with the decision to slot the back of a prime at precipice of a containment game. This is generally a bad idea because the risk won’t be worth the reward. Either a 4 or 3 prime isn’t going to be strong enough to create a recube scenario you wouldn’t otherwise have (if you even survive and cover the checker on the next two rolls) or because the position is already strong enough that the extra risk isn’t worth giving your opponent a roll or two to get back in the game.